Person Detection
本教程部署一个真实的 AI 推理应用 Person Detection,完整演示:通过 Python SDK 订阅视频流推理结果、发现设备上的模型与流、配置应用权限,并验收一个会发布检测事件、联动设备灯控的完整应用。
不想自己 build 镜像?下载预编译包 person-detection.tar,解压即得 app.yaml 与 image.tar,按 §5 部署到设备即可。
1. 功能概述
Person Detection 订阅摄像头视频流,用 AI 检测模型逐帧推理,当画面中出现人时:
- 统计人数与置信度;
- 向事件总线发布
app/person-detection/detection与alerts/detection事件(带防抖冷却); - 联动设备补光灯(
device.set_white_light)。
本教程基于 ne503 源码仓库里的完整示例项目。先获取仓库并进入应用目录:
git clone https://github.com/camthink-ai/ne503.git
cd ne503/apps/person-detection
该目录已包含本教程所需的全部文件:
person-detection/
├── app.py             # 应用主逻辑(SDK 订阅 + 检测 + 事件 + 灯控)
├── app.yaml           # 应用清单(权限/资源/环境变量/阈值)
├── build.sh           # 构建脚本(复制 SDK → buildx → save → .aipc)
├── Dockerfile         # 容器构建定义
└── requirements.txt   # Python 依赖
后续步骤逐个讲解这些文件的关键内容,以及需核对/修改的字段(视频流名、模型名、检测阈值)。
2. 应用结构与 SDK 用法
2.1 应用源码 app.py
下面是 Person Detection 的完整源码(即仓库 apps/person-detection/app.py)。它做五件事:初始化 SDK 客户端 → 订阅 sub 流推理结果 → 按 DETECTION_THRESHOLD 过滤 person → 向事件总线发布结构化检测结果 → 检测到人时联动补光灯;并监听 SIGTERM 优雅退出。
#!/usr/bin/env python3
"""Person Detection Application for AIPC Platform"""
import os
import sys
import time
import signal
import logging
from datetime import datetime
from typing import Optional

# AIPC SDK
from hailo_ipc_sdk import (
    InferenceClient,
    EventClient,
    DeviceClient,
    FdMediaClient as MediaClient,
    Config,
    InferenceResult,
)

logging.basicConfig(
    level=getattr(logging, os.environ.get('LOG_LEVEL', 'INFO')),
    format='[%(asctime)s] [%(levelname)s] %(message)s',
    datefmt='%Y-%m-%d %H:%M:%S'
)
logger = logging.getLogger(__name__)


class PersonDetectionApp:
    """Person Detection Application"""

    def __init__(self):
        self.running = True
        self.app_id = Config.get_app_id()
        self.debug = Config.is_debug()

        # Configuration from environment
        self.detection_threshold = float(os.environ.get('DETECTION_THRESHOLD', '0.2'))
        self.alert_cooldown = int(os.environ.get('ALERT_COOLDOWN_SECONDS', '5'))

        # SDK Clients
        self.inference: Optional[InferenceClient] = None
        self.events: Optional[EventClient] = None
        self.device: Optional[DeviceClient] = None
        self.media: Optional[MediaClient] = None

        # State tracking
        self.frame_count = 0
        self.total_detections = 0
        self.last_alert_time = 0
        self.person_count_history = []

        signal.signal(signal.SIGINT, self._signal_handler)
        signal.signal(signal.SIGTERM, self._signal_handler)

    def _signal_handler(self, signum, frame):
        self.running = False

    def initialize(self) -> bool:
        try:
            self.inference = InferenceClient()
            models = self.inference.list_models()
            logger.info(f"Available models: {[m.model_id for m in models]}")
            if not any(m.model_id == "hailo_yolov8n_384_640" for m in models):
                logger.warning("Required model 'hailo_yolov8n_384_640' NOT found")

            self.events = EventClient()

            try:
                self.device = DeviceClient()
            except Exception as e:
                logger.warning(f"Device control not available: {e}")
                self.device = None

            try:
                self.media = MediaClient()
                available_streams = self.media.list_streams()
                logger.info(f"Available video streams: {available_streams}")
            except Exception as e:
                logger.warning(f"Media client not available: {e}")
                self.media = None

            return True
        except Exception as e:
            logger.error(f"Failed to initialize clients: {e}")
            return False

    def run(self):
        if not self.initialize():
            self._cleanup()
            return 1

        logger.info("Subscribing to stream 'sub' with model 'hailo_yolov8n_384_640'")
        first_frame_received = False

        try:
            # Subscribe to video stream inference results
            for frame_seq, result in self.inference.subscribe(
                stream="sub",
                model="hailo_yolov8n_384_640",
                fps=10,
            ):
                if not self.running:
                    break
                if not first_frame_received:
                    first_frame_received = True
                    logger.info(f"Received first inference result - frame {frame_seq}")
                self._process_frame(frame_seq, result)
        except KeyboardInterrupt:
            pass
        finally:
            if not first_frame_received:
                logger.warning("No inference results - check stream 'sub' and model 'hailo_yolov8n_384_640'")
            self._cleanup()
        return 0

    def _process_frame(self, frame_seq: int, result: InferenceResult):
        self.frame_count += 1
        persons = [
            obj for obj in result.objects
            if obj.label == "person" and obj.score >= self.detection_threshold
        ]
        if persons:
            self.total_detections += 1
            logger.info(f"[Frame {frame_seq}] Detected {len(persons)} person(s)")

        self._publish_detection_event(frame_seq, result, persons)

        # Device control: turn on light when person detected
        if persons and self.device:
            self._trigger_light()

        if self.frame_count % 100 == 0:
            self._print_statistics()

    def _publish_detection_event(self, frame_seq: int, result: InferenceResult, persons: list):
        event_data = {
            "app_id": self.app_id,
            "frame_sequence": frame_seq,
            "timestamp_ns": result.timestamp_ns,
            "timestamp_iso": datetime.now().isoformat(),
            "person_count": len(persons),
            "total_frames_processed": self.frame_count,
            "total_detections": self.total_detections,
            "objects": [
                {
                    "label": obj.label,
                    "confidence": round(obj.score, 3),
                    "bbox": {
                        "x": round(obj.bbox.x, 3),
                        "y": round(obj.bbox.y, 3),
                        "width": round(obj.bbox.width, 3),
                        "height": round(obj.bbox.height, 3),
                    },
                }
                for obj in persons
            ],
        }
        self.events.publish(f"app/{self.app_id}/detection", event_data)

        # Publish alert if cooldown expired
        current_time = time.time()
        if persons and (current_time - self.last_alert_time) >= self.alert_cooldown:
            self.events.publish("alerts/detection", {
                "type": "person_detected",
                "app_id": self.app_id,
                "person_count": len(persons),
                "timestamp": datetime.now().isoformat(),
            })
            self.last_alert_time = current_time

    def _trigger_light(self):
        try:
            self.device.set_white_light(50)
        except Exception as e:
            logger.debug(f"Light control failed: {e}")

    def _print_statistics(self):
        avg = sum(self.person_count_history) / len(self.person_count_history) if self.person_count_history else 0
        logger.info(f"Statistics: frames={self.frame_count}, detections={self.total_detections}, avg_persons={avg:.2f}")

    def _cleanup(self):
        for client in (self.inference, self.events, self.device, self.media):
            if client:
                client.close()


def main():
    sys.exit(PersonDetectionApp().run())


if __name__ == "__main__":
    main()
关键逻辑对照(调整模型/流/阈值时的定位点):
| 模块 | 位置 | 说明 |
|---|---|---|
| 配置读取 | __init__ | DETECTION_THRESHOLD、ALERT_COOLDOWN_SECONDS 从环境变量读(默认 0.2 / 5);实际值由 app.yaml 的 env 注入,见 §2.2 |
| 模型/流发现 | initialize | list_models() / list_streams() 打印设备真实值,并校验 hailo_yolov8n_384_640 与 sub 是否可用 |
| 订阅推理 | run | infer.subscribe(stream="sub", model="hailo_yolov8n_384_640", fps=10)——stream 必须是 sub,main 只发 H264 会让调用永久挂死 |
| 检测过滤 | _process_frame | 只保留 label == "person" 且 score >= threshold 的目标 |
| 事件发布 | _publish_detection_event | 每帧发 app/person-detection/detection;alerts/detection 在冷却窗口内只发一次 |
| 灯控联动 | _trigger_light | 检测到人时 device.set_white_light(50)(50% 亮度) |
| 优雅退出 | _signal_handler / _cleanup | 收到 SIGTERM 置 running=False,跳出循环后关闭全部客户端 |
2.2 权限清单 app.yaml
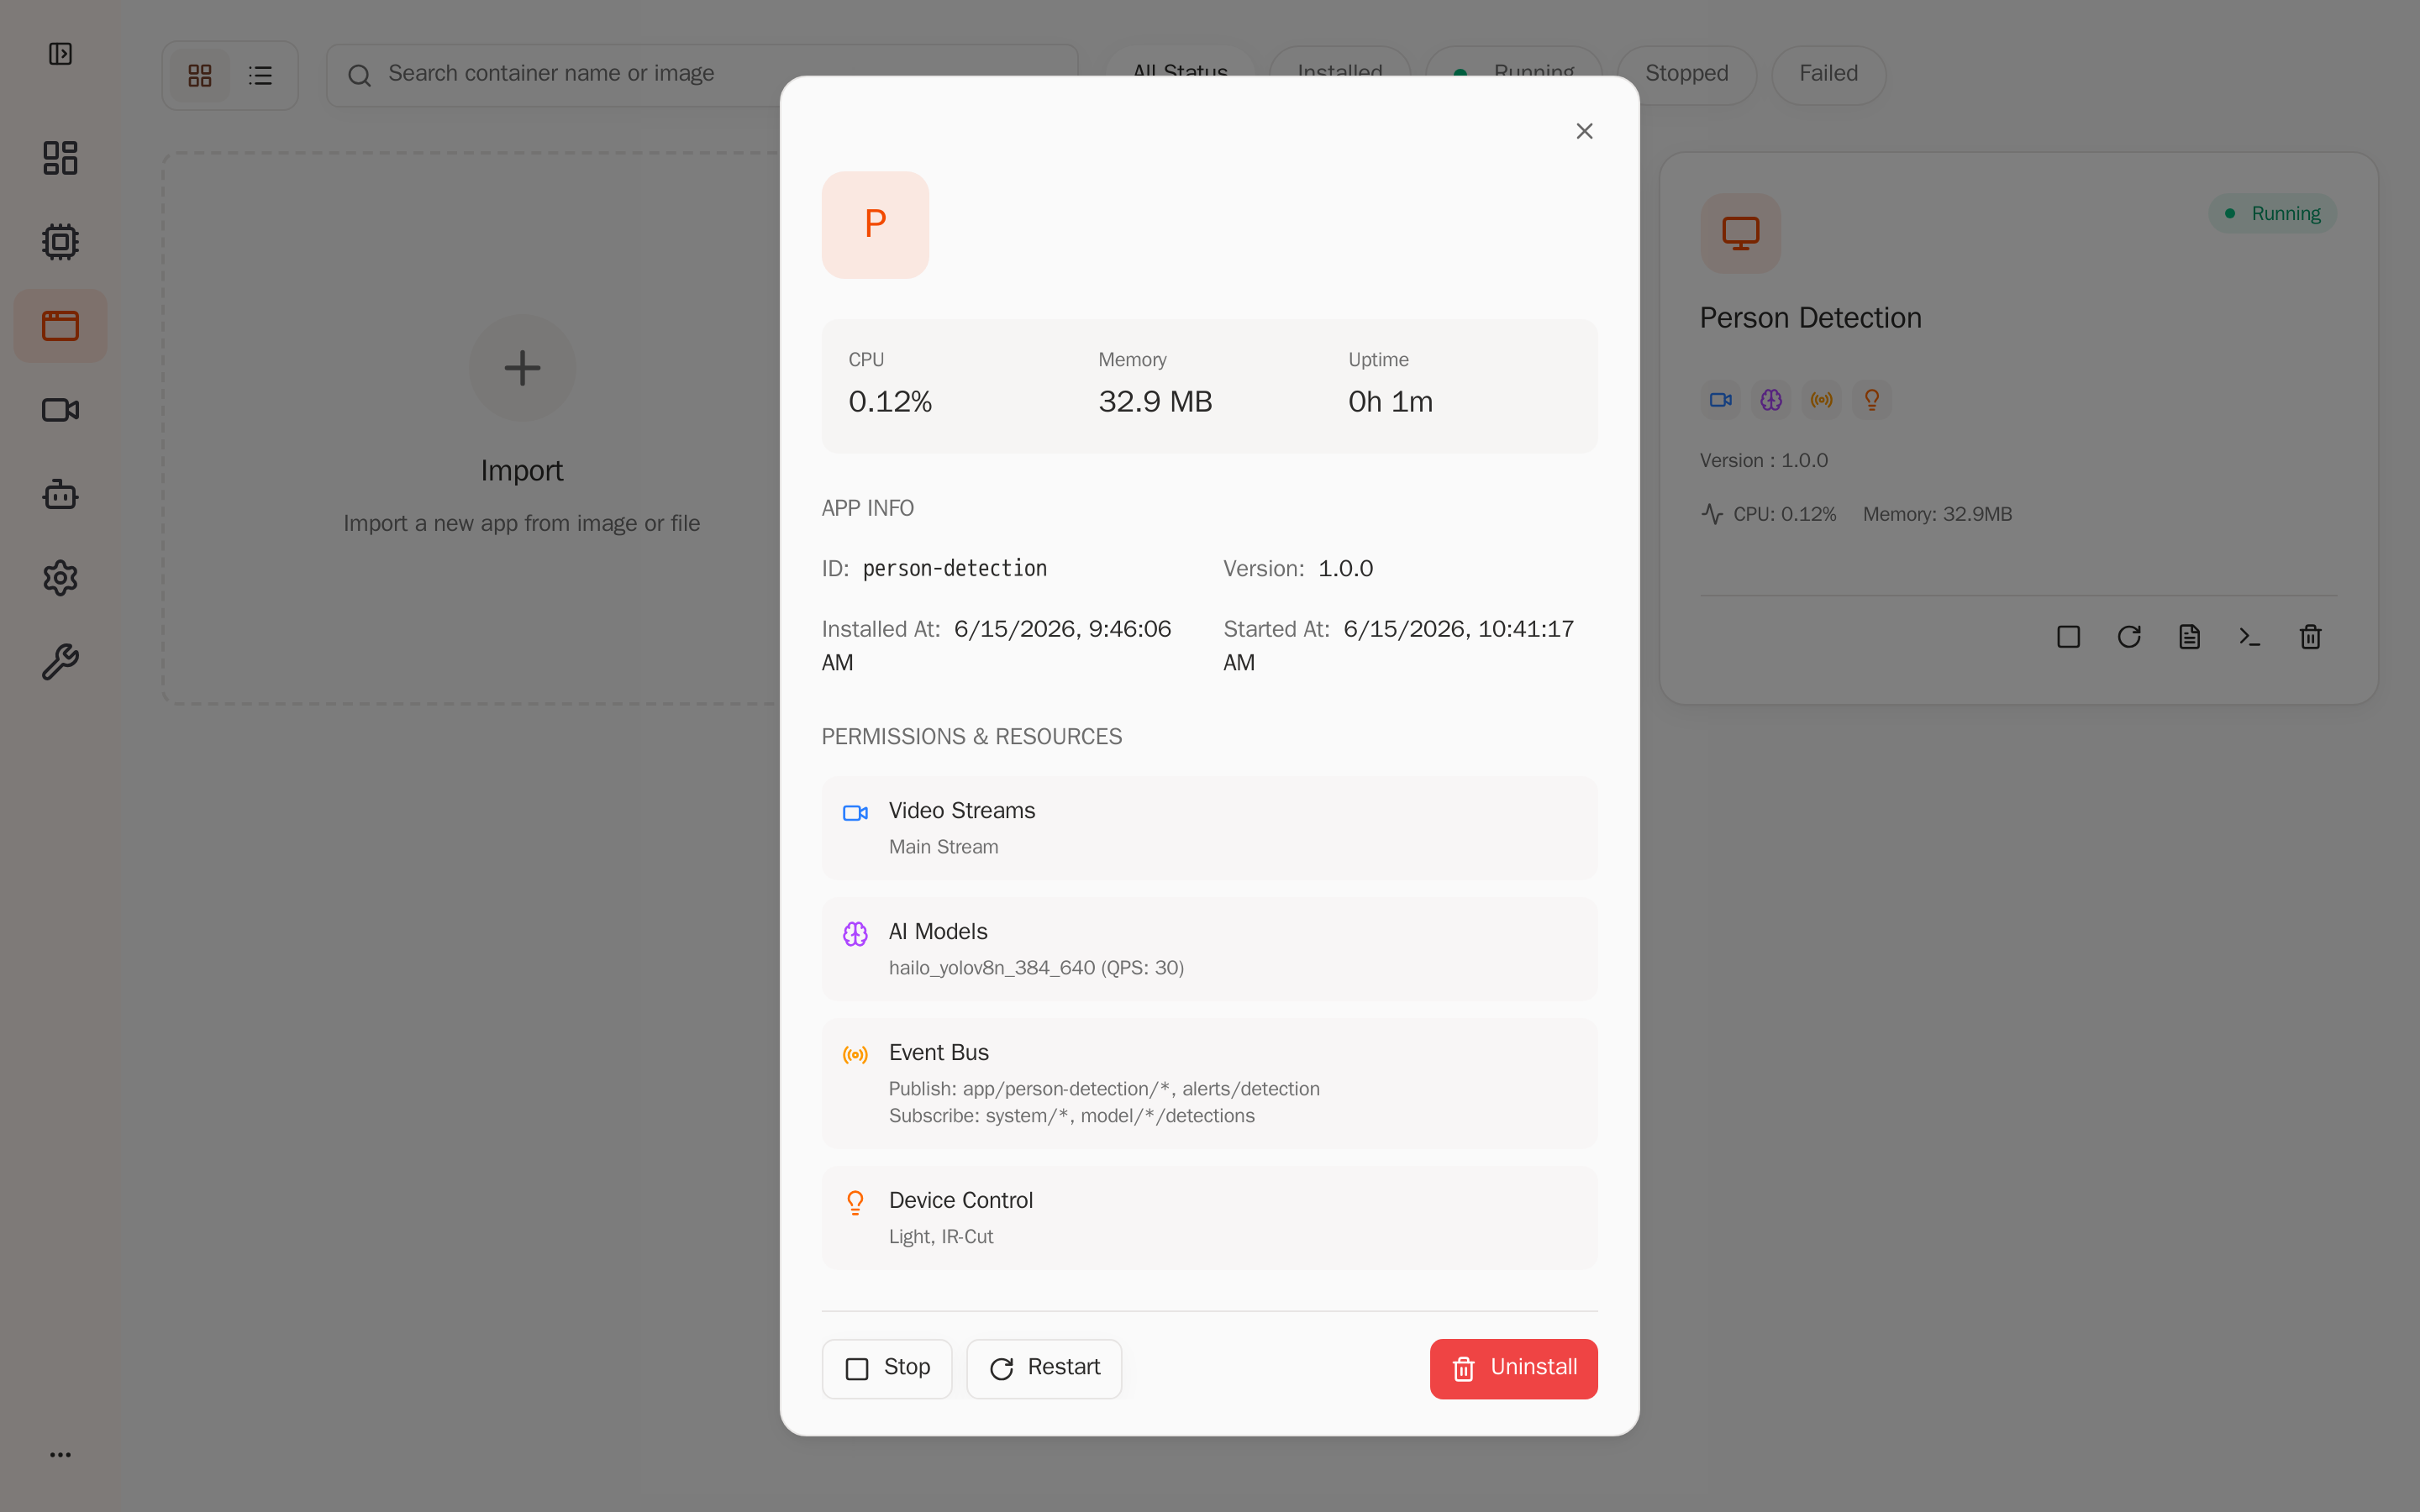
应用必须在 app.yaml 声明所需权限,平台据此做容器隔离与沙箱。Person Detection 声明:视频流 sub.raw(sub 发布推理用的原始 NV12 帧,main 只用于 RTSP 拉流)、模型 hailo_yolov8n_384_640、事件发布/订阅主题、设备灯控。
# AIPC Platform Application Manifest
apiVersion: v1
kind: Application

metadata:
  id: person-detection
  name: Person Detection
  version: 1.0.0
  description: Real-time person detection with AI inference and event publishing
  author: AIPC Team

spec:
  image: aipc/person-detection:1.0.0

  resources:
    cpu: "50%"
    memory: "256Mi"

  permissions:
    video:
      - sub.raw                       # 发布原始 NV12 帧的流(main 只发 H264,无法订阅推理)
    inference:
      models:
        - hailo_yolov8n_384_640        # 须匹配设备已加载模型
      max_qps: 30
      max_concurrent: 2
      allow_register_model: false
    events:
      publish:
        - app/person-detection/*
        - alerts/detection
      subscribe:
        - system/*
        - model/*/detections
    device:
      light: true                     # 补光灯联动
      ir_cut: true
    network:
      mode: isolated                  # 容器网络隔离(无外网)

  # 环境变量:app.py 通过 os.environ 读取
  env:
    - name: DETECTION_THRESHOLD
      value: "0.3"                    # person 置信度门槛,低于此分数的目标被忽略
    - name: ALERT_COOLDOWN_SECONDS
      value: "5"                      # alerts/detection 事件的最小间隔(秒)
    - name: LOG_LEVEL
      value: "INFO"                   # 日志级别:DEBUG / INFO / WARNING / ERROR

  volumes:
    - host: /opt/aipc/data/person-detection
      container: /app/data
      readonly: false
    - host: /opt/aipc/logs/person-detection
      container: /app/logs
      readonly: false

  autostart: false
  restart_policy: on-failure
  restart_max_retries: 3

  healthcheck:
    enabled: true
    interval: 30s
    timeout: 5s
    retries: 3
声明式权限模型意味着:应用在沙箱里只能访问这里列出的资源。任何未声明的流、模型、事件主题或设备控制,调用时都会被平台拒绝。完整字段参考见仓库
docs下的 Application Manifest 说明。
3. 构建镜像
3.1 构建文件
Dockerfile —— 基于 python:3.11-slim-bookworm,装系统依赖、把 SDK 本地装进镜像、再装应用依赖,并以非 root 用户运行:
FROM python:3.11-slim-bookworm

# 系统依赖
RUN apt-get update && apt-get install -y --no-install-recommends \
    bash curl procps libglib2.0-0 libsm6 libxext6 libxrender-dev \
    && rm -rf /var/lib/apt/lists/*

WORKDIR /app

# SDK 本地安装(由 build.sh 在构建前复制进来)
COPY hailo_ipc_sdk/ /app/hailo_ipc_sdk/
COPY setup.py README.md /app/
RUN pip install --no-cache-dir -e .

# 应用代码与依赖
COPY app.py /app/app.py
COPY requirements.txt /app/requirements.txt
RUN pip install --no-cache-dir -r requirements.txt

# 非 root 用户
RUN useradd -m -u 1000 appuser && chown -R appuser:appuser /app
RUN mkdir -p /app/data /app/logs && chown -R appuser:appuser /app/data /app/logs

ENV APP_ID=person-detection
ENV PYTHONUNBUFFERED=1
ENV LOG_LEVEL=INFO

HEALTHCHECK --interval=30s --timeout=5s --start-period=10s --retries=3 \
    CMD python3 -c "from hailo_ipc_sdk import InferenceClient; c = InferenceClient(); c.close()" || exit 1

USER appuser
CMD ["python3", "/app/app.py"]
requirements.txt —— 仅 numpy(SDK 已自带 protobuf/grpc,无需重复声明):
numpy>=1.21.0
设备容器运行时无外网,SDK 必须随镜像带入。build.sh 会在构建前把 sdk/python/hailo_ipc_sdk/ 复制进应用目录,Dockerfile 的 COPY hailo_ipc_sdk/ 将其打进镜像,再 pip install -e . 本地安装。
3.2 构建与打包
仓库自带的 build.sh 一键完成"构建镜像 → 导出 → 打包"全流程,无需手动敲多条 docker 命令。
cd apps/person-detection
# 必须用 arm64:设备为 aarch64,构建 x86_64 镜像将无法导入设备
bash build.sh arm64
build.sh 内部依次执行 5 步:
| 步骤 | 动作 | 说明 |
|---|---|---|
| 1 | 复制 SDK | 把 sdk/python/ 下的 hailo_ipc_sdk/、setup.py、README.md 复制进当前应用目录(Dockerfile 需要它们) |
| 2 | 构建镜像 | docker buildx build --platform linux/arm64 生成 aipc/person-detection:1.0.0 |
| 3 | 导出镜像 | docker save 导出为 image.tar |
| 4 | 打包 | zip 把 app.yaml + image.tar 打成 person-detection.aipc |
| 5 | 清理 | 删除步骤 1 复制的 SDK 文件和中间的 image.tar,只保留 person-detection.aipc |
构建产物:
| 产物 | 大小 | 说明 |
|---|---|---|
Docker 镜像 aipc/person-detection:1.0.0 | ~434 MB | python:3.11-slim + grpcio/numpy/protobuf,留在本地 Docker |
person-detection.aipc | ~97 MB | 最终交付包(app.yaml + image.tar 的 zip) |
build.sh 步骤 5 会删掉 image.tar,而部署到设备需要 app.yaml 和 image.tar 两个独立文件。部署前先解压 .aipc 拿回这两个文件:unzip -o person-detection.aipc。
4. 发现并配置模型与视频流
app.py 里 subscribe(model=...) 的模型名、app.yaml 里 permissions.video 的流名,必须使用设备上的真实值,不得直接沿用示例值——不同设备、不同固件版本的名字可能不同,填错会直接报 StatusCode.NOT_FOUND。
下面分三步走:查模型 → 查流 → 把正确值填进应用。
4.1 查询设备上的模型
设备模型文件放在 /opt/aipc/models/,首次使用前要先扫描并加载到 NPU:
TOKEN="Bearer <token>"   # 用默认凭据 admin/password 调 /api/login 获取

# 1. 扫描模型目录,把 .hef 注册到平台
curl -X POST http://<设备IP>:8080/api/v1/ai/models/scan -H "Authorization: $TOKEN"

# 2. 加载指定模型到 NPU(推理前必须加载)
curl -X POST http://<设备IP>:8080/api/v1/ai/models/hailo_yolov8n_384_640/load -H "Authorization: $TOKEN"

# 3. 列出当前可用模型,确认 model_id
curl http://<设备IP>:8080/api/v1/ai/models -H "Authorization: $TOKEN"
NE503 出厂自带检测模型 hailo_yolov8n_384_640(YOLOv8n,COCO 80 类,含 person)。记下 list 返回的真实 model_id,下一步填进 app.py。
4.2 查询设备上的视频流
流名用 SDK 查最直接(curl 没有专门的查流接口)。在 app.py 初始化阶段调用:
from hailo_ipc_sdk import FdMediaClient as MediaClient
print(MediaClient().list_streams())   # → ['main', 'sub']
NE503 通常有两个流,用途完全不同——此差异是后续配置的关键。
4.3 关键:推理必须用 sub 流
两个流的帧格式不同,决定了能否用于推理:
| 流 | 分辨率 | 帧格式 | 推理 |
|---|---|---|---|
sub | 720p | 原始 NV12 | ✅ 可用于推理(平台按模型输入缩放后喂给 NPU) |
main | 4K | 编码 H264 | ❌ 只用于 RTSP 拉流观看 |
模型输入分辨率应与所订阅流的分辨率尽量一致;不一致时平台仍会做预处理 resize,但这会增加开销,比例悬殊时还可能影响精度。可在 Web 控制台调整 sub(及 third)流的分辨率,使其贴近模型输入(如 640×384)。
subscribe(stream="main") 拿不到任何帧,调用会一直挂住、无报错、无超时。app 卡在 "Waiting for inference results" 通常源于此原因——将 main 改为 sub 即可解决。
最终填写位置:
| 文件 | 字段 | 值 |
|---|---|---|
app.py | subscribe(stream=...) | sub |
app.yaml | permissions.video | [sub.raw] |
app.py | subscribe(model=...) | §4.1 查到的 model_id(如 hailo_yolov8n_384_640) |
app.yaml | permissions.inference.models | 同上的 model_id |
5. 部署到设备
build.sh 的产物是 person-detection.aipc(app.yaml + image.tar 的 zip 包),且构建结束时会删掉中间的 image.tar。部署前先解压出两个独立文件:
cd apps/person-detection
unzip -o person-detection.aipc      # 在当前目录解压出 app.yaml + image.tar
解压后手上有 app.yaml 和 image.tar。三种部署方式任选其一:
- Web 控制台上传(推荐):浏览器打开 Web 控制台 → App Management → Import → 选择 Upload Package → 分别上传
app.yaml和image.tar→ 点击 Install。全程图形界面,无需 SSH。 - aipc-cli(备选):已 SSH 登录设备时,把
app.yaml和image.tar拷到设备后,执行aipc-cli app install app.yaml image.tar。 - HTTP 两步上传(备选):从开发机登录取 token →
upload-image(image.tar)→upload-manifest(app.yaml)→install-package(JSON:manifest_path+image_path+force)→ 轮询install-progress/<task_id>到phase=complete。
6. 启动与验收
6.1 启动应用
部署完成后应用处于 Stopped 状态,需要手动启动一次。两种方式任选其一。
方式一:Web 控制台启动(推荐)
进入 App Management,找到 Person Detection 卡片(状态显示 Stopped),点击卡片上的 Start 按钮。正常情况下几秒内状态徽章由 Stopped 切换为 Running,卡片下方开始显示 CPU 与内存占用。
方式二:HTTP API 启动
curl -X POST http://<设备IP>:8080/api/v1/apps/person-detection/start -H "Authorization: Bearer <token>"
新部署的应用首次启动时,平台需要把镜像载入容器运行时,可能超过 10 秒的 API 超时,返回 code:6002 DeadlineExceeded。这不是错误——再调用一次 start(或 Web 上再点一次 Start)即可成功。
6.2 Web 控制台验收
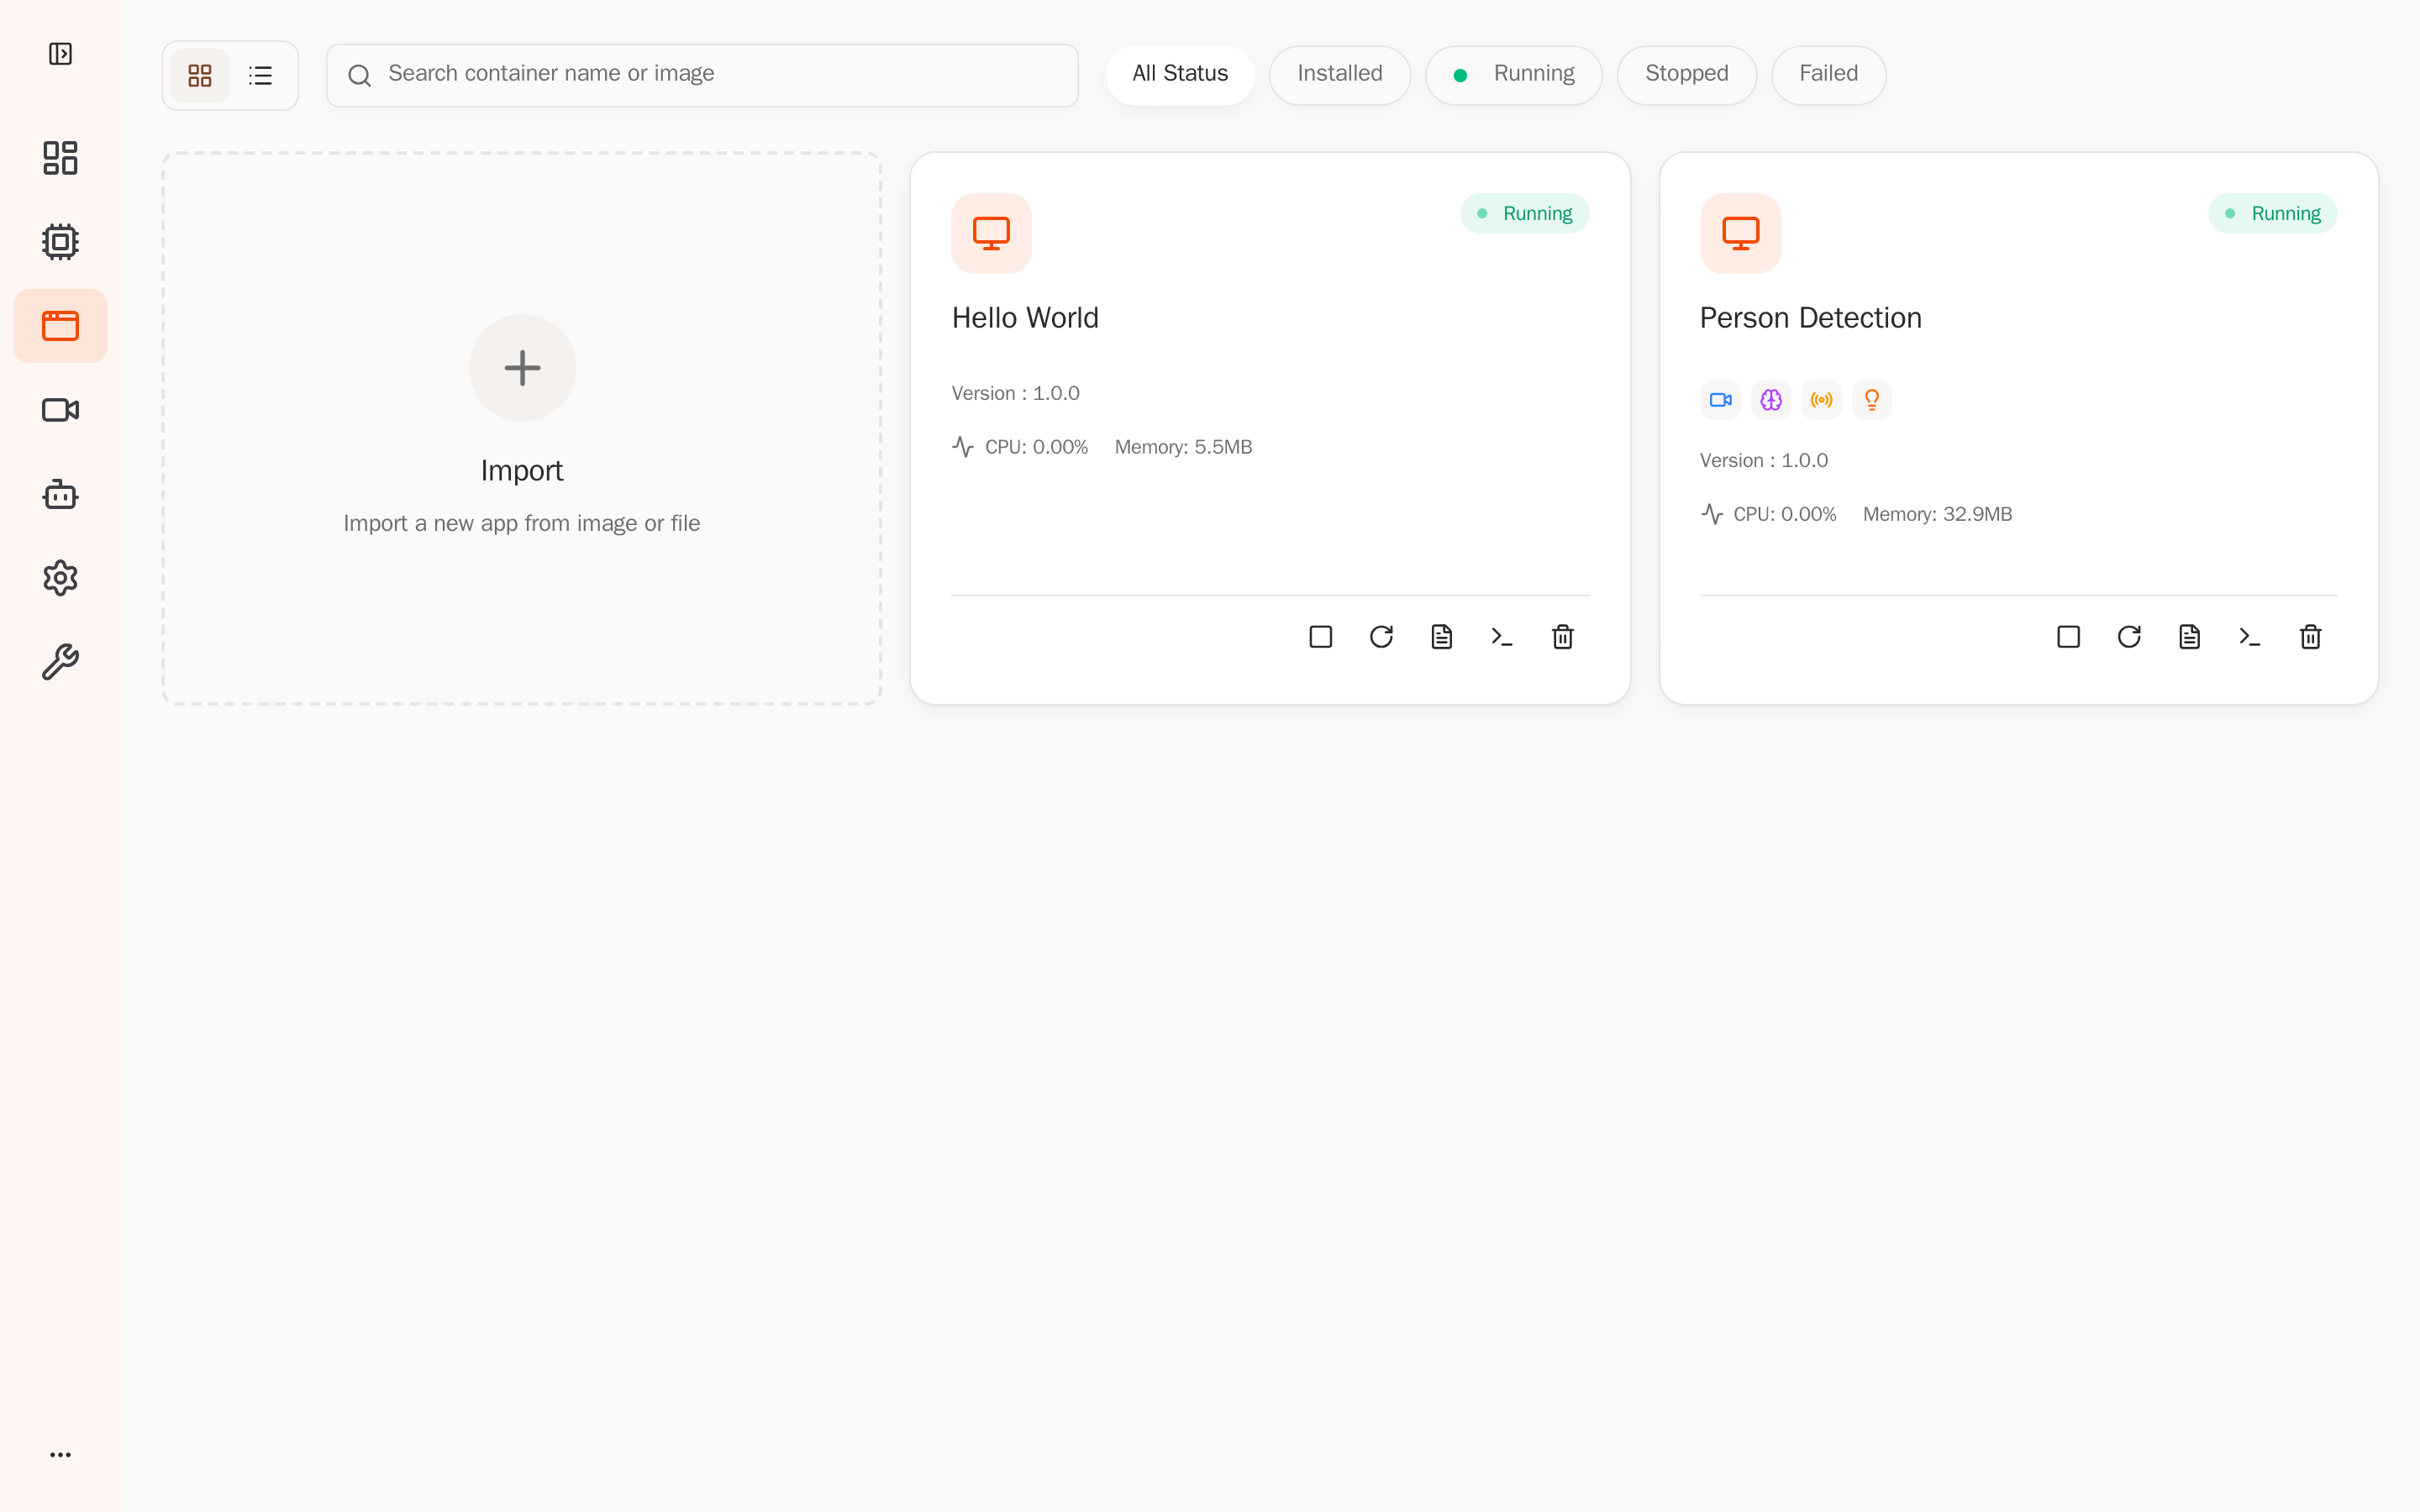
打开 Web 控制台 → Applications,Person Detection 处于 Running 状态,占用约 33 MB 内存:
点击 Person Detection 打开详情。Permissions & Resources 区域能看到平台已按 app.yaml 注入的权限——视频流 sub.raw、模型 hailo_yolov8n_384_640(QPS 30)、事件发布/订阅主题、设备灯控。这证明应用在沙箱里只拥有它声明的权限:
6.3 查看运行日志与检测输出
应用启动后,有三种方式查看实时推理结果。
方式一:Web 控制台 Logs 实时流
在 Applications 列表里找到 Person Detection,点击该应用的 Logs 按钮,打开 Live Stream 面板,实时滚动显示容器 stdout/stderr,包括每一帧的检测日志和每 100 帧一次的统计:
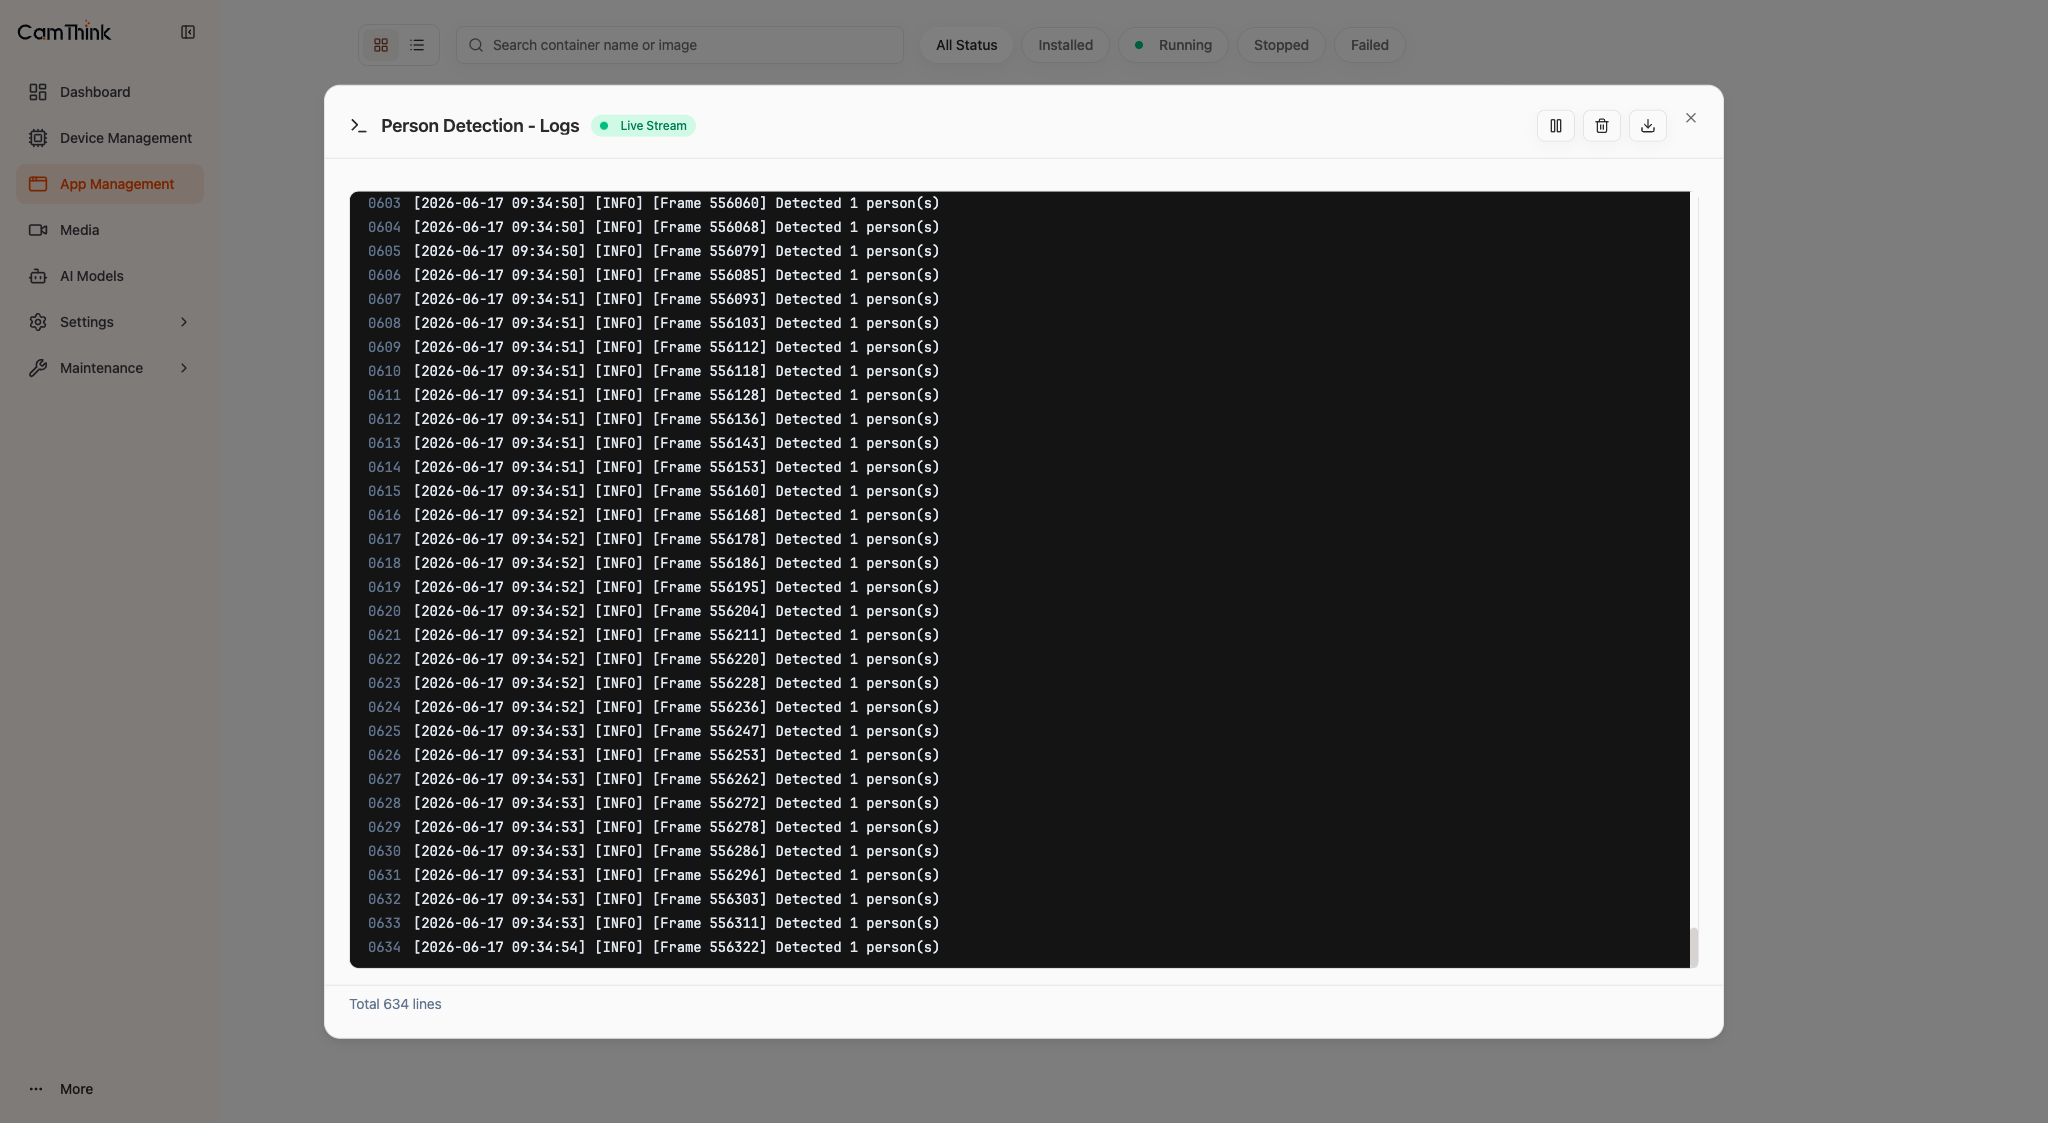
当画面中存在人员时,[Frame N] Detected M person(s) 行持续刷新,Statistics 的 detections 与 avg_persons 随之增长——这是验证推理链路实际运行最直观的依据。
方式二:HTTP API 拉取最近日志
curl "http://<设备IP>:8080/api/v1/apps/person-detection/logs?max_lines=15" -H "Authorization: Bearer <token>"
[INFO] Available models: ['hailo_yolov8n_384_640']
[INFO] Available video streams: ['main', 'sub']
[INFO] Subscribing to stream 'sub' with model 'hailo_yolov8n_384_640'
[INFO] Received first inference result - frame 1
[INFO] [Frame 142] Detected 1 person(s)
[INFO] Statistics: frames=200, detections=198, avg_persons=1.00
detections 随帧增长、avg_persons 接近 1.0,即说明推理链路在真实运行。
方式三:事件总线订阅结构化检测结果
应用把每次检测的置信度、bbox、人数打包成结构化 JSON 发布到事件总线。在设备上用 CLI 订阅即可看到:
aipc-cli event subscribe 'app/person-detection/*'
{"app_id":"person-detection","frame_sequence":142,"person_count":1,
 "confidence":0.879,"bbox":{"x":0.31,"y":0.22,"width":0.27,"height":0.61},
 "total_detections":1118}
以上三种方式任一正常滚动,都说明 SDK 各客户端初始化成功、模型与 sub 流都可用、订阅成功并持续推理。
若 Web Logs 报 no log file found for container aipc-person-detection,多半是设备 root 分区满了。SSH 登录后用 df -h / 确认;临时处理可 truncate -s 0 /opt/aipc/logs/*.log 清理积累过大的平台日志后重装该应用。
7. 小结
本教程完成了一个真实 AI 推理应用的端到端部署:
- SDK 调用 ——
InferenceClient.subscribe订阅流式推理、EventClient.publish发事件、DeviceClient联动硬件 - 资源发现 ——
list_models()/list_streams()查真实名字,填进app.py与app.yaml - 权限声明 ——
app.yaml的permissions决定沙箱能力,平台严格按此隔离 - 部署验收 —— Web 控制台确认 Running + 权限注入 + 日志确认推理链路
后续可参考仓库 apps/ 下的其它示例(people-counting、object-detection、parking-lot 等)开发自有应用。