Engineering Guide
This page covers the full engineering process: device preparation, backend deployment, channel configuration, integration validation, daily usage and privacy operations.
1. Deployment Scenarios
Best results at 0.5–3 m, with ≤8 faces in frame at once.
| Scenario | Traits | Approach |
|---|---|---|
| Door / reception (primary) | Faces frontal, 2–5 s dwell | Wall mount or desk stand, 1.4–1.6 m above floor |
| Office entrance (attendance) | Burst traffic | N-frame confirmation + report-on-new-face; walk-through friendly |
| Retail greeting | Frequent profiles | Enable periodic re-report; backend handles pose robustness |
| Privacy-sensitive demo areas | No unmasked output allowed | Mosaic on: video blurred, raw crops only to a controlled backend |
Mounting
- Height: lens at 1.4–1.6 m, tilt < 15° (frontal faces recognize best)
- Avoid: backlight (windows/lamps toward lens); strong side lighting casting half-face shadows
- Lens: standard M12 (HFOV 88°/137°); 2–4 m coverage → 88°, wider → 137°

Verify before fixing: in the live preview, confirm target faces are ≥ 1/10 of frame height (smaller faces hit the min-area filter), unobstructed, evenly lit.
2. Bill of Materials
| # | Item | Spec | Qty | Purpose |
|---|---|---|---|---|
| 1 | NE302 AI camera | STM32N6・Wi-Fi 6・4MP | 1 per point | Detection, tracking, mosaic, crop reporting |
| 2 | Face firmware | ne302 firmware ≥ v1.1 (face demo) | 1 | On-camera face features |
| 3 | Recognition backend | Your own service, or any Python-capable PC for the mock backend | 1 | Face matching, returns names |
| 4 | Power | USB Type-C 5V | 1 | Camera supply |
Getting started: 1× NE302 + 1 backend (a laptop on the same LAN works for demos). The MQTT channel additionally needs a broker (public brokers for demo data only — see §8).
3. Network Topology

- Camera and backend on the same LAN (or a publicly reachable backend); the camera needs no public network
- Bandwidth: video stays on the camera's own preview; recognition reports are event-driven (tens of KB each)
- MQTT: camera and backend connect to the same broker; one uplink topic, one downlink topic
4. Setup
Order: camera online → flash face firmware & model → deploy backend → configure channel → four-stage validation.
4.1 Deploy the face features on the camera
4.1.1 Bring the camera online
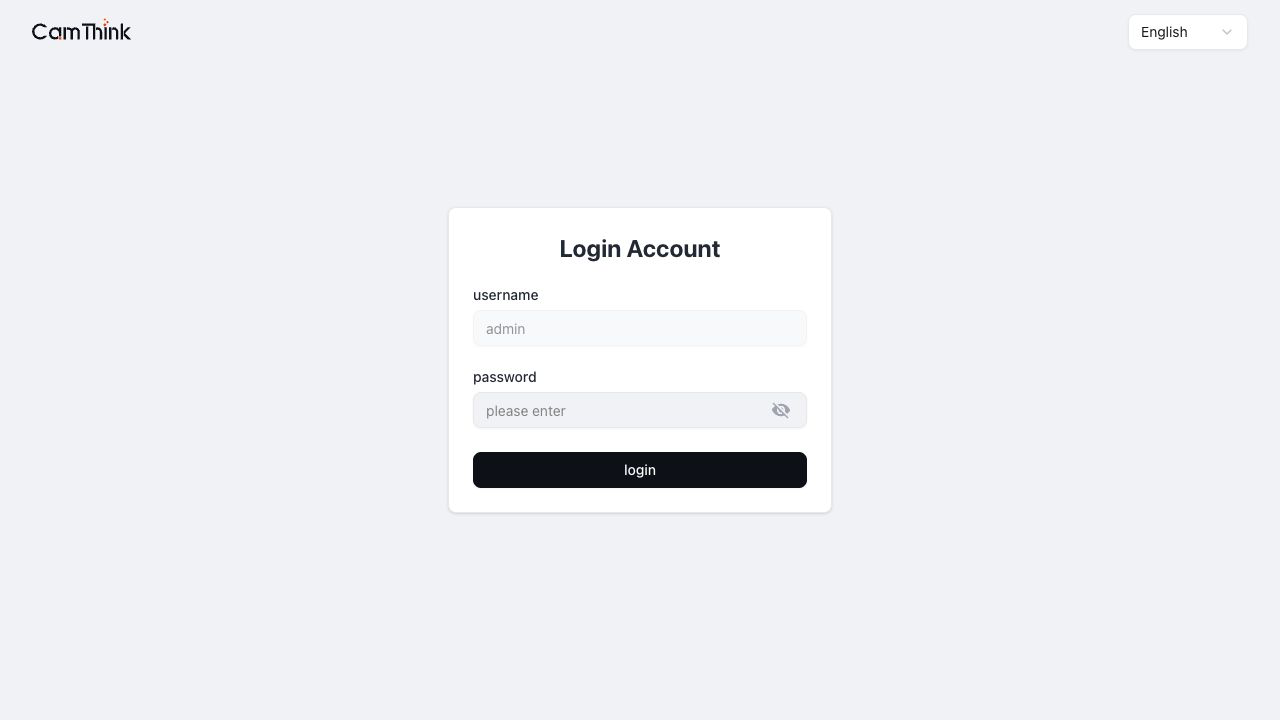
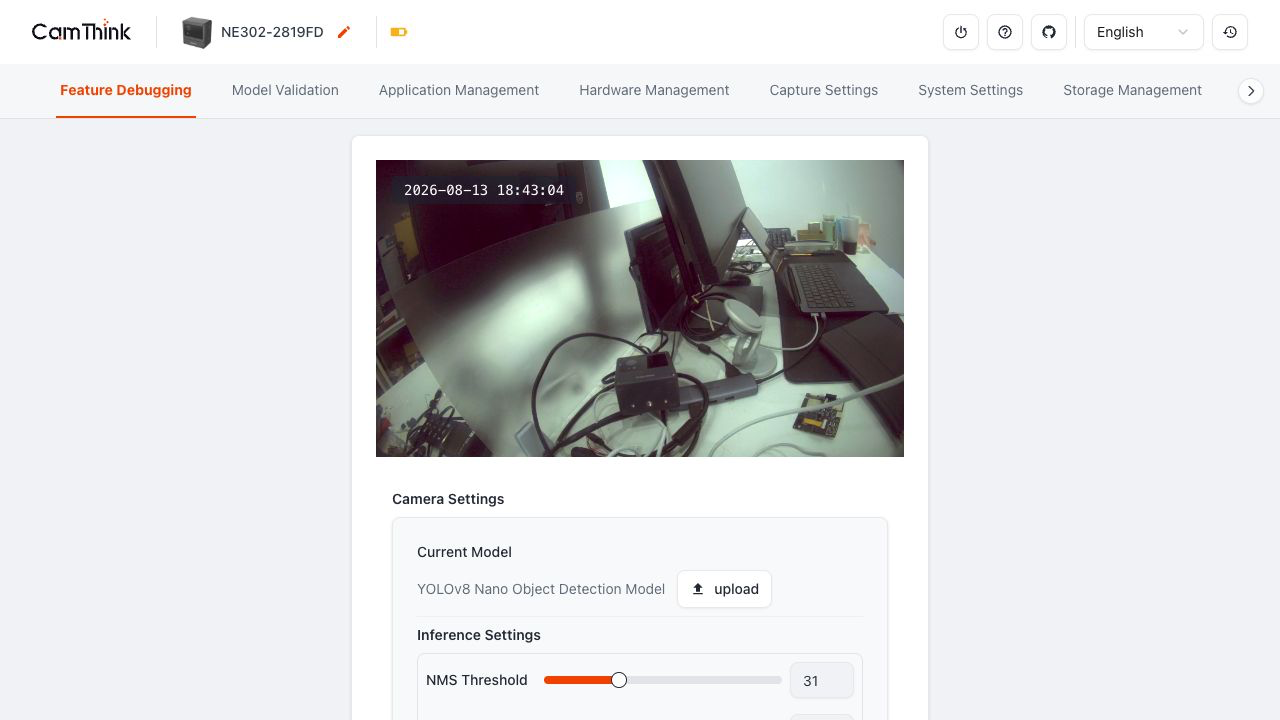
Follow the NE302 Quick Guide: assembly, power, web login (default admin / password; change it immediately).
4.1.2 Flash the face firmware and model
Two artifacts: the application firmware (the face features) and the YuNet detection model. Both build from the feature/face-detection-demo branch of the open-source project.
Get the code (already cloned? git checkout feature/face-detection-demo && git pull):
git clone https://github.com/camthink-ai/ne302.git
cd ne302
git checkout feature/face-detection-demo
No git? On the GitHub page use Branch → feature/face-detection-demo → Code → Download ZIP to grab the branch archive.
Deploy (recommended: full flash + partition reset) — the device may have OTA'd older firmware or carried user-uploaded models; partial flashes would leave stale config and models behind:
# In the ne302 open-source project (toolchain docs included)
make erase-nvs       # reset the config partition: face switches/params to defaults, model-slot selection back to AI_1
make flash           # builds everything, then full-flashes FSBL/firmware/web/model (YuNet into AI_1)/Wi-Fi; auto-erases the OTA partition
After reboot, a Face Detection entry in the web navigation means success (face detection is enabled by default).
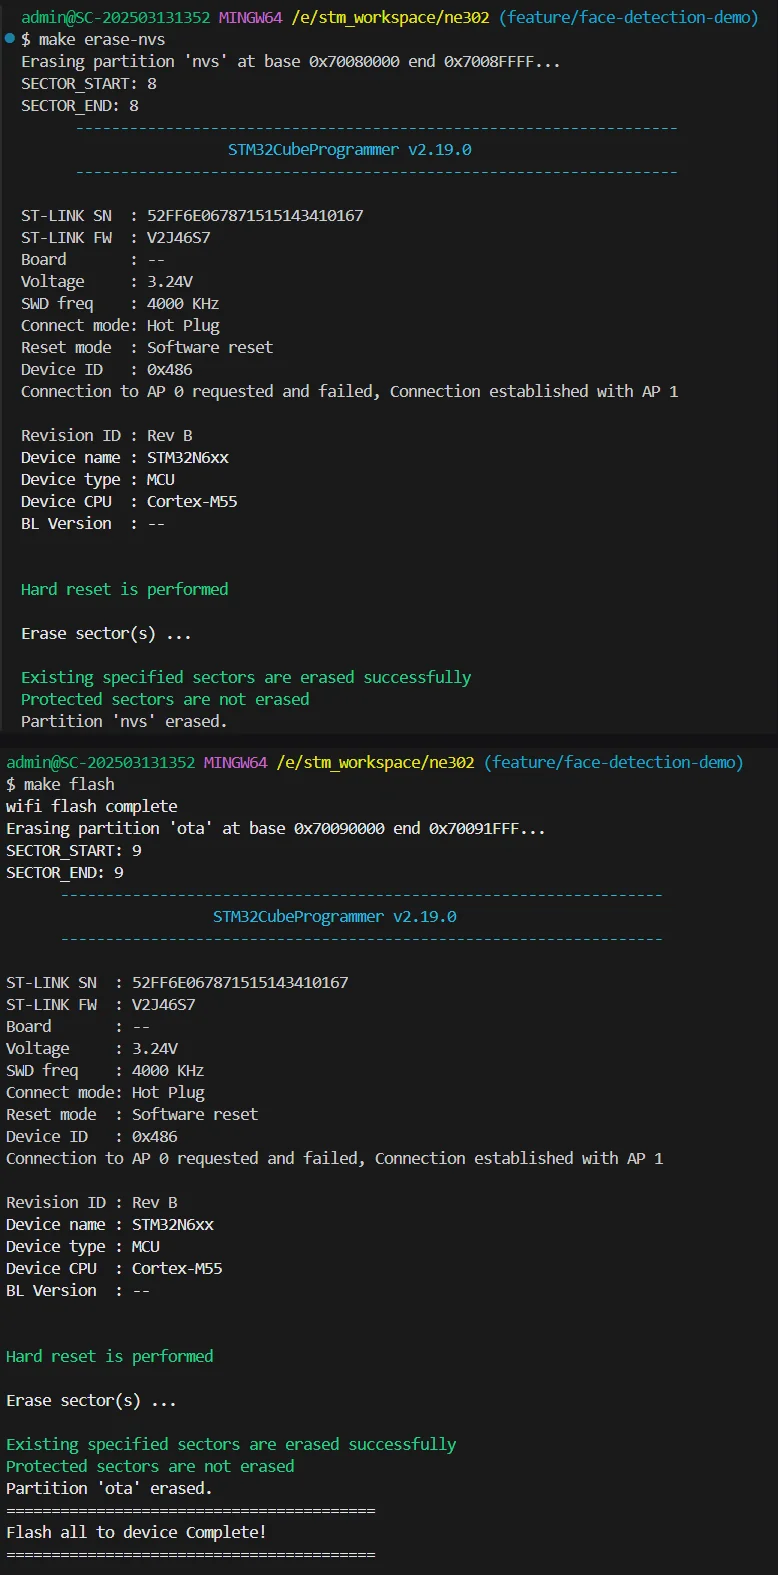
Success markers: Partition 'nvs' erased. followed by Flash all to device Complete! means flashing is done; on connection failures, check the ST-Link connection/driver and retry.
Web upgrade (alternative): on an already-online camera, upload firmware and model packages on the System Upgrade page (model = AI type) — no disassembly; see System Maintenance.
4.1.3 Enable the face features
Web → Face Detection:
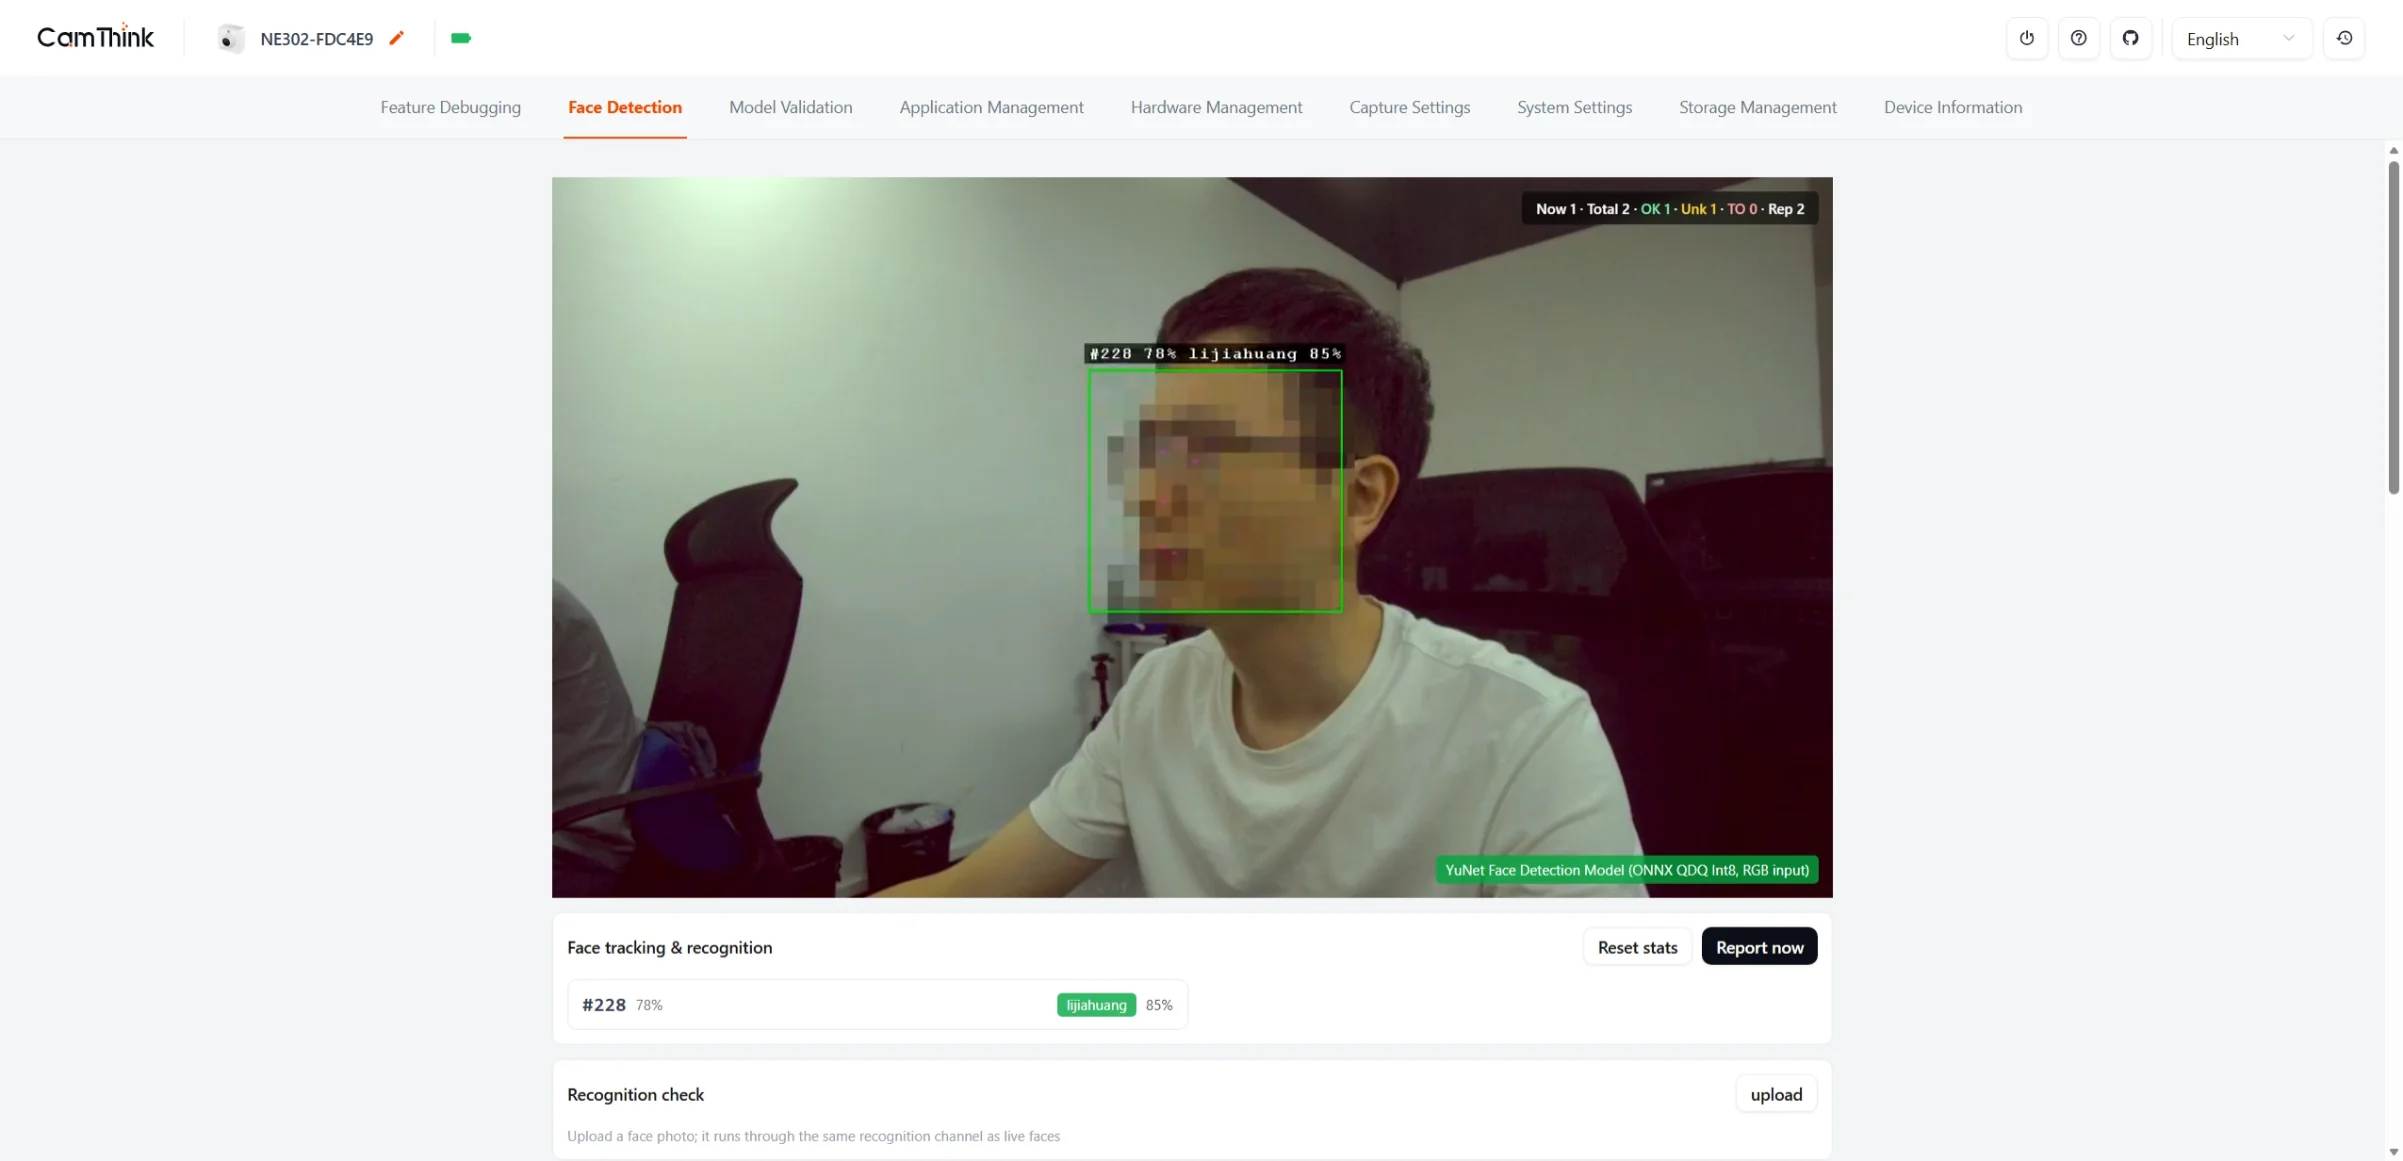
- Open the Basic group → enable "Face detection" — boxes with
#ID confidenceappear (on-device inference is working) - Verify: a frontal face within 1 m gets a stable box and a non-jumping ID
4.2 Deploy the recognition backend
4.2.1 Mock backend (demo / integration / evaluation)
The project ships Script/face_demo_backend.py with real ArcFace recognition (insightface), tiered fallback (face → aHash → md5):
# Python 3.8+; first run auto-downloads a ~330MB model pack
pip install insightface onnxruntime

# Webhook mode (matches the device default; listens on http://0.0.0.0:8080/face)
python Script/face_demo_backend.py --gallery ./face_gallery --out ./face_captures

# MQTT mode (topics per the device MQTT config, see 4.3.2)
python Script/face_demo_backend.py --mode mqtt --mqtt-host <broker> --mqtt-port 1883 \
  --topic-report <device uplink topic> --topic-result <device downlink topic> \
  --gallery ./face_gallery --out ./face_captures
The log line recognition: ArcFace embeddings (N enrolled) confirms real recognition is ready.
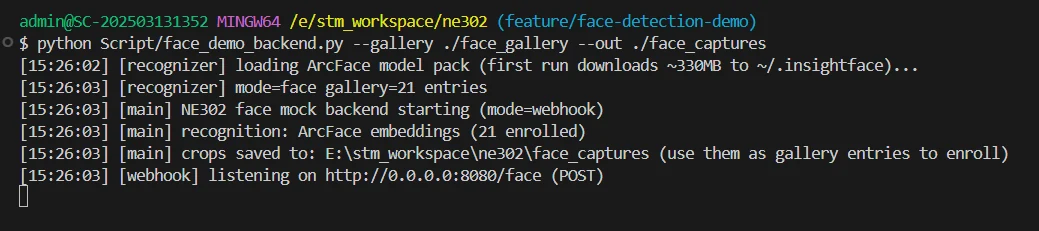
Mock backend startup: mode=webhook, 21 enrolled embeddings, listening on http://0.0.0.0:8080/face
4.2.2 Enroll faces (build the gallery)
Ordering note: the gallery loads when the backend starts — enroll first then start (recommended); if faces are enrolled after startup, restarting the service applies them (the embedding cache makes restarts a few seconds).
mkdir -p face_gallery/alice        # directory name = displayed identity
# drop 2–4 photos of the person (frontal best; more shots = better pose robustness)
Photo sources: trigger a live report, then pick sharp crops from --out (recommended — matches the camera's imaging); or any frontal photos. Embeddings are cached per file — restarts are instant; changed files re-embed automatically.
Face photos are biometric data:
face_gallery/andface_captures/are git-ignored in the project; never commit or share them; delete after demos.
4.2.3 Integrate your own recognition service (production)
The protocol is two JSON messages (see Docs/Face_Detection_Demo.md §5 in the open-source project): the uplink face_report (with the face crop) and the reply face_recognition_result (echoing request_id). Your backend implements: receive the report → recognize → reply name + confidence with the same request_id. In Webhook mode this is simply "receive a multipart POST, respond with JSON".
4.3 Configure the channel (pick one)
Web → Face Detection → Reporting group: enable reporting, choose the channel.
4.3.1 Webhook (recommended: sync, zero extra components)
- In Application Management → Webhook, set
http://<backend IP>:8080/faceand enable (Enable Push on, Push Status "Enabled"); Test Push verifies connectivity first - Enable "Reporting" on the face page, channel Webhook
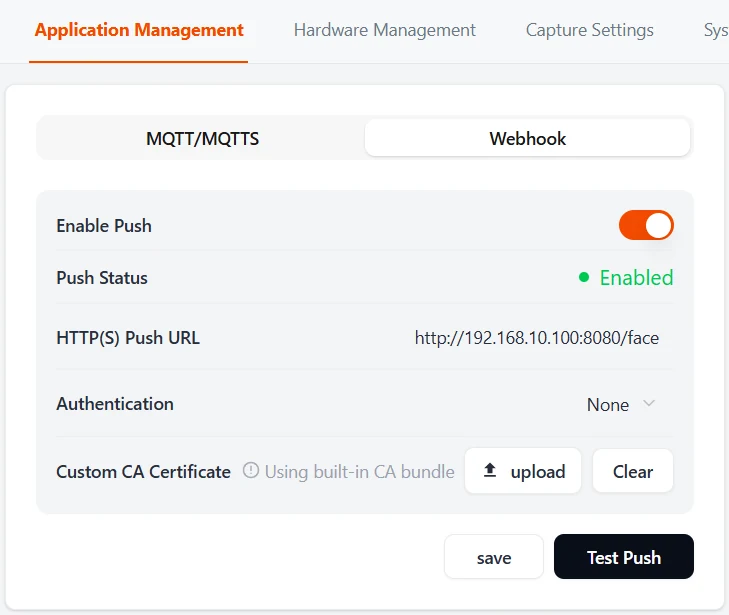
Device webhook config: the URL is the mock backend's listen address; Authentication per your backend (None for demos)
The camera POSTs the face image → the backend responds synchronously → the overlay refreshes instantly. Fits any HTTP backend.
4.3.2 MQTT (message architectures)
- Configure and connect the broker in Application Management → MQTT/MQTTS (status must be "connected")
- Enable "Reporting", channel MQTT
The camera publishes face images (base64) to the data report topic; the backend replies on the data receive topic; the device consumes face_recognition_result there and associates it with the face.
Public brokers (e.g. broker.emqx.io) are for demo data only — reported images are visible to any subscriber. Real face data requires your own broker + MQTTS + authentication.
4.4 Validation (four stages)
| Stage | How | Pass criteria |
|---|---|---|
| 1. Detect/track | Enable the feature, watch the view | Stable box + #ID confidence, no ID jumping |
| 2. Report | Press "Report now", watch the backend terminal | Backend logs the image and saves it (face_captures/) |
| 3. Recognize | An enrolled face on camera | Box turns green with the name within 1 s; backend logs status=ok |
| 4. Boundaries | Stop the backend, trigger again | Box turns red with timeout after ~5 s; recovers green automatically once the backend returns |
Helper: the Recognition check card (upload a face photo on the face page) validates stages 2/3 without anyone on camera.

All four stages pass = acceptance complete.
5. Usage
5.1 Live view and recognition states
Burned into the stream (identical on every viewer): box color = state (white=recognizing, cyan=report sent, green=recognized, yellow=unknown, red=timeout/error), single-line label #ID detection-conf name recognition-conf. The web page adds a stats chip, the recognition list with full names, and Report/Reset buttons.

Edge adaptation: labels flip inside the box or to the other side near frame edges — never clipped; boxes are clamped in-frame.
5.2 Configuration panel
| Group | Key items | Notes |
|---|---|---|
| Basic | Face detection | Master switch |
| On-screen display | Box / ID / confidence / landmarks / result | Independent toggles |
| Face mosaic | Enable, block size, expansion | Video stream only; reported crops stay unblurred |
| Reporting | Enable, channel, report confidence, periodic re-report, cooldown, result timeout/retention | Report threshold ≥ detection threshold = "shown but not reported" |
| Crop & image | Expansion ratio (uniform, clamped), min edge, fixed size (letterbox, no stretch), JPEG quality | Use fixed size if the backend expects one |
| Tracking & detection | Detection confidence, min area, IoU, missed frames, confirm frames, anti-blink hold, extrapolation | More false positives → raise detection threshold; lingering boxes → lower missed/hold |
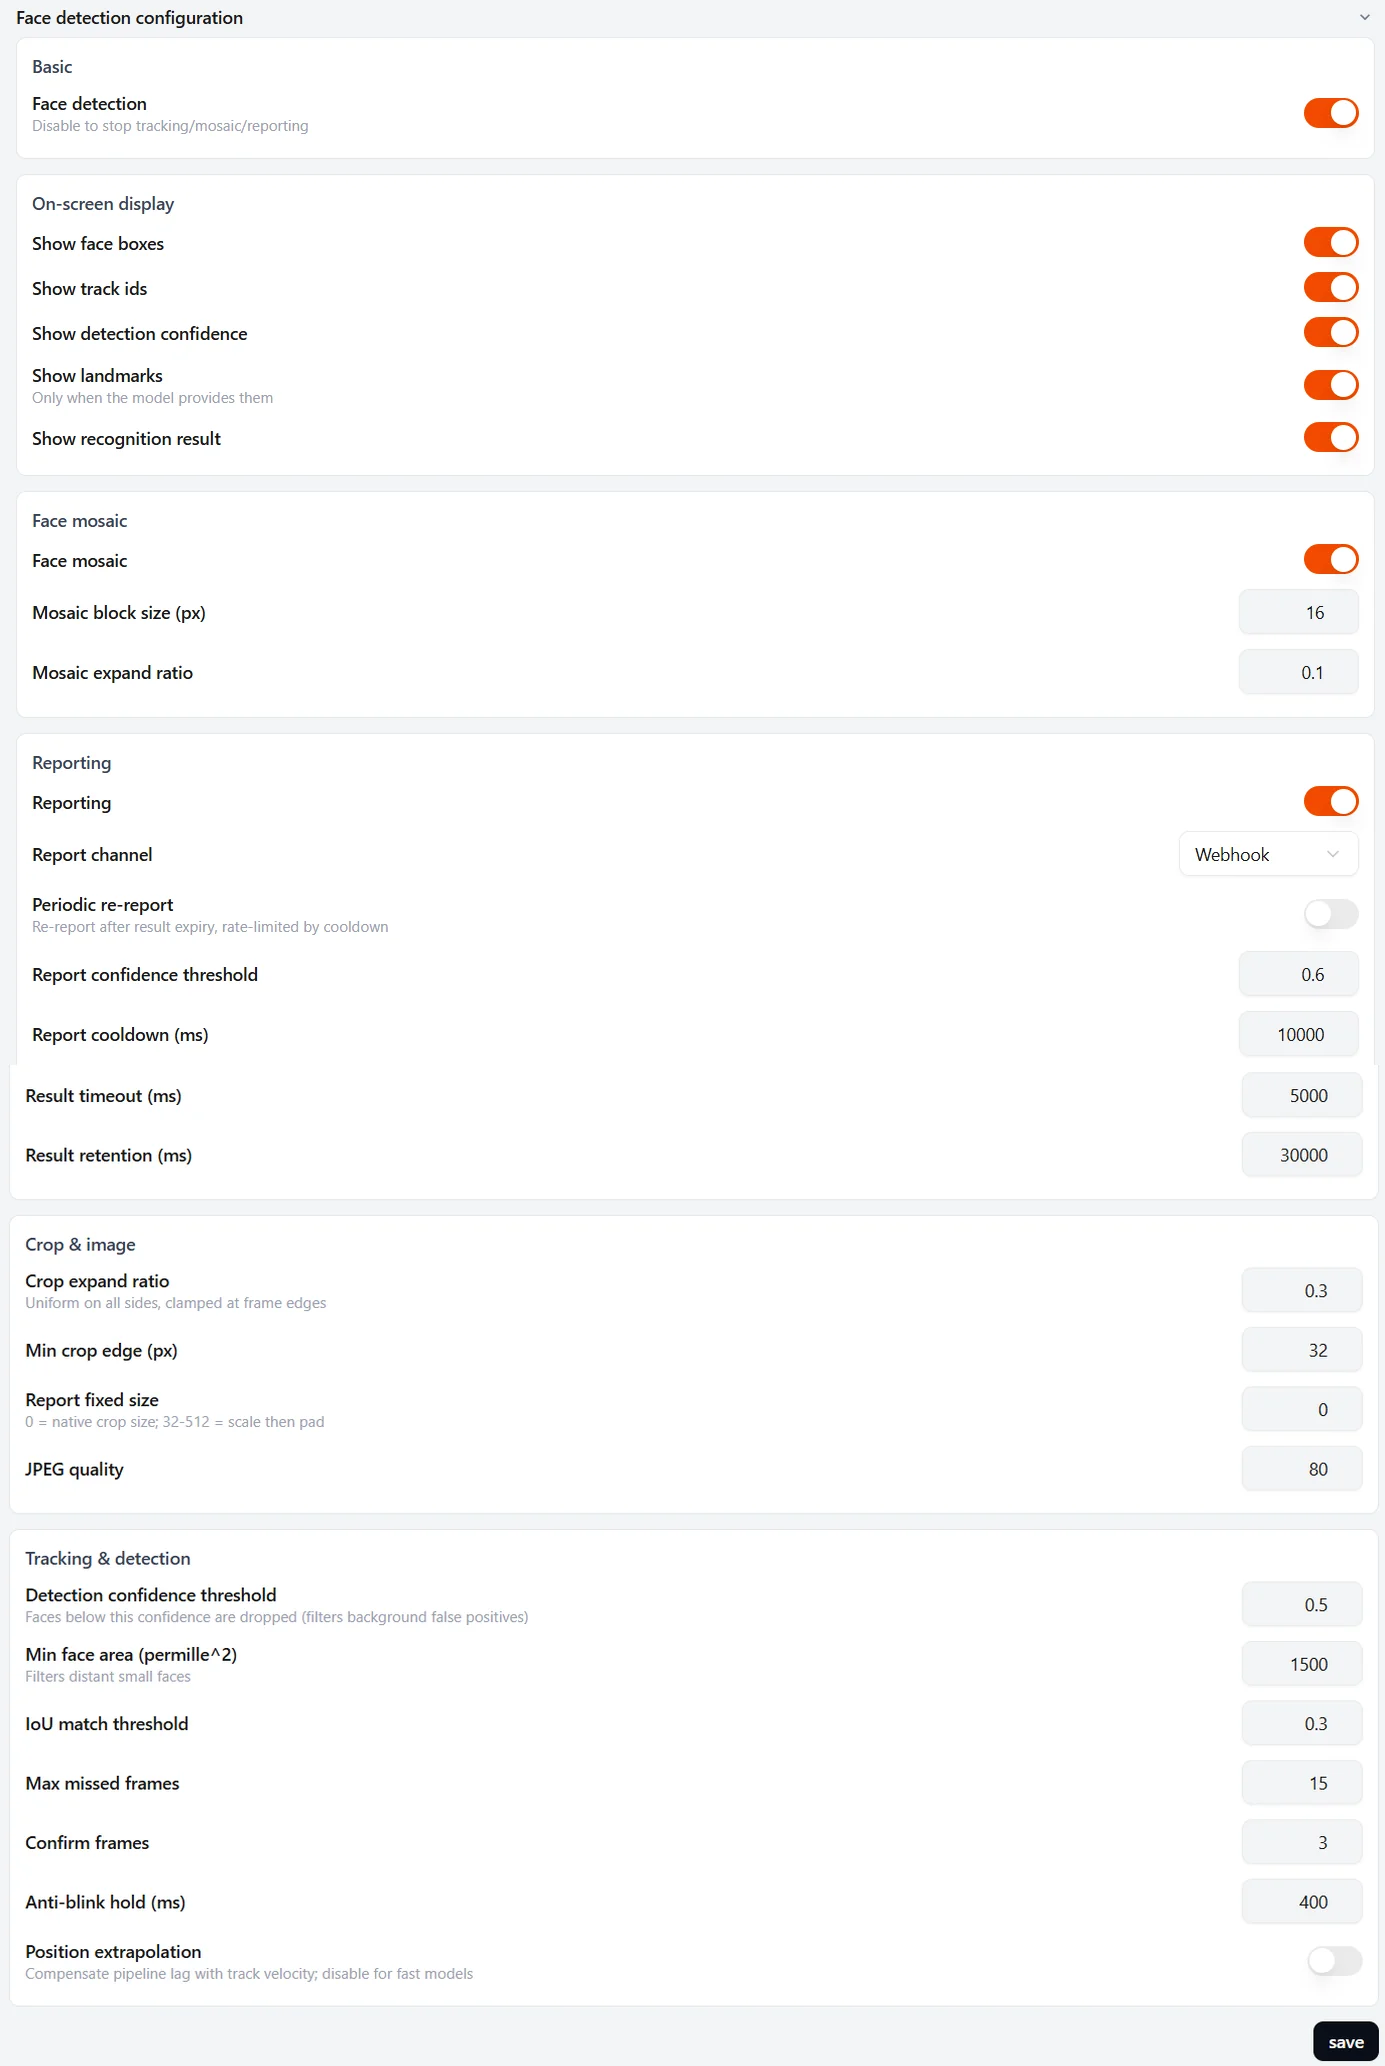
Toggles apply instantly; numeric fields save with the Save button. Everything persists across reboots (NVS).
5.3 Privacy controls (mosaic)
With mosaic enabled:
- Video side (preview/RTSP/RTMP/recording): faces blurred in real time, irreversible
- Reporting side: the backend still receives the unblurred original (recognition needs it); cropping runs before blurring by design
- Records: every successfully reported face is archived in the capture records (trigger
face, local-only), downloadable/deletable
5.4 Capture records
Reported faces appear in Capture Records with trigger face — for after-the-fact review and enrollment material; lifecycle (quota/cleanup) matches normal captures.
6. Operations
| Symptom | Action |
|---|---|
| No boxes | Feature enabled? Face too small/far → lower min area; check lighting |
| Boxes but no name, backend silent | Channel down: Webhook URL reachable? MQTT shows "connected"? |
| Boxes, backend logs, no name | Not matched: is the person enrolled? Tune the backend threshold |
| Name appears slowly | Network RTT; keep the backend on the same LAN for Webhook |
| Many false positives | Raise detection confidence (0.5 → 0.6–0.7) |
| Boxes linger after faces leave | Lower "max missed frames" and "anti-blink hold" |
Report encode failures (JPEG encode failed) | Occasional HW contention — built-in retry + watchdog self-heal; if frequent, collect logs and contact support |
Built-in self-healing: backend timeouts don't affect detection/mosaic (states flow timeout→recovery automatically); the report worker self-recovers; no manual action after the backend returns.
7. Performance
| Metric | Value |
|---|---|
| Detection inference | YuNet 320×320, ~7ms/frame (NPU) |
| Recognition latency | Webhook same-LAN < 1 s; MQTT depends on the broker path |
| Concurrent tracks | ≤16 (≤8 in frame recommended for accuracy) |
| Report payload | Tens of KB JPEG per report (size/quality configurable) |
| Result timeout | Default 5 s (configurable 0.1–60 s) |
Accuracy depends on lighting, pose and distance; validate on site.
8. Privacy & Data Safety
- Video mosaic is irreversible; reported originals go only to your configured backend — public-internet/public-broker deployments must use MQTTS/HTTPS + auth, demo data only
- Backend-side galleries (enrollment photos/embeddings) and captures are sensitive: local storage, access control, delete after demos
- Device-side
facearchives are local-only; clear records before handover - Jurisdictional compliance (e.g. PIPL/GDPR): face collection requires explicit notice and separate consent — post signage at the deployment site
9. Support
- Community: Discord / GitHub Discussions
- Customization / protocol integration / volume deployment: contact us
Learn More
- Solution Description
- NeoEyes NE302 overview
- NE302 Data Transmission (MQTT / Webhook)
- Open-source project (firmware / web / model / mock backend / protocol docs): github.com/camthink-ai/ne302