Hello World
This tutorial uses a minimal Hello World application to demonstrate the complete lifecycle of an NE503 container application: write application → build ARM64 image → upload and deploy → start → verify in Web Console → view logs → clean up. This minimal closed loop is the foundation for iterating on any subsequent AI application.
Hello World does not depend on the AI SDK — it prints a counter in a loop, used to verify that the development environment and deployment pipeline work end to end.
Don't want to build the image yourself? Download the prebuilt package hello-world.tar, unzip it to get app.yaml and image.tar, and follow §4 to deploy to the device.
1. Prerequisites
| Condition | Verification |
|---|---|
| NE503 device online and running | Open http://<device-ip>:8080 in a browser; the Web login page should appear |
| Docker installed on the dev machine | docker --version reports >= 20.10 |
| Dev machine can reach the device | curl -o /dev/null -w "%{http_code}" http://<device-ip>:8080 returns 200 |
| Device login credentials | Web Console defaults to admin / password (change after first login) |
The NE503 device uses ARM64 architecture. Apple Silicon (M-series) development machines are also ARM64 and support native builds at higher speed. On x86 machines, Docker buildx uses QEMU emulation — slower but fully functional.
- Docker on the dev machine is only used for
docker buildxcross-arch image builds (see §3) — a one-time action on the dev machine. - The device runs containers via containerd; apps run on the device without depending on Docker (the device OS ships with docker, but container orchestration is handled entirely by containerd — nothing for you to install or configure).
2. Application Structure
The Hello World app consists of three files (full source in the repo at apps/hello-world/):
hello-world/
├── app.py          # App logic
├── app.yaml        # Manifest (resources/permissions/config)
└── Dockerfile      # Container build definition
app.py — pure Python, prints a counter in a loop and handles SIGTERM for graceful exit (the platform sends SIGTERM when stopping an app):
import os, time, signal

class HelloWorldApp:
    def __init__(self):
        self.running = True
        self.app_id = os.environ.get("APP_ID", "hello_world")  # injected by the platform
        self.counter = 0
        signal.signal(signal.SIGTERM, self._signal_handler)

    def _signal_handler(self, signum, frame):
        self.running = False

    def run(self):
        while self.running:
            self.counter += 1
            print(f"[{time.strftime('%Y-%m-%d %H:%M:%S')}] #{self.counter:06d} - Hello World from AIPC!")
            time.sleep(1)

if __name__ == "__main__":
    HelloWorldApp().run()
app.yaml — the manifest, declaring the image, resource limits, and startup policy (Hello World needs no permissions):
apiVersion: v1
kind: Application
metadata:
  id: hello-world
  name: Hello World
  version: 1.0.0
  description: A simple hello world application that prints continuously
spec:
  image: aipc/hello-world:1.0.0      # must match the docker build -t tag
  resources:
    cpu: "10%"
    memory: "32Mi"
  autostart: false
  restart_policy: on-failure
  restart_max_retries: 3
Dockerfile — based on python:3.11-alpine, small footprint:
FROM python:3.11-alpine3.19
WORKDIR /app
COPY app.py /app/app.py
ENV PYTHONUNBUFFERED=1
ENV APP_ID=hello_world
CMD ["python3", "/app/app.py"]
3. Build the Image
In the app directory, build the ARM64 image, export it as a tar, then package it as an .aipc installer:
cd apps/hello-world

# 1. Build the ARM64 image (--load loads it into local Docker)
docker buildx build --platform linux/arm64 --load -t aipc/hello-world:1.0.0 .

# 2. Export the image as a tar
docker save aipc/hello-world:1.0.0 -o image.tar

# 3. Package as .aipc (a zip of app.yaml + image.tar)
zip hello-world.aipc app.yaml image.tar
Build artifacts (real):
| Artifact | Size |
|---|---|
| Docker image | 26.5 MB (113 MB on disk) |
image.tar | 25 MB |
hello-world.aipc | 25 MB |
.aipcis just a zip archive ofapp.yaml+image.tar, convenient for storage and distribution. Deploying to the device uses theimage.tarandapp.yamlinside it (see next section); the.aipcitself is not uploaded via the API.
On macOS + Docker Desktop, apk add occasionally fails with Failed to create ...: I/O error. This is a known intermittent buildx issue — re-running the build command succeeds.
4. Deploy to the Device
After building, you have app.yaml and image.tar. Three deployment options — Web Console recommended (graphical, no SSH):
All three options need app.yaml and image.tar as two separate files. After the manual build in §3, both are in the app directory. If you used the repo's apps/<app>/build.sh (which deletes the intermediate image.tar after packaging .aipc), run unzip -o <app>.aipc first.
4.1 Upload via Web Console (recommended)
-
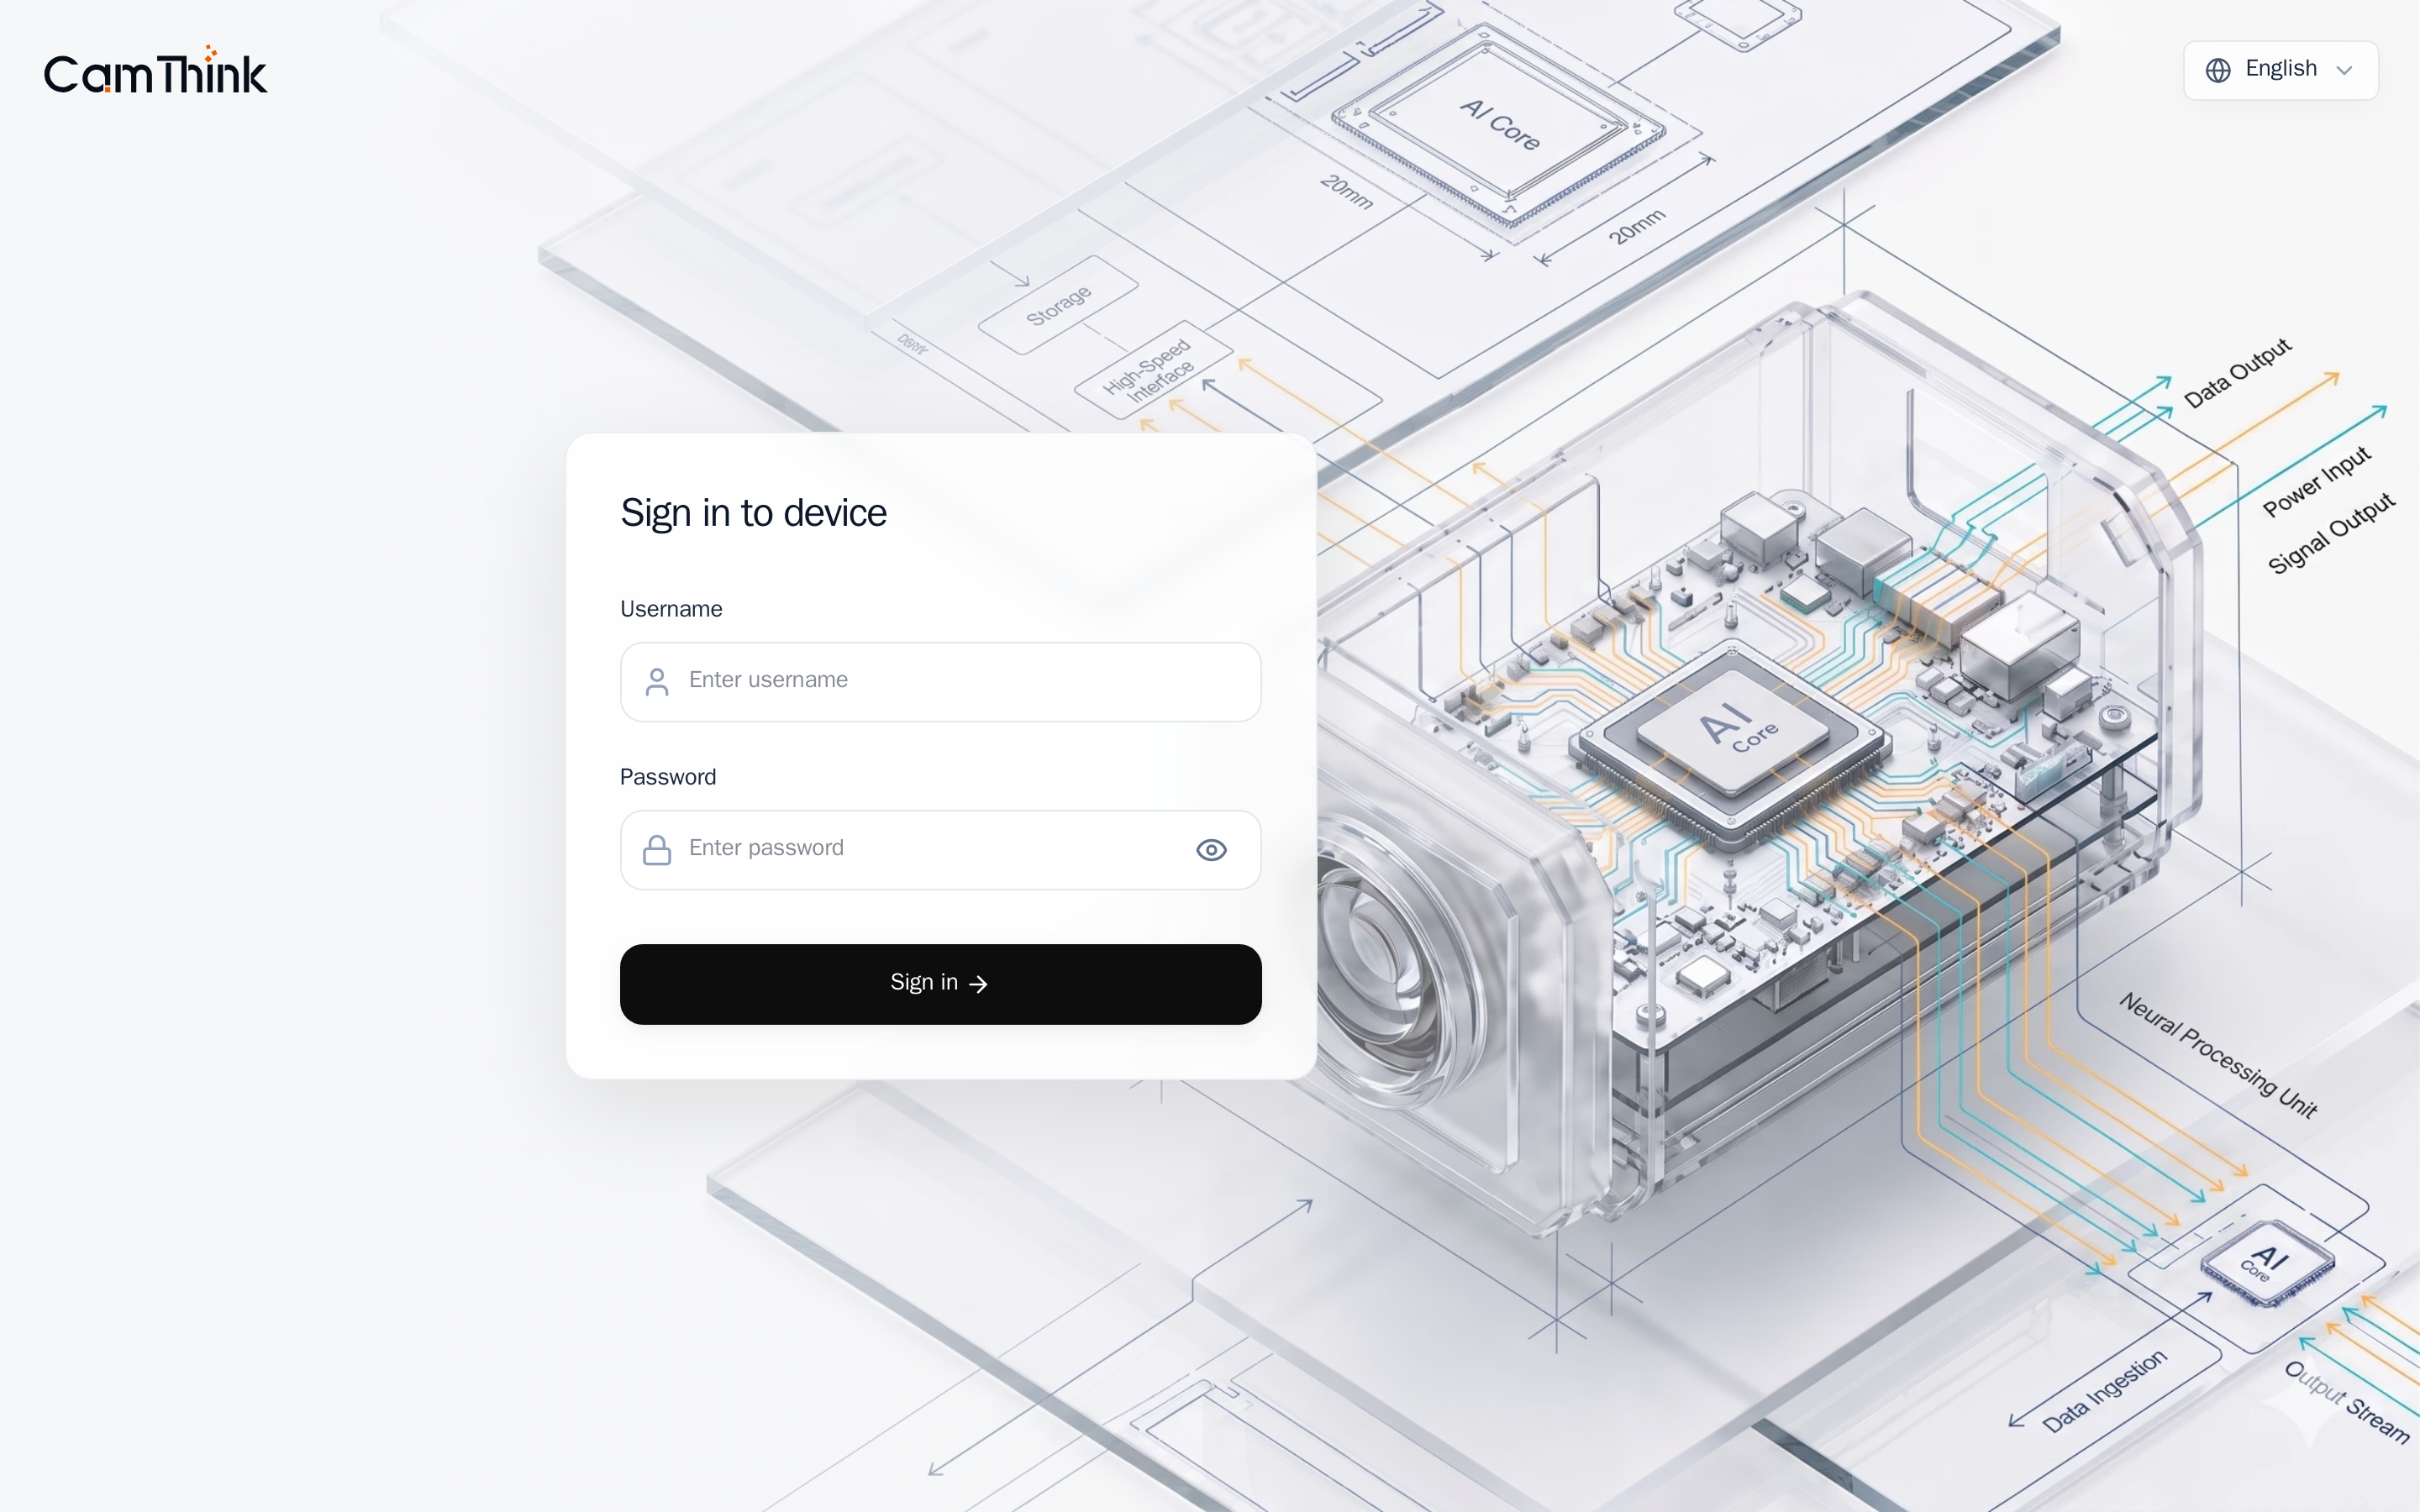
Open the Web Console at
http://<device-ip>:8080and log in with the defaultsadmin/password. -
Click App Management in the left nav to open the app list. Click the Import card in the top-right.
-
The Application Setup Wizard opens. In the first step Source, pick the third option Upload Package — it accepts both the
app.yamlmanifest and the image file. -
Under App Manifest (app.yaml), click Choose File and select your
app.yaml; under Container Image, selectimage.tar.
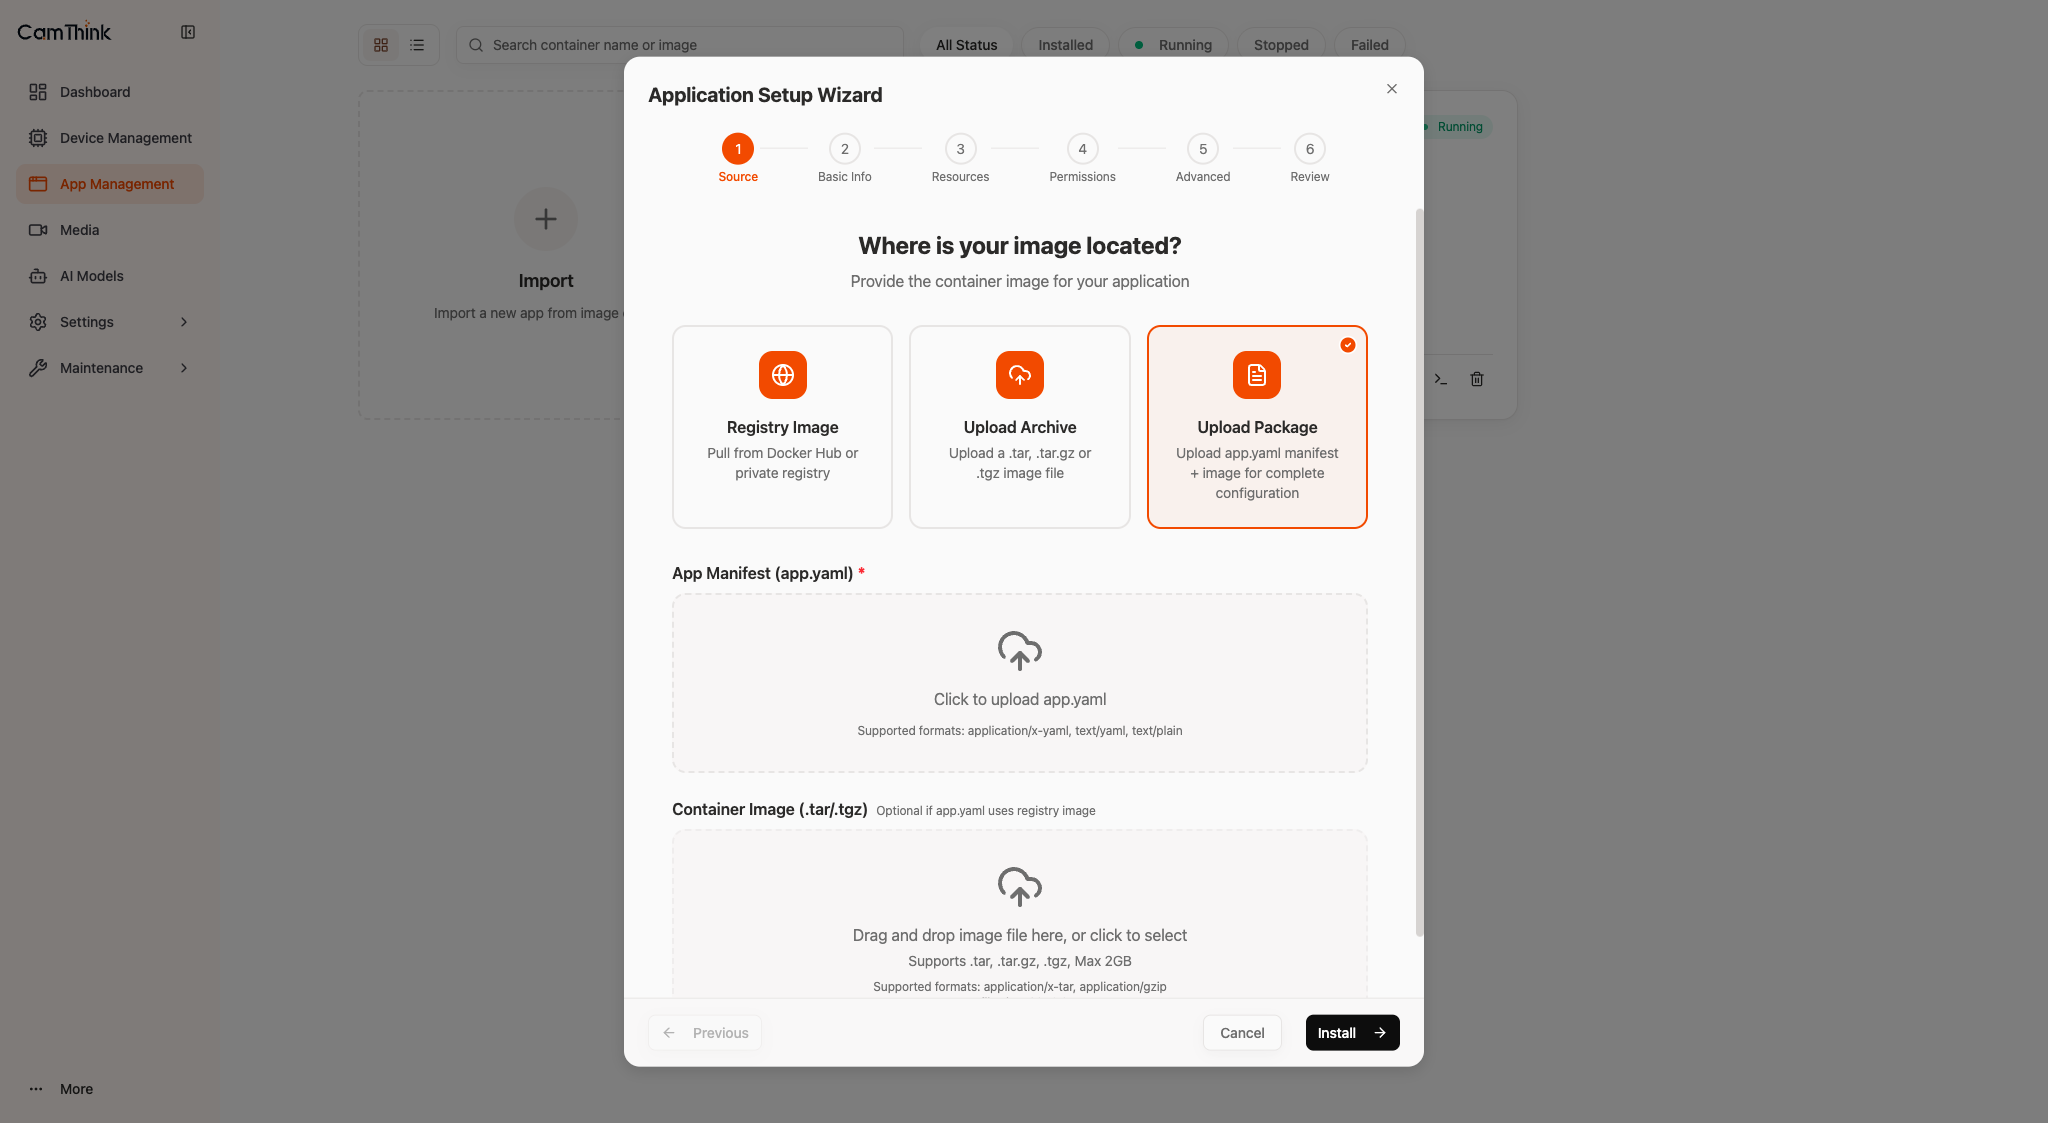
- Click Install in the bottom-right. The wizard runs the remaining steps (parse manifest → import image → register app), usually in 10–15 seconds. Hello World then appears in the app list (initially Stopped; started in the next section).
4.2 Deploy via aipc-cli (alternative)
If you already SSH'd into the device, the platform's bundled aipc-cli installs it in one command. First copy app.yaml and image.tar to the device:
scp app.yaml image.tar root@<device-ip>:/tmp/
ssh root@<device-ip>
Then on the device:
aipc-cli app install app.yaml image.tar
4.3 Deploy via HTTP API (alternative)
Suited to scripting / CI automation. The flow is two-step upload + async install: log in for a token → upload the image and manifest separately → trigger the install and poll progress.
The legacy single-file upload
curl -F 'app=@xxx.aipc' /api/v1/appsno longer works — the two-step flow below is required.
# Log in for a token (the returned value carries a "Bearer " prefix; pass the whole string as the Authorization header)
curl -X POST http://<device-ip>:8080/api/login \
  -H "Content-Type: application/json" \
  -d '{"username":"admin","password":"password"}'

# Upload image and manifest (field name is "file" for both; each returns its path)
curl -X POST http://<device-ip>:8080/api/v1/apps/upload-image \
  -H "Authorization: Bearer <token>" -F "file=@image.tar"
curl -X POST http://<device-ip>:8080/api/v1/apps/upload-manifest \
  -H "Authorization: Bearer <token>" -F "file=@app.yaml"

# Trigger the async install (JSON body with the two paths above), then poll the returned task_id until phase=complete
curl -X POST http://<device-ip>:8080/api/v1/apps/install-package \
  -H "Authorization: Bearer <token>" -H "Content-Type: application/json" \
  -d '{"manifest_path":"<manifest path>","image_path":"<image path>","force":true}'
# → {"data":{"task_id":"0f26285a"}}
curl http://<device-ip>:8080/api/v1/apps/install-progress/<task_id> \
  -H "Authorization: Bearer <token>"
Usually completes in 10–15 seconds.
5. Start and Verify
5.1 Start the app
After deployment the app is in Stopped state; start it once manually. Either option works.
Option 1: Web Console (recommended)
Go to App Management, find the Hello World card (Stopped), and click Start. The status badge switches from Stopped to Running within a few seconds.
Option 2: HTTP API
curl -X POST http://<device-ip>:8080/api/v1/apps/hello-world/start \
  -H "Authorization: Bearer <token>"
On first start of an image, the platform loads it into the container runtime, which may exceed the 10-second API timeout and return code:6002 DeadlineExceeded. This is not an error — call start once more (or click Start again in the Web UI) and it succeeds.
5.2 Verify in the Web Console
Log into http://<device-ip>:8080 (admin / password) and confirm the app is running from a user's perspective:
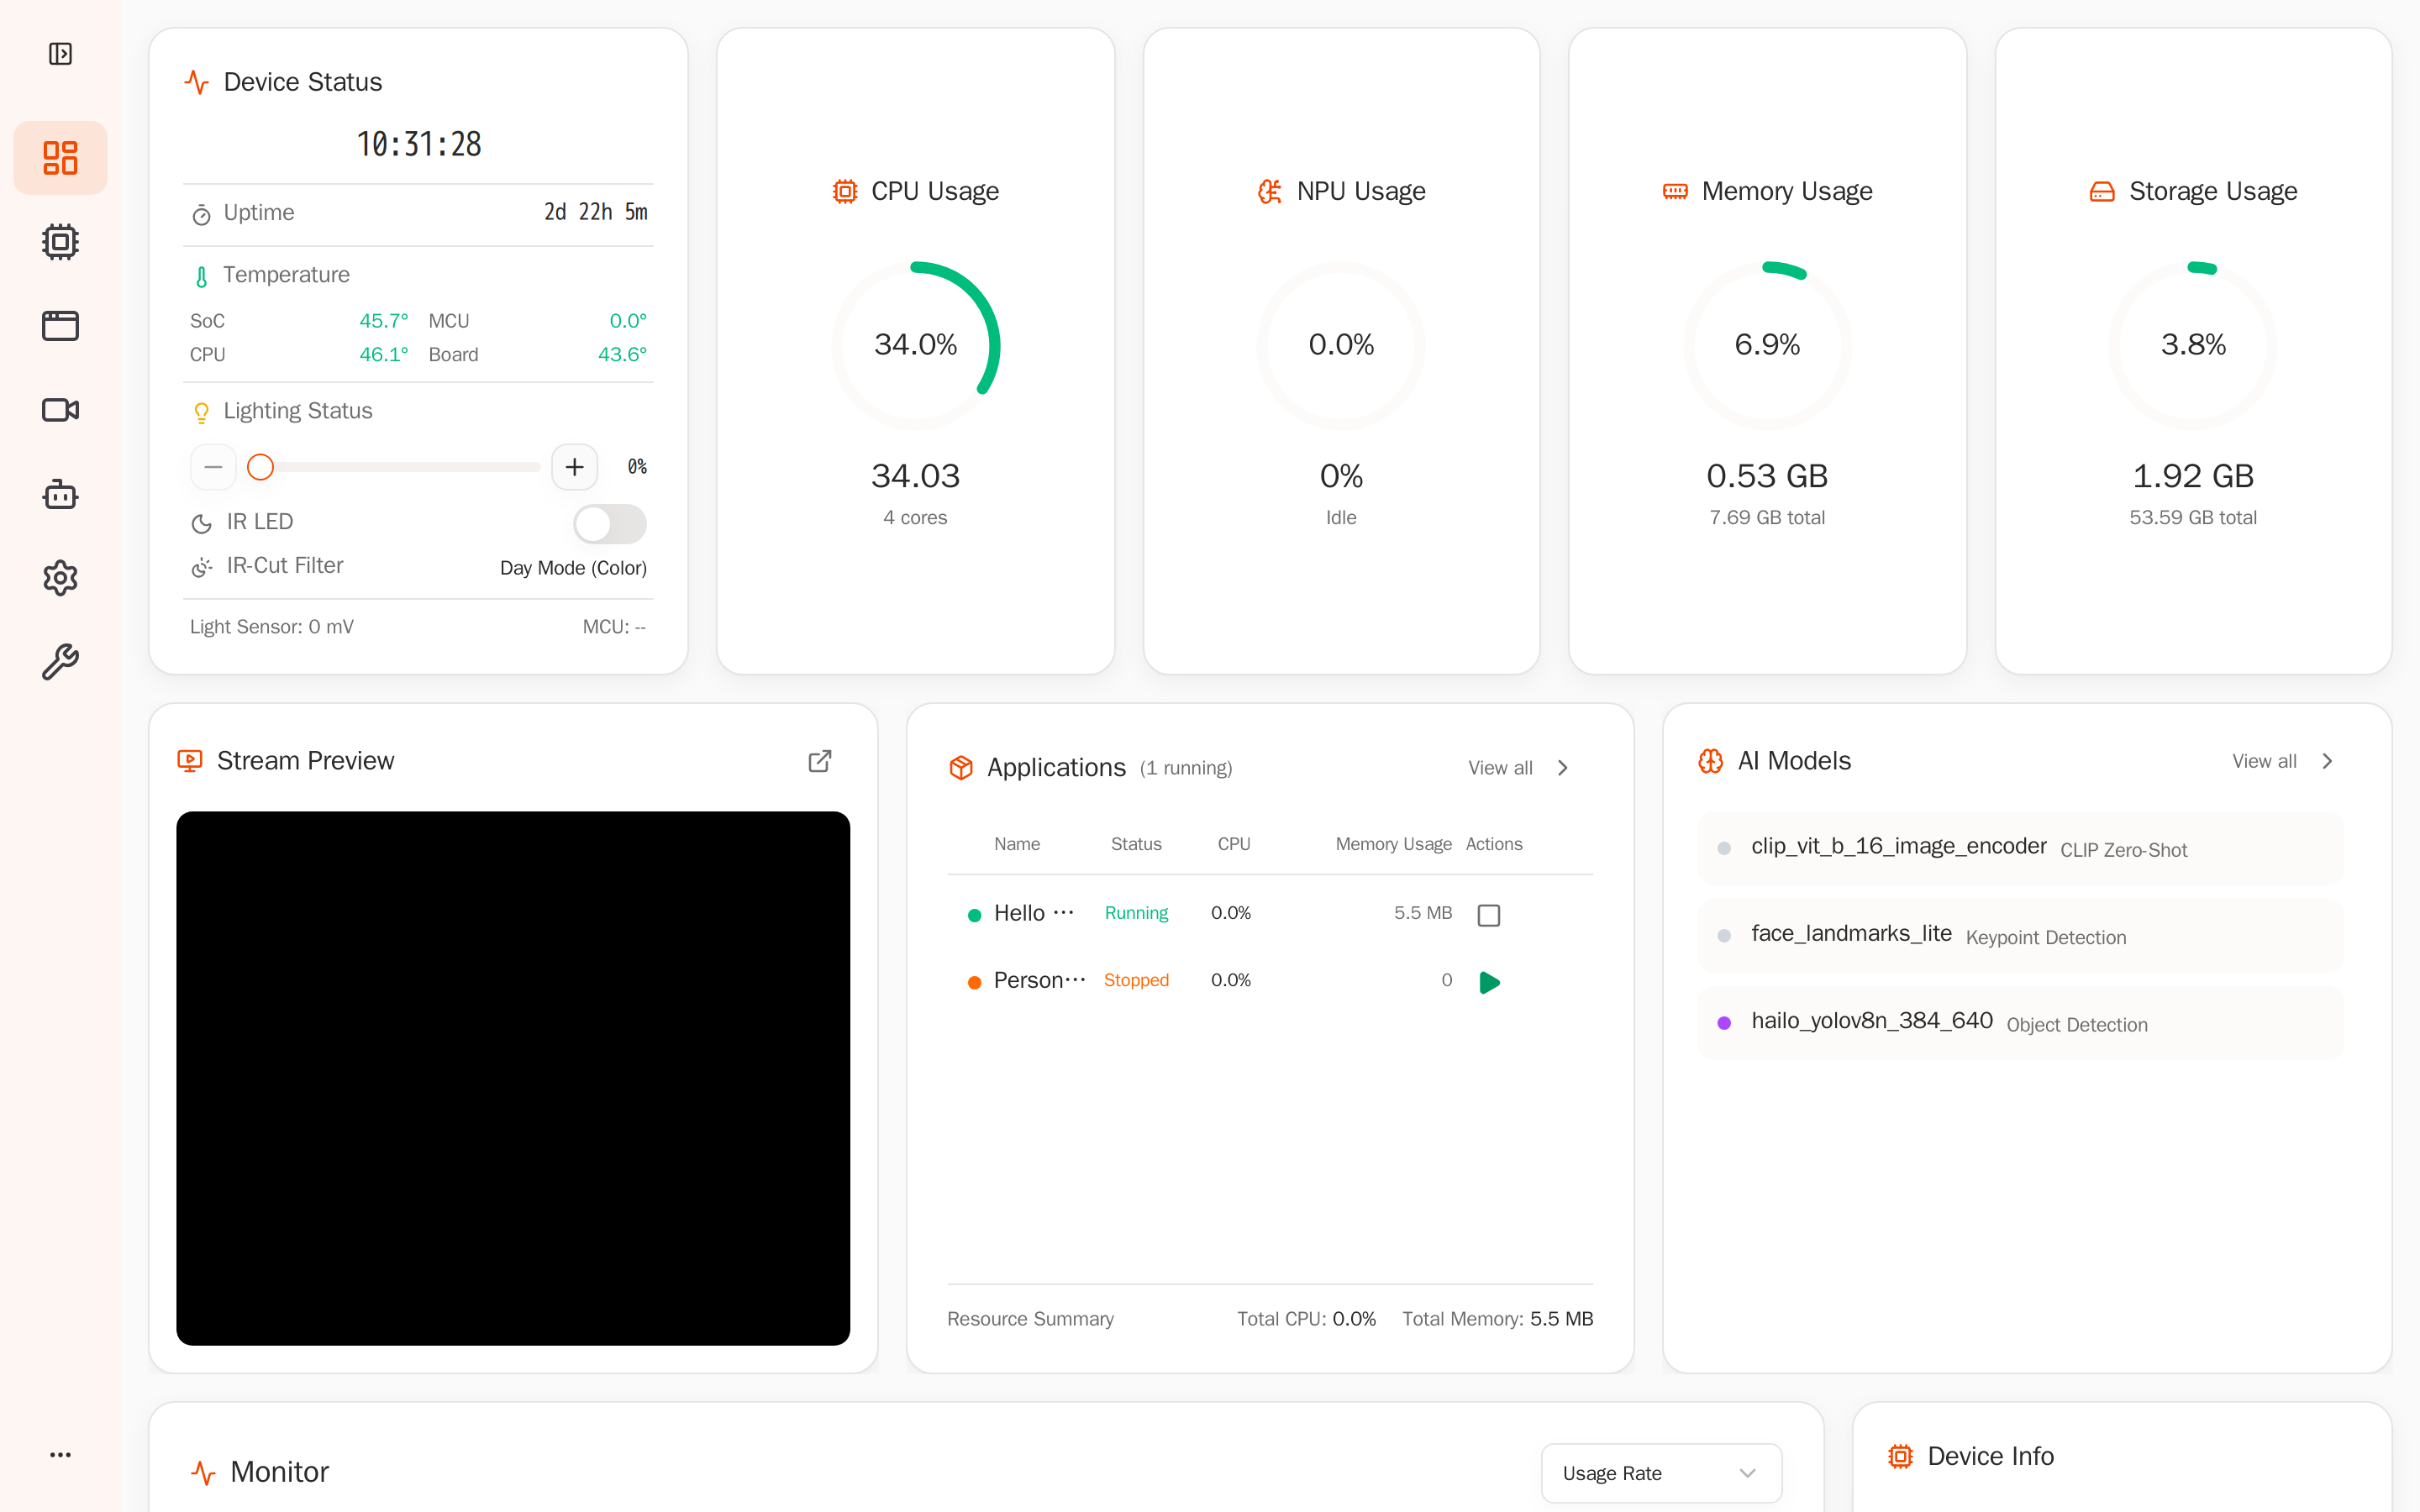
The Dashboard shows device status at the top; the Applications area in the middle lists running apps:
Under Applications on the left, Hello World is Running with live resource usage:
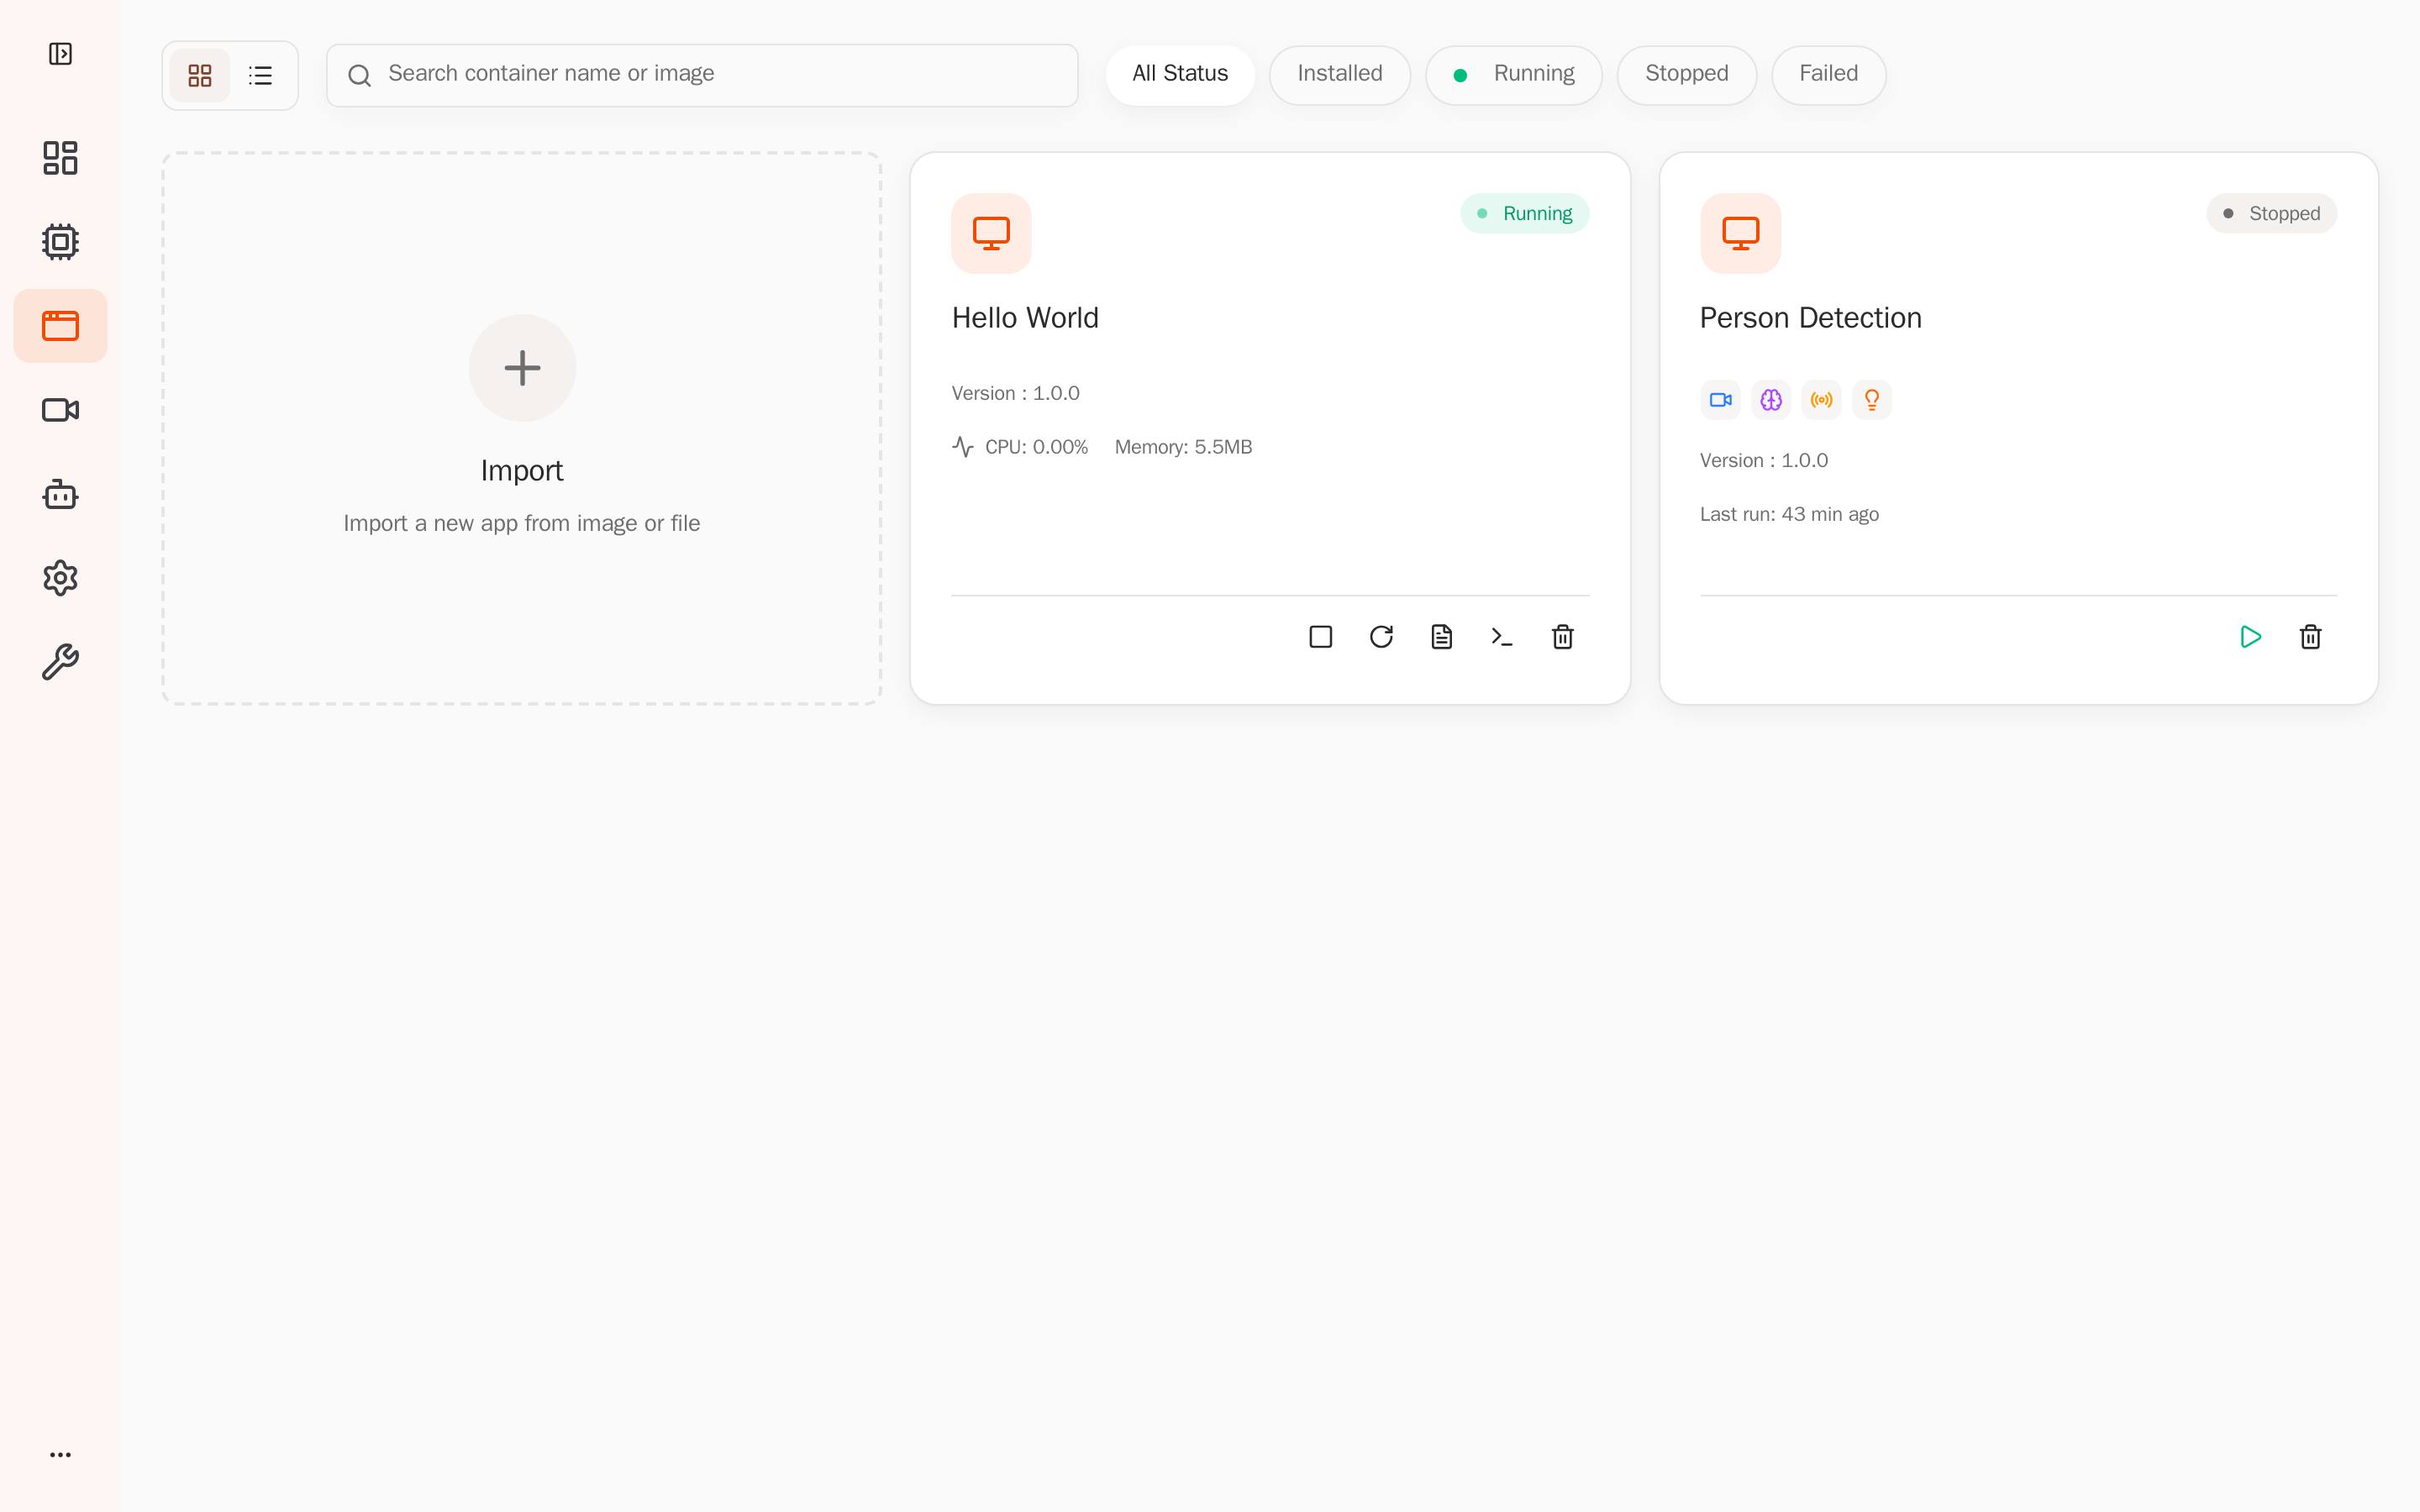
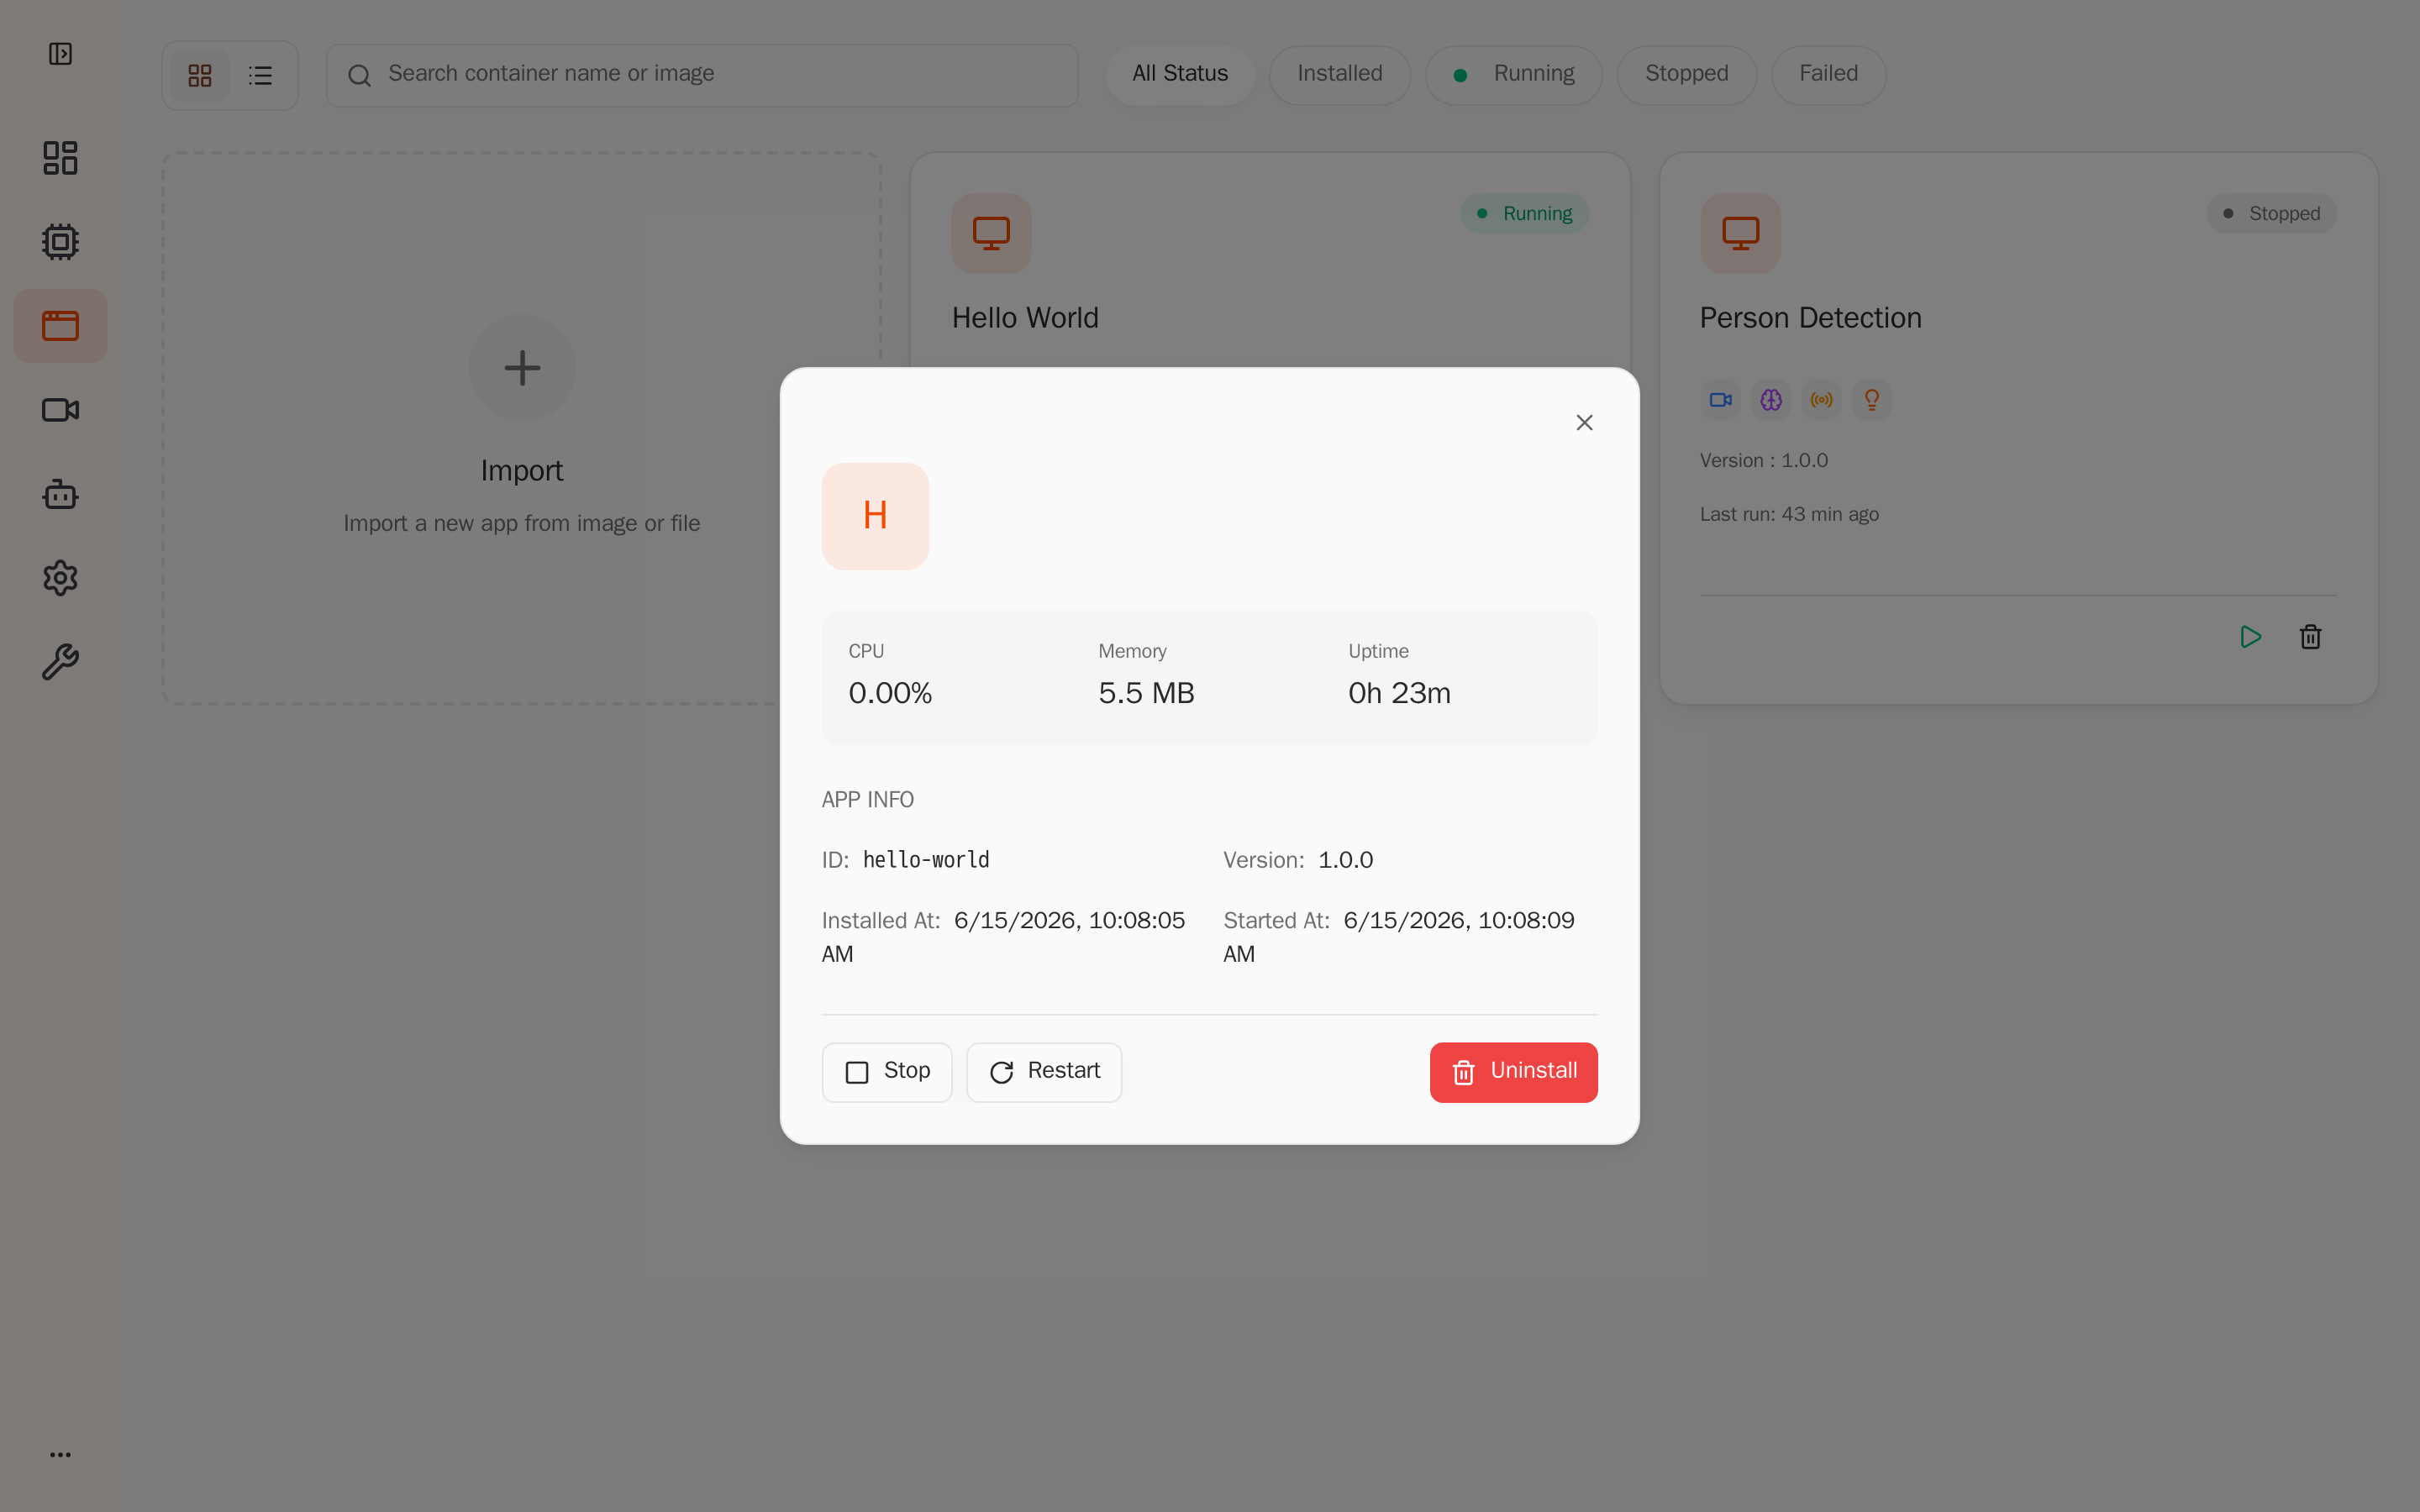
The detail page shows app ID, version, uptime, and Stop / Restart / Uninstall actions — the app is now managed by the platform:
5.3 View runtime logs
App logs can also be fetched via the API (returns NDJSON, one JSON object per line):
curl "http://<device-ip>:8080/api/v1/apps/hello-world/logs?max_lines=10" \
  -H "Authorization: Bearer <token>"
{"timestamp":1781509897838838800,"level":"info","message":"[2026-06-15 07:51:23] #000011 - Hello World from AIPC!"}
{"timestamp":1781509897838892960,"level":"info","message":"[2026-06-15 07:51:24] #000012 - Hello World from AIPC!"}
{"timestamp":1781509897838901400,"level":"info","message":"[2026-06-15 07:51:25] #000013 - Hello World from AIPC!"}
The counter increments once per second, confirming the app is running steadily.
6. Stop and Clean Up
After verification, stop and uninstall the app:
# Stop
curl -X POST http://<device-ip>:8080/api/v1/apps/hello-world/stop -H "Authorization: Bearer <token>"
# → {"data":{"message":"App stopped successfully"}}

# Uninstall
curl -X DELETE http://<device-ip>:8080/api/v1/apps/hello-world -H "Authorization: Bearer <token>"
# → {"data":{"message":"App uninstalled successfully"}}
7. Summary
This tutorial covered the complete closed loop for an NE503 container application:
- Write — the
app.py+app.yaml+Dockerfiletrifecta - Build —
docker buildx build --platform linux/arm64→docker save→zip .aipc - Deploy — Web Console upload (recommended) / aipc-cli / HTTP two-step upload — pick one
- Verify — confirm Running in the Web Console + check logs for output
- Clean up — stop + uninstall