PIR Sensor Integration
This guide describes how to connect a PIR (Passive Infrared) motion sensor to the NE301 and set up an on-demand capture pipeline using MQTT data forwarding and the NeoMind platform.
1. Overview
1.1 Why Use a PIR Sensor
In scenarios such as security monitoring, construction site surveillance, and wildlife observation, continuous recording generates large amounts of irrelevant footage, wasting storage and bandwidth while increasing the effort required to filter meaningful data. A PIR (Passive Infrared) motion sensor outputs a signal upon detecting target movement, triggering the device to capture only event-driven frames and ensuring each capture contains actionable data.
The NE301 supports both battery and external power. In battery-powered deployments, PIR-triggered capture is critical — the device remains in a low-power state when no activity is detected and wakes up only on motion events, significantly extending battery life. With external power, PIR triggering still reduces redundant data and lowers storage and transmission overhead.
1.2 Solution Architecture
The end-to-end data flow is as follows:
PIR Sensor (NP624M-F) → NE301 Capture → MQTT Forwarding → NeoMind Platform
- PIR Sensor: Detects human motion and outputs a trigger signal
- NE301: Receives the trigger signal and performs capture
- MQTT Forwarding: Pushes captured data to a specified MQTT Broker via the MQTT protocol
- NeoMind: Edge AI platform built on large language models, managing devices via MQTT with support for automation rule engines and data visualization dashboards (GitHub)
1.3 Prerequisites
| Item | Requirement |
|---|---|
| Hardware | NE301 device, PIR sensor (e.g., NP624M-F) |
| Software | NeoMind platform account, accessible MQTT Broker |
| Network | NE301 can reach the MQTT Broker and NeoMind platform |
2. Hardware Preparation and Connection
2.1 Required Materials
| Component | Description |
|---|---|
| NE301 device | FSBL version 1.0.3 or later required |
| PIR sensor | e.g., NP624M-F, digital dual-element, RF interference resistant |
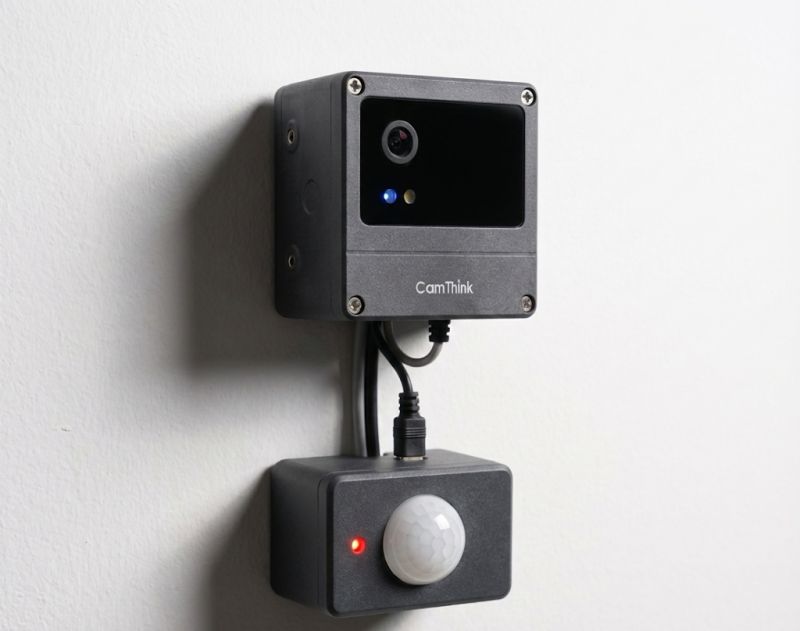
2.2 Installation
Connect the PIR sensor to the PIR header on the NE301 mainboard, ensuring the sensor faces the target detection area. After installation:
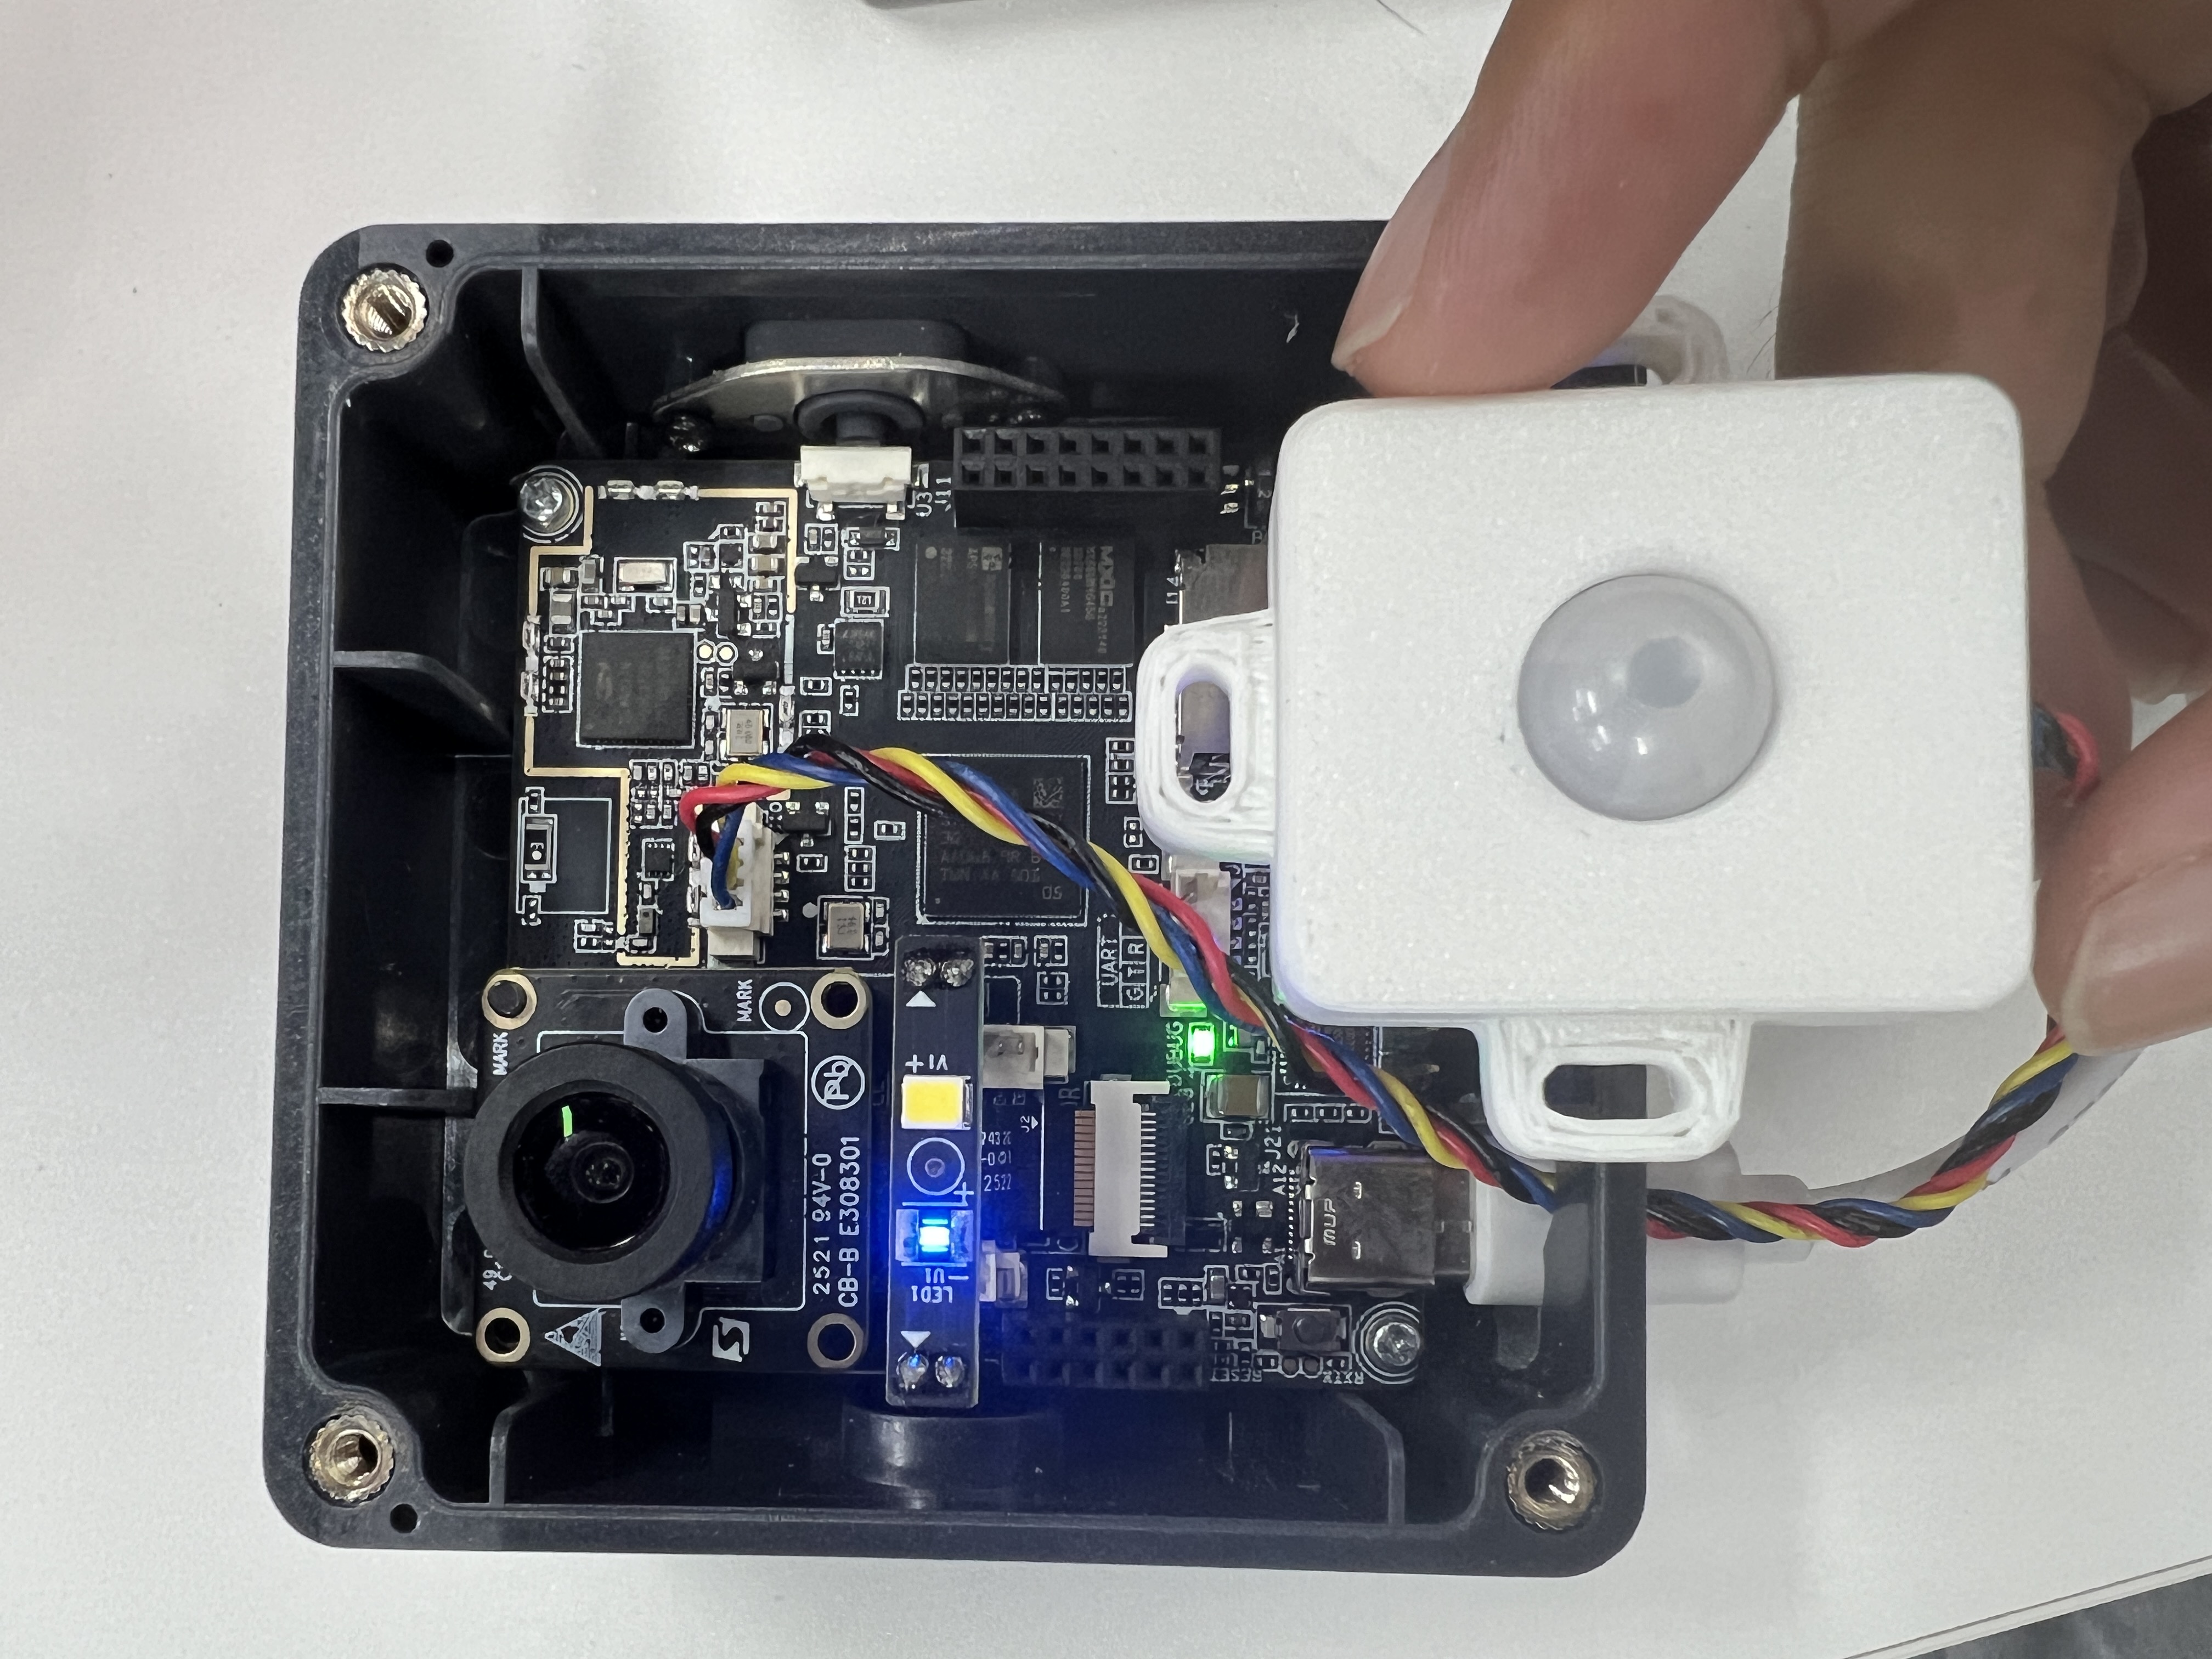
To connect a different PIR sensor model, refer to the PIR Sensor Header (STM32U073KBU6) pinout in the Hardware Connection Guide.
3. PIR Sensor Configuration
3.1 Check Device Status
Log in to the NE301 web configuration interface and verify the device is operating normally:

Confirm the following:
- Network connection is active
- Model configuration is correct
- MQTT configuration is correct
3.2 Configure PIR Parameters
Navigate to the PIR sensor configuration page and adjust parameters based on your deployment scenario:
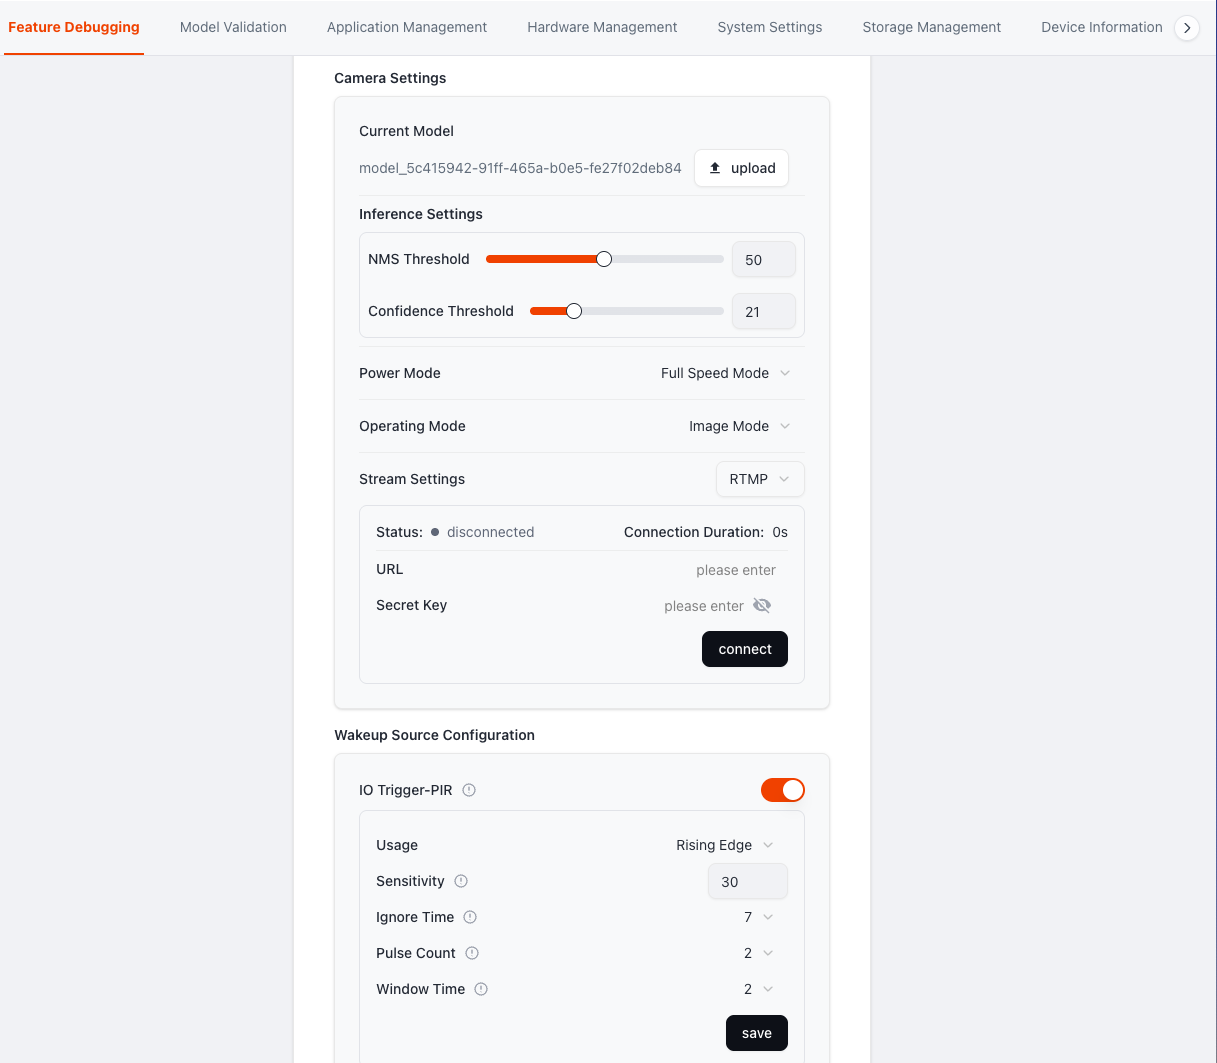
Key Configuration Items:
| Parameter | Description | Recommended Value |
|---|---|---|
| IO Trigger-PIR | Enable PIR trigger; PIR can wake the device for capture | On |
| Usage | Trigger mode: Rising Edge, Falling Edge, or Both Edges | Rising Edge |
| Sensitivity | Sensitivity value; lower values increase sensitivity and detection range. Indoor recommended: 30–40 | 30 |
| Ignore Time | Post-trigger ignore period. N = N×0.5+0.5 s (e.g., 7 → 4 s) | 7 |
| Pulse Count | Number of pulses after trigger. Higher values improve noise immunity but slightly reduce response speed | 2 |
| Window Time | Maximum time window for pulse occurrence. M = M×2+2 s (e.g., 2 → 0–6 s) | 2 |
4. MQTT Data Forwarding Configuration
4.1 MQTT Forwarding Overview
After a PIR-triggered capture, the NE301 forwards captured data to a specified MQTT Broker via the MQTT protocol. The NeoMind platform auto-discovers and registers devices via MQTT, subscribes to the corresponding topics to receive data, and processes events through its data dashboard and automation rule engine.
4.2 Configuration Steps
Step 1: Navigate to the MQTT forwarding settings page

Step 2: Enter MQTT Broker information
| Configuration | Description |
|---|---|
| Broker Address | MQTT server address |
| Port | MQTT service port (typically 1883 or 8883) |
| Username | MQTT authentication username |
| Password | MQTT authentication password |
| Topic | Data publishing topic; must match the NeoMind subscription topic |
Step 3: Save and test the connection
After saving, perform a PIR trigger test to confirm that data is being forwarded correctly via MQTT.
5. NeoMind Platform
5.1 Device Management and Data Dashboard
The NeoMind platform auto-discovers and registers NE301 devices via MQTT, providing device management and data dashboard functionality. Users can monitor PIR trigger events, captured data, and device status in real time through the visual interface.
5.2 Capture Data Display
When the PIR sensor detects motion and triggers a capture, the NeoMind dashboard displays the corresponding event record and captured data:
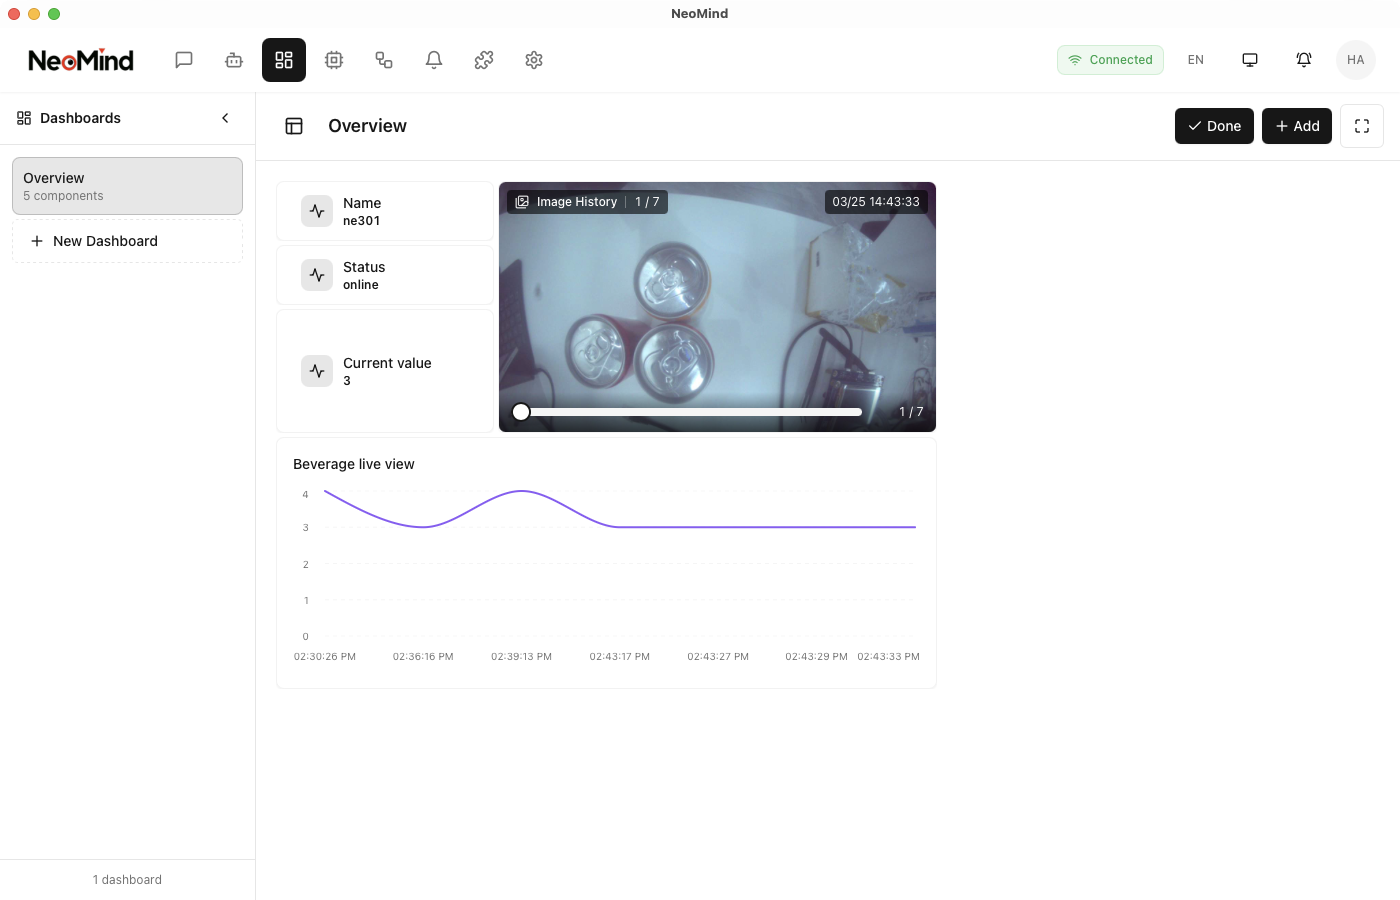
The dashboard shows:
- Trigger event timeline
- Capture image preview
- Event statistics
5.3 Further Configuration
For detailed NeoMind platform configuration and usage, refer to the NeoMind Quick Start.
6. Integration Testing
After completing all configurations above, verify the pipeline as follows:
- Confirm hardware is connected properly, device is online, and PIR is enabled
- Walk in front of the PIR sensor and verify the NE301 responds with a capture
- Check the NeoMind dashboard to confirm captured data has arrived with event records and image previews displaying correctly
- Verify the device enters low-power state when no motion is detected
7. Troubleshooting
| Issue | Troubleshooting |
|---|---|
| PIR not triggering | Decrease Sensitivity value / decrease Ignore Time / verify sensor connection |
| No capture data | Check MQTT Broker address, port, credentials, and network connectivity |
| Dashboard shows no data | Confirm MQTT publish topic matches the NeoMind subscription topic |
| Excessive battery drain | Increase Sensitivity value or Ignore Time to reduce unnecessary triggers |
8. Appendix
References
PIR Sensor Specifications (Example)
| Parameter | Value |
|---|---|
| Model | NP624M-F |
| Type | Digital dual-element |
| Supply Voltage | 1.6–3.6 V |
| Current Consumption | 5 μA |
| Feature | RF interference resistant |
Join Developer Community
Chat with developers about technical issues Get the latest product updates and tutorials

GitHub Repository
Submit issues to report problems View source code and contribute
Last updated: 2026-04-02