Windows WSL Source Build And Flash
Audience: users who build and flash NE301 from source in a Windows + WSL setup (via Docker) after following Development Environment Setup and System Flashing And Initialization. Use this as a reference and adjust based on your hardware situation.
Key steps are shown below:
1. Environment Preparation
- Install/enable
- Windows 10/11 + WSL2 (Ubuntu recommended).
- Docker Desktop, and in Settings → Resources → WSL Integration, enable your distro.
- STLink driver: https://www.st.com/en/development-tools/stsw-link009.html?utm_source=chatgpt.com#get-software
- STM32CubeProgrammer: https://www.st.com/en/development-tools/stm32cubeprog.html#get-software (handy for verifying the debugger and cable)
- Clone the repo (inside WSL)
git clone https://github.com/camthink-ai/ne301.git
cd ne301 - Fix CRLF scripts
Some scripts turn into CRLF on Windows and error with
$'\r': command not found. Convert them to LF in WSL:sed -i 's/\r$//' Script/generate-reloc-model.sh - Confirm WSL can run Docker commands:
docker versionshould print client info.
2. Pass ST-LINK Through To WSL
-
In elevated PowerShell, install usbipd-win (skip if already installed):
winget install --exact dorssel.usbipd-win -
Plug in ST-LINK and list devices:
usbipd listNote the ST-LINK
<busid>(for example, maybe 2-3). -
Force bind and enable auto-attach to all WSL2 distros:
usbipd bind --force --busid <busid>
usbipd attach --wsl --auto-attach --busid <busid>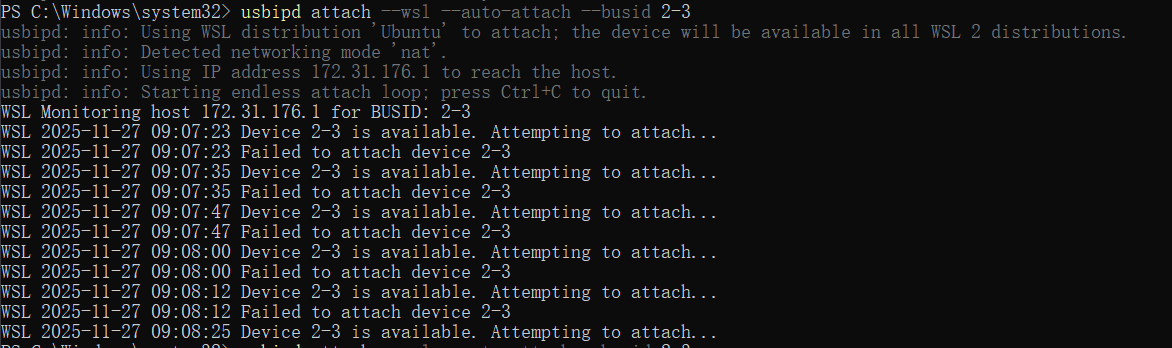

-
If prompted, reboot Windows and rerun the commands.
-
If attach fails, try
usbipd detach --busid <busid>,usbipd unbind --busid <busid>,wsl --shutdown, replug ST-LINK, then bind/attach again.
Tip: If STM32CubeProgrammer is connected to the ST-LINK, disconnect it before passing through to WSL.
-
-
Back in WSL, verify:
lsusbSeeing
0483:3748 STMicroelectronics ST-LINK/V2means pass-through succeeded. If ST-LINK disappears after re-enumeration, repeat the PowerShell attach steps.
3. Start The Docker Dev Container
In the repo directory inside WSL (use $(pwd); avoid \ line breaks in PowerShell):
docker run -it --rm --privileged \
  -v "$(pwd)":/workspace \
  -v /dev/bus/usb:/dev/bus/usb \
  camthink/ne301-dev:latest
If you must run it in PowerShell, put it on one line or use the backtick
`for continuation. If the host lacks/dev/bus/usbyou cannot pass USB; running inside WSL is still recommended.
After entering the container, confirm the toolchain and ST-LINK:
STM32_Programmer_CLI -l
If ST-LINK is not listed, re-check the usbipd attach status.
4. Build + Flash Flow
- Recommended one-liner (inside the container):
make flash - Build only:
make          # FSBL + App + Web + Model
make app # same as single module build - Flash components individually:
make flash-fsblmake flash-appmake flash-webmake flash-modelmake flash-wakecore
5. Common Issues & Fixes
5.1 Docker reports invalid reference format
PowerShell cannot use \ for line continuation; use a single-line command or backtick `. Running inside WSL is recommended.
5.2 $'\r': command not found
Scripts were converted to CRLF. Run sed -i 's/\r$//' <file> or switch to LF in your editor.
5.3 usbipd attach fails / device disappears
- Run commands in elevated PowerShell.
- Replug the device, then
usbipd detach/unbind→wsl --shutdown→usbipd bind --force→usbipd attach --wsl --auto-attach.
5.4 Unable to get core ID / No STM32 target found
- Usually a bad connection or the chip crashed: check SWDIO/SWCLK/GND/NRST wiring and common ground; verify DIP switches and power.
- Try low frequency + hard reset:
Press and hold Reset while running it if needed.
STM32_Programmer_CLI -c port=SWD mode=UR reset=HARD_RST freq=1000
5.5 External Flash erase fails (optional)
- Erase manually:
STM32_Programmer_CLI -c port=SWD mode=UR reset=HARD_RST freq=1000 \
-e 0x70000000 0x70300000 - Write again:
STM32_Programmer_CLI -c port=SWD mode=UR reset=HARD_RST freq=1000 \
-d build/ne301_App_signed_pkg.bin 0x70100000 -v - If it still fails, check power/cables or try Mass Erase in the GUI with the External Loader.
5.6 STM32_Programmer_CLI -l shows no ST-LINK info
Example:
root@1e35ac8374ea:/workspace# STM32_Programmer_CLI -l
Detected locale "C" with character encoding "ANSI_X3.4-1968", which is not UTF-8.
Qt depends on a UTF-8 locale, and has switched to "C.UTF-8" instead.
If this causes problems, reconfigure your locale. See the locale(1) manual
for more information.
-------------------------------------------------------------------
STM32CubeProgrammer v2.19.0
-------------------------------------------------------------------

===== DFU Interface =====

No STM32 device in DFU mode connected

===== J-Link Interface =====
No J-Link/flasher probe detected.
===== STLink Interface =====
No ST-Link detected!

===== UART Interface =====

Total number of serial ports available: 0

root@1e35ac8374ea:/workspace#
If the container cannot see any ST-LINK/serial devices, USB is not passed through or nothing is connected. Troubleshoot as follows:
- On the host/WSL, check devices:
lsusbshould show something like “STMicroelectronics ST-LINK/V2”. Installsudo apt install usbutilsin WSL iflsusbis missing. - In WSL, use
usbipd wsl listto see status. If not attached, runusbipd wsl attach --busid <busid>, then confirm withlsusb. - Container run args must include USB pass-through:
--privileged -v /dev/bus/usb:/dev/bus/usb. If the current container lacks USB, exit and re-run docker with these flags. - Re-enter the container and run
lsusb; once ST-LINK appears,STM32_Programmer_CLI -lshould list it. - Ensure the board is powered, cables are good, and no other program (e.g., VSCode debugger, STM32_Programmer Connect) is occupying the ST-LINK.
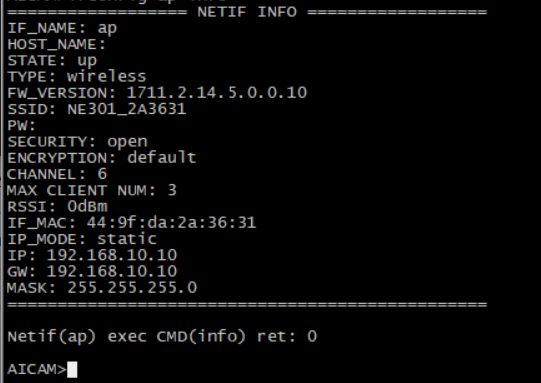
6. Tips For Getting The Device MAC
After flashing, reboot the device (Reset or power cycle) and connect to the WiFi AP named NE301{MAC last 6 letters letters}. If only one NE301 is nearby, just connect; for multiple devices, confirm the MAC:
- After it joins the LAN, find the MAC from your router/switch DHCP lease or ARP list. If you know the device IP, in Windows run:
ping <device IP>
arp -a <device IP> - Or check the label on the unit directly.
- Or watch the boot serial log (prints the device MAC).
After connecting a serial console, run ifconfig wifi ap to view the output.
7. Special Case
If the environment is set up and flashing succeeds but the device WiFi AP still will not start, the WiFi firmware may not be updated. Join our Discord for further help.
8. Wrap-up
Using the WSL environment, the above steps let you reproduce the flows in Development Environment Setup and System Flashing And Initialization on Windows + WSL while avoiding common pitfalls. Cross-reference this with the original docs—hope it helps!