Data Transforms
Data Transforms let NeoMind automatically process telemetry data after device data is written to Telemetry (triggered by the write event, millisecond-scale) — using a JavaScript function to convert raw metrics into derived metrics. For example:
- Celsius → Fahrenheit
- Raw voltage + current → computed power
- Device online state → human-readable status text
- Invoke extension commands to process data (e.g. YOLO detection → extract confidence)
Derived metrics from transforms can be used just like regular device metrics in dashboards, rules, and AI Agents.
Rules vs Transforms
| Dimension | Rules | Transforms |
|---|---|---|
| Purpose | Condition evaluation → execute actions | Data processing → generate new metrics |
| Output | Notifications / commands / Agent calls | New telemetry metrics (bindable to dashboards/rules) |
| Logic | JSON conditions + actions | JavaScript code |
| Timing | Fires when condition is met | Real-time transform per data point |
Interface Overview
Switch to the Transforms tab in the Automation page:
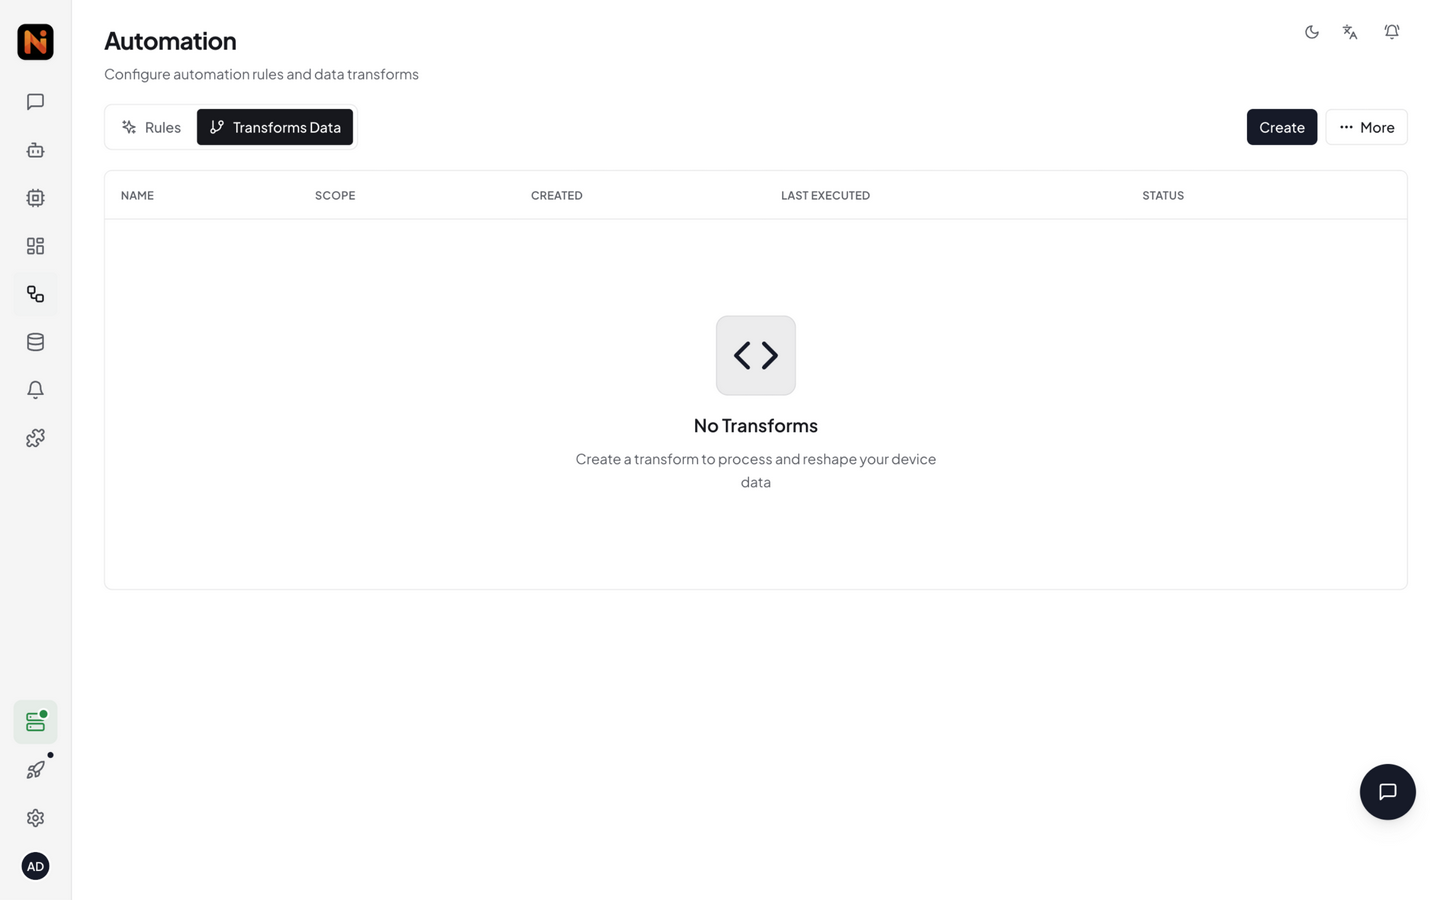
The page displays all transforms in a table, each row containing:
| Column | Description |
|---|---|
| Name | Transform display name |
| Scope | Global / Device Type / Device |
| Created | When the transform was created |
| Last Executed | When it last ran |
| Status Toggle | Enable / disable switch |
| Actions Menu | Edit, export, delete |
The Import / Export button in the top right lets you bulk import/export transform JSON.
Creating a Transform via Web UI
Step 1: Open the Transform Builder
In the Transforms tab, click the Create button to open the full-screen builder:
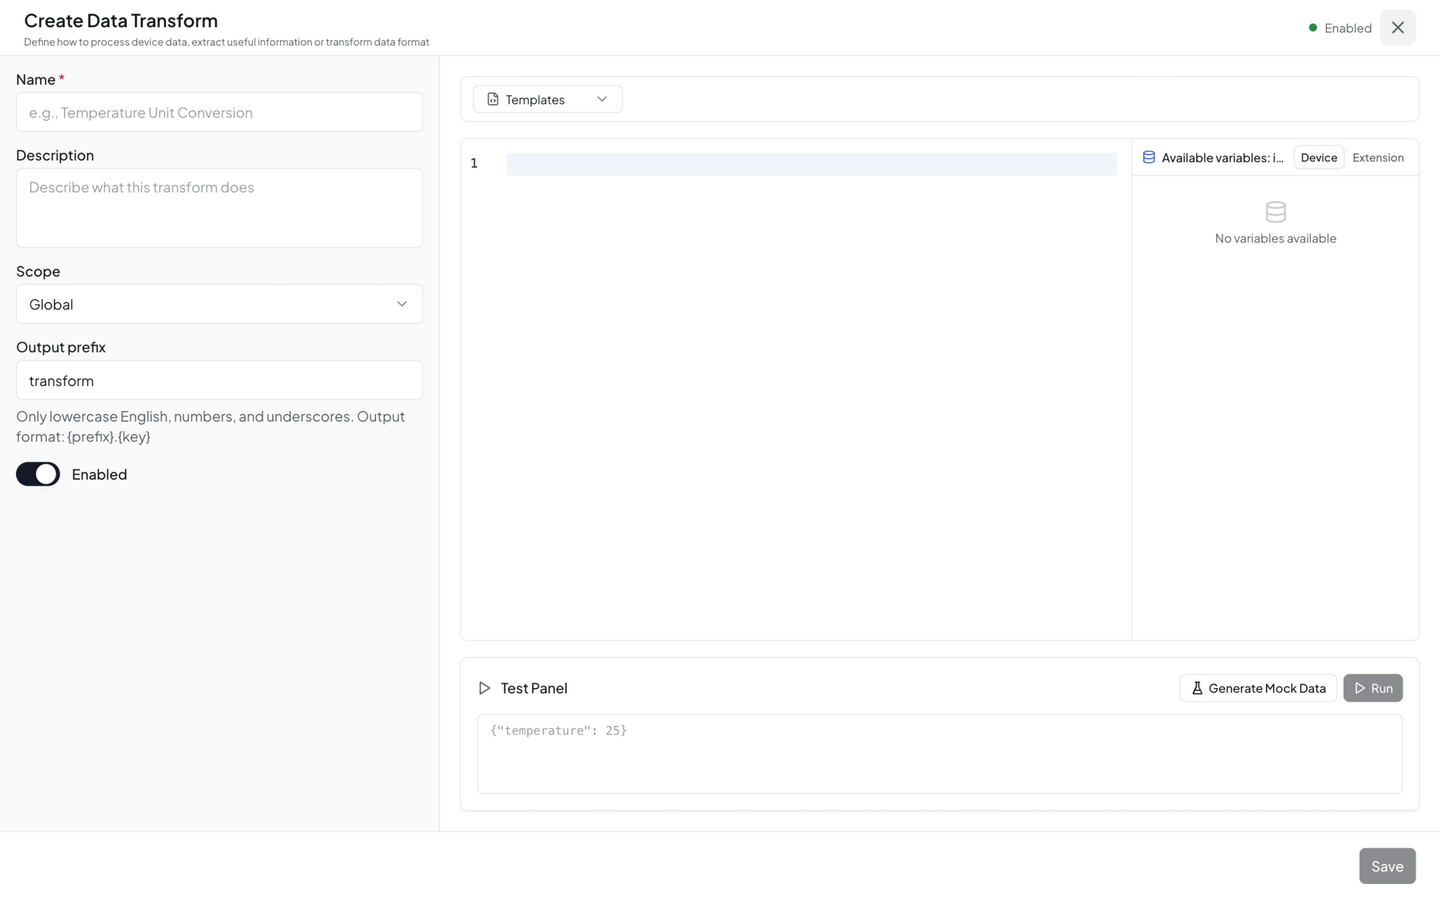
The builder uses a split-pane layout:
| Area | Description |
|---|---|
| Left · Config Rail | Name, description, scope, output prefix, complexity |
| Right · Code Workspace | JavaScript code editor + variables panel + test strip |
Step 2: Fill in Basic Info
| Field | Description |
|---|---|
| Name | Transform display name |
| Description | Optional, explains the transform's purpose |
| Output Prefix | Naming prefix for derived metrics. If set to converted, output metrics are named converted.temp_f |
| Complexity | Number 1–5, used for execution ordering (lower complexity executes first) |
Step 3: Select Scope
Scope determines which devices' data the transform processes:
| Scope | Description | Use Case |
|---|---|---|
| Global | Processes all devices' data | Universal transforms (e.g. unit conversion) |
| Device Type | Only processes data from a specified device type | Batch transforms for similar devices |
| Device | Only processes a single device's data | Custom transforms for a specific device |
Step 4: Write the Transform Code
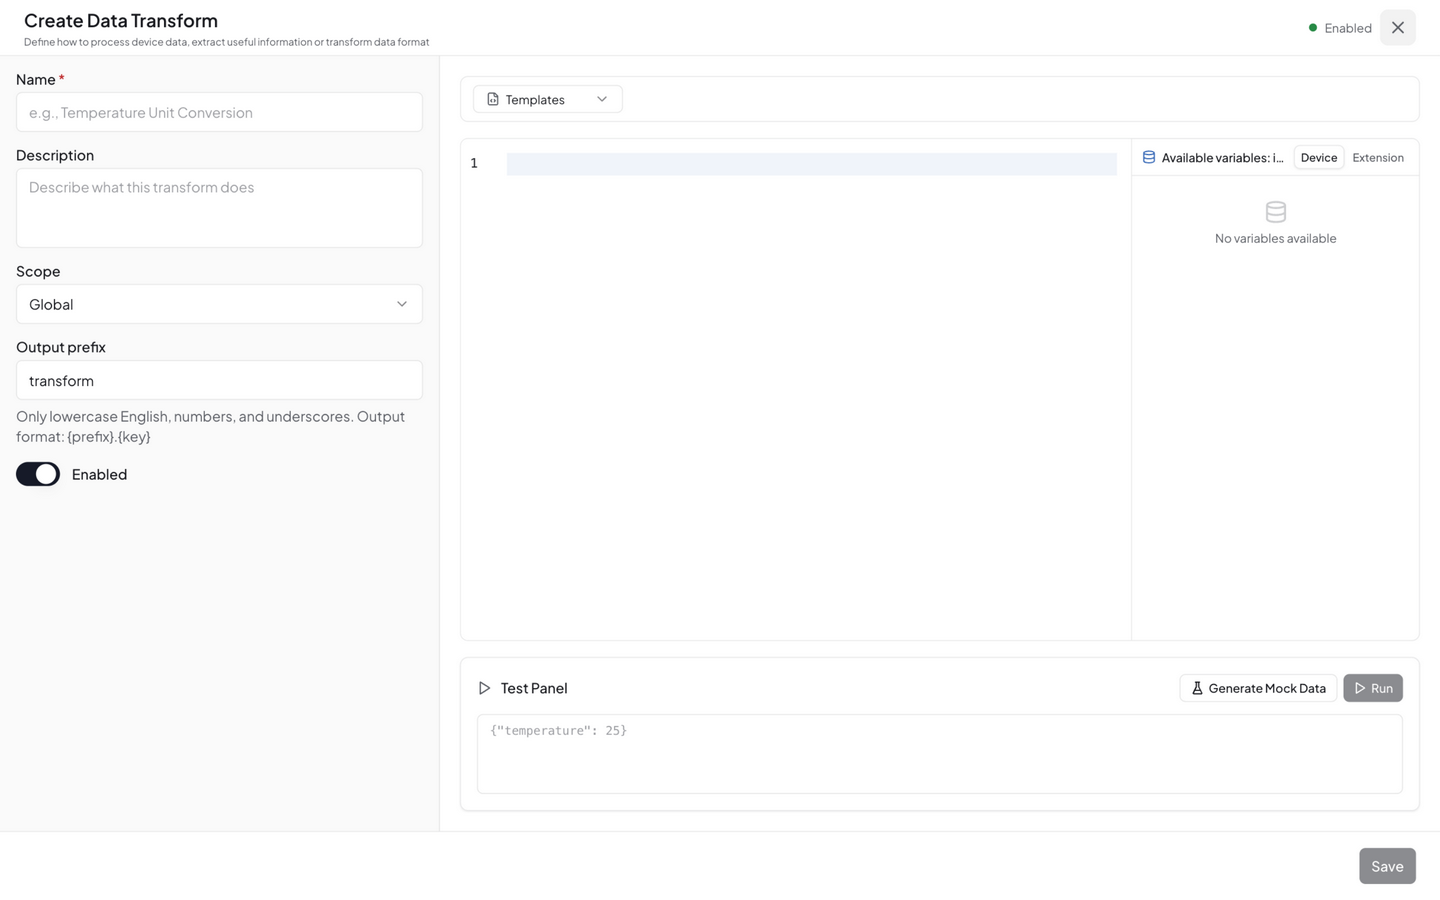
Write the transform function in JavaScript in the code editor. The input variable holds the input value — single-key metric objects (e.g. {"temperature": 25}) are auto-unwrapped to the scalar so it can be used directly; access the full input object via input_raw. return an object as output:
// Celsius to Fahrenheit
return {
  temp_f: input * 9/5 + 32
}
Available variables:
| Variable | Description |
|---|---|
input | The input data — single-key metric objects (e.g. {"temperature": 25}) are auto-unwrapped to the scalar so it can participate in arithmetic directly |
input_raw | The full input data object (no auto-unwrap) |
extensions.invoke(ext_id, command, params) | Invoke an extension command; returns the extension's result |
input auto-unwrap rules — know exactly what your code receives before writing it; this is the single biggest factor in whether a transform "just works" or errors out:
| Device data shape | Value of input | Value of input_raw | How to write code |
|---|---|---|---|
Scalar (e.g. 25) | 25 | 25 | input * 9/5 + 32 |
Single-key object {"temperature": 25} | 25 (auto-unwrapped) | {"temperature": 25} | Use input * 9/5 + 32 directly; use input_raw.temperature when you need the key name |
Multi-key object {"temperature": 25, "humidity": 60} | The object as-is | Same as input | input.temperature * 9/5 + 32 |
The same input * 9/5 + 32 works with {"temperature": 25} (single key, auto-unwrapped) but yields NaN with {"temperature": 25, "humidity": 60} (multi-key). If a transform must be reused across device types with uncertain input shapes, write defensively: return { temp_f: (input_raw.temperature ?? input) * 9/5 + 32 }. Always verify both shapes with the test strip before saving.
Variables panel: The left panel lets you insert device metrics and extension data sources. After selecting a device type, all its metrics are listed — click to insert into code. You can also select extension commands from the extension panel to generate invocation code.
Step 5: Test the Transform
The test strip at the bottom of the builder lets you validate the transform with mock data:
- Enter a mock value in the test input (e.g.
25) - Click Test
- Check the output result
After testing, click Save to save the transform.
How Transforms Work
Derived metrics are registered with the DataSourceId format transform:<transform_id>:<prefix>.<field>, e.g. transform:9a1b2c3d…:converted.temp_f, and appear grouped under the Transform type in data source pickers. These metrics can be:
- Bound as data sources in dashboards
- Referenced in rule conditions
- Bound in Agent Focused mode
Transform Examples
1. Celsius to Fahrenheit
return {
  temp_f: input * 9 / 5 + 32
}
Output metric: converted.temp_f
2. Compute Power (Voltage × Current)
// Assume input contains voltage and current
return {
  power: input.voltage * input.current,
  power_kw: (input.voltage * input.current) / 1000
}
3. Device Status Text
return {
  status_text: input === 1 ? "Online" : "Offline",
  is_online: input === 1
}
4. Invoke Extension to Process Image
// Call YOLO extension for object detection
const result = extensions.invoke('yolo-video', 'detect', {
  data: input
})

return {
  detections: result.detections,
  object_count: result.detections.length,
  has_person: result.detections.some(d => d.class === 'person')
}
5. Call an Extension for External Data (extensions.invoke)
extensions.invoke(extension_id, command, params) is not limited to images — any command of any installed extension can be called. For example, use a weather extension to add outdoor context to a temperature reading:
// Fetch current weather (extension ID and command name per the Extensions page)
const weather = extensions.invoke('weather.ext', 'get_current', { location: 'Beijing' })

return {
  temp_f: input * 9/5 + 32,
  outdoor_temp: weather.temp_f || 0
}
Before running your code, the transform engine scans it for extensions.invoke(...) calls, executes those extension commands asynchronously first, then injects the results into the code context — so the syntax above reads values synchronously, no await needed. Missing extensions or failed invocations are recorded in the execution record's warnings (see output.warning_count in step 3 of the complete lifecycle example).
6. Numeric Range Classification
let level = 'normal'
if (input > 80) level = 'critical'
else if (input > 60) level = 'warning'
else if (input > 40) level = 'notice'

return {
  level: level,
  level_value: { normal: 0, notice: 1, warning: 2, critical: 3 }[level]
}
Complete Lifecycle Example: From Creation to Dashboard
Here is the full journey in one real scenario: a device reports Celsius; we derive a Fahrenheit metric and put it on a dashboard.
Step 1 · Create the transform via CLI
# (Optional) validate the logic first — nothing is persisted
neomind transform test-code \
  --code 'return { temp_f: input * 9/5 + 32 }' \
  --input '{"temperature": 25}'

# Create and enable
neomind transform create \
  --name "Fahrenheit Converter" \
  --scope global \
  --code 'return { temp_f: input * 9/5 + 32 }' \
  --output-prefix converted \
  --enabled true
Once created, neomind transform list shows it (with ID, scope, output prefix). --scope accepts global (all devices), device_type:TH Sensor (a type), or device:sensor-01 (a single device).
Step 2 · Device data arrives; the transform runs automatically
Nothing to trigger manually — when sensor-01 publishes {"temperature": 25}, the transform engine matches the scope, executes the code within milliseconds, and writes the derived metric converted.temp_f = 77 into the time-series store. The derived metric's full identity is transform:<transform_id>:converted.temp_f.
Step 3 · Confirm the execution
neomind transform executions <transform_id> --limit 20
A real execution record looks like this (status: "completed" means success):
{
  "id": "7c44cb8f-…",
  "automation_id": "f010c73c-…",
  "automation_type": "transform",
  "started_at": 1788930297329,
  "ended_at": 1788930297338,
  "status": "completed",
  "error": null,
  "output": { "metric_count": 1, "warning_count": 0 }
}
To see the metric values themselves, feed a test data point through the transform and inspect the output:
curl -X POST http://localhost:9375/api/automations/transforms/<transform_id>/test \
  -H "Authorization: Bearer <JWT>" -H "Content-Type: application/json" \
  -d '{ "device_id": "sensor-01", "data": {"temperature": 25} }'
The metrics array in the response is exactly what the transform produces (identical to what gets written to the time-series store when real data arrives):
{
  "success": true,
  "data": {
    "transform_id": "f010c73c-…",
    "metrics": [{
      "device_id": "sensor-01",
      "transform_id": "f010c73c-…",
      "metric": "converted.temp_f",
      "value": 77.0,
      "timestamp": 1788930297,
      "quality": 1.0
    }],
    "count": 1,
    "warnings": []
  }
}
Step 4 · Bind it on a dashboard
Open the dashboard editor, add a widget (Chart / Value) → find the Transform group in the data source picker → select converted.temp_f (full ID like transform:f010c73c-…:converted.temp_f) → save. From then on, every incoming device data point updates the derived metric on the dashboard in real time. Rule conditions can reference the same metric too (e.g. converted.temp_f > 170 triggers an alert).
CLI Management
# Create a transform (Celsius → Fahrenheit; access the input value via `input` in JS)
neomind transform create \
  --name "Fahrenheit Converter" \
  --scope global \
  --code 'return { temp_f: input * 9/5 + 32 }' \
  --output-prefix converted \
  --enabled true

# List all transforms / view details
neomind transform list
neomind transform get <id>

# View recent executions (first stop when "the code ran but produced no output")
neomind transform executions <id> --limit 20

# Enable / disable
neomind transform enable <id>
neomind transform disable <id>

# Delete
neomind transform delete <id>
REST API
# Create transform
curl -X POST http://localhost:9375/api/automations \
  -H "Content-Type: application/json" \
  -d '{
    "name": "Fahrenheit Converter",
    "description": "Convert Celsius to Fahrenheit",
    "type": "transform",
    "enabled": true,
    "definition": {
      "scope": "global",
      "js_code": "return { temp_f: input * 9/5 + 32 }",
      "output_prefix": "converted",
      "complexity": 2
    }
  }'

# List all transforms
curl http://localhost:9375/api/automations

# Update transform
curl -X PUT http://localhost:9375/api/automations/<id> \
  -H "Content-Type: application/json" \
  -d '{"name": "Updated Name", "definition": {"scope": "global", "js_code": "...", "output_prefix": "converted", "complexity": 2}}'
Import / Export
The Import / Export button in the Transforms tab supports bulk management. You can also select Export from an individual transform's actions menu to export a single transform.
Export file format: neomind-transforms-YYYY-MM-DD.json.
Integration with Other Modules
| Module | Description |
|---|---|
| Dashboards | Transform output metrics can be bound as dashboard widget data sources |
| Automation Rules | Rule conditions can reference transform output transform:<prefix>:<field> metrics |
| AI Agent | Agent Focused mode can bind transform output metrics |
| Devices | Transforms process raw telemetry published by devices |
| Extensions | Transform code can call extensions.invoke() to execute extension commands |
Best Practices
- Use Output Prefixes wisely: Set different prefixes for different transforms (e.g.
converted,status,aggregated) to avoid metric name collisions - Test before saving: The builder's Test feature quickly validates code logic without waiting for real data
- Complexity ordering: Transforms that depend on other transforms' output should have higher complexity to ensure correct execution order
- Minimize scope: Use Device Type instead of Global when possible to reduce unnecessary transform overhead
- Keep code lightweight: Transforms execute on every data point — keep code simple (avoid complex loops/recursion)
Mobile
On mobile, the interface switches to a single-column layout supporting list viewing and status toggling. Edit transforms on desktop (the code editor needs screen space).
Next Steps
- Automation Rules — Reference transform-derived metrics in rule conditions
- Use Dashboards — Bind derived metrics as dashboard widget data sources
- Extensions — Call extension commands from transforms via
extensions.invoke()
Last updated: 2026-09-09