Face Recognition Solution
Turn images captured by NE101/NE301 cameras into identity recognition results with the Face Recognition extension (
face-recognition) — SCRFD detects faces, ArcFace matches them against the face gallery, and results flow into the dashboard, automation rules, and AI Chat.
1. Overview
The Face Recognition extension for NeoMind detects faces and identifies individuals from images captured by connected devices: the SCRFD model detects faces, and ArcFace extracts 512-dimensional face feature vectors that are matched against the face gallery for identity recognition. Once bound to a device's image stream, every snapshot is automatically detected and recognized, with results displayed in real-time on the dashboard and queryable via AI Chat using natural language.
Typical Application Scenarios:
| Scenario | Description |
|---|---|
| Access Control | Identify personnel entering and leaving, enabling smart access management |
| Attendance Tracking | Automatically recognize employees' facial features and log attendance |
| Visitor Registration | Compare visitors against registered personnel to distinguish known from unknown individuals |
| Security Monitoring | Detect and identify individuals in surveillance footage in real-time |
Data Flow:
| Stage | Description |
|---|---|
| Image Capture | NE101/NE301 captures images via timed snapshots or event triggers |
| Face Detection & Recognition | The extension detects faces (SCRFD), extracts features, and matches them against the gallery (ArcFace); unmatched faces are labeled unknown |
| Result Display | The dashboard shows face bounding boxes, identity labels, and confidence scores in real time, with history support |
| AI Chat Query | Query historical recognition records and statistics using natural language |
2. Bill of Materials (BOM)
Beyond a camera and the platform, all face-recognition inference (detection + feature matching + gallery storage) runs locally on the NeoMind host — no extra server needed. A local LLM is only required if you want AI Chat queries.
| Item | Specification | Purpose | Required |
|---|---|---|---|
| Smart Camera | NE101 or NE301 | Image capture | ✅ |
| NeoMind Platform | v0.9.0+ (Download) | Edge AI management | ✅ |
| Face Recognition Extension | face-recognition 2.7.x | Face detection and identity recognition | ✅ |
| Local LLM | Ollama | AI Chat backend | Optional |
3. Prerequisites
3.1 NeoMind Installation and Configuration
Complete the NeoMind installation, registration, and basic configuration first. For detailed steps, refer to NeoMind Quick Start.
3.2 Device Registration
Register your NE101 or NE301 with the NeoMind platform:
- Navigate to the Device Management page in NeoMind
- Click Add Device and select the device type (NE101 or NE301)
- Confirm the device info (device ID and topic are auto-generated, or customize them)
- Save and wait for the device to come online
For detailed steps, refer to NeoMind Quick Start - Device Management.
3.3 Verify the Device Is Online
- The Devices page shows the newly added device (e.g.,
ne101-gate) with an online status. - In the device details, confirm there is an image metric — face recognition binding uses the image metric named
imageby default; make sure it keeps updating when the device captures images. - Note the device ID: you will need it for binding and for metric references (DataSourceId format:
device:<deviceID>:<metric>).
4. Install the Face Recognition Extension
The extension is published in the official extension marketplace; the current version is 2.7.x (this guide uses 2.7.8).
4.1 Install from the Extension Marketplace (Recommended)
Step 1: Go to the Extensions management page, click the Extension Marketplace icon (globe) in the toolbar, and search for face-recognition
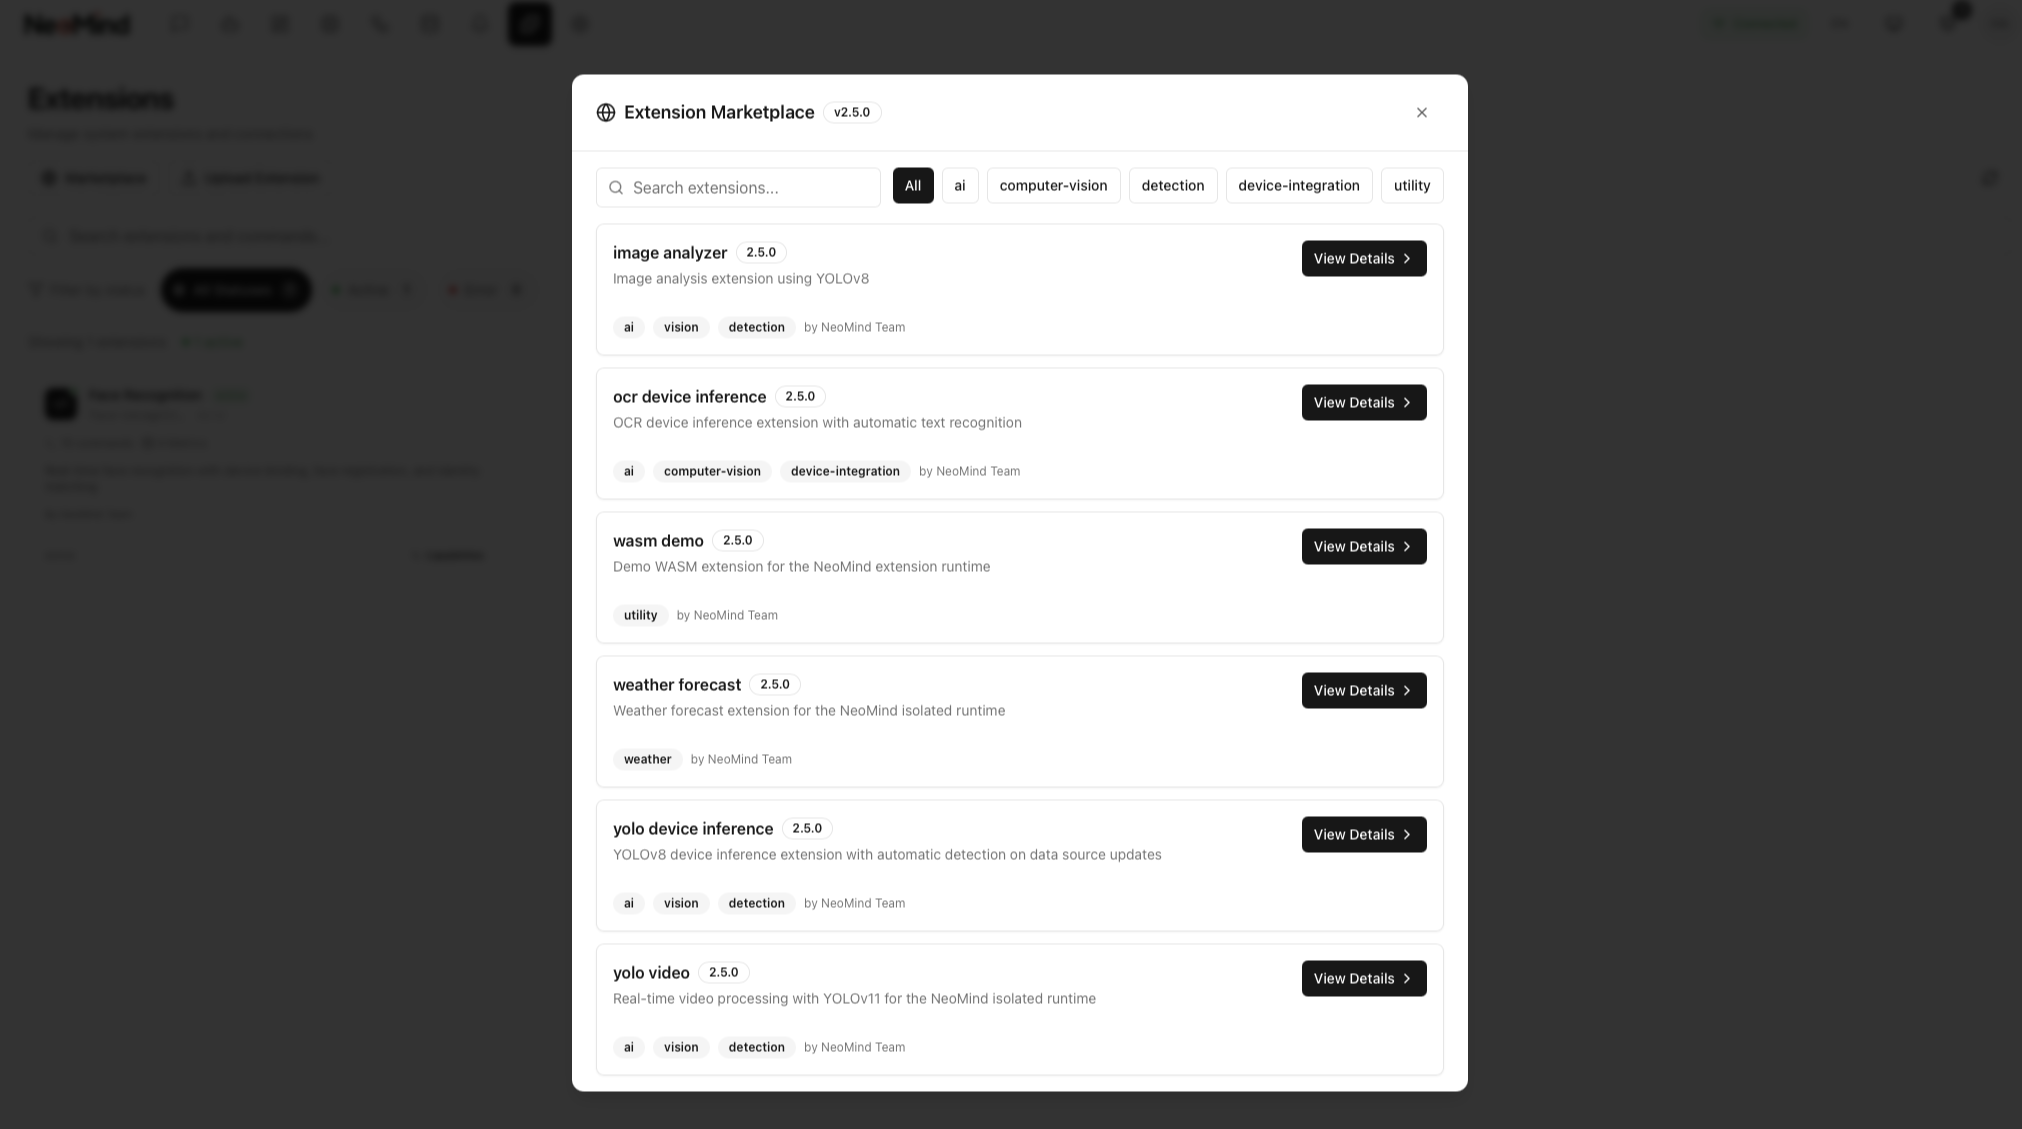
Step 2: Click to view the extension details, review the description, then click Install — NeoMind downloads and installs it automatically. After installation the extension appears in the extension list and starts automatically; confirm its status is Running

4.2 CLI Installation (Optional)
neomind extension market-list                     # List extensions available in the marketplace
neomind extension market-install face-recognition # Install from the marketplace (latest by default)
neomind extension market-install face-recognition --version 2.7.8
4.3 Verify the Installation
- The extension card in the list and the top of the extension detail page should show Running (green dot).
- Open the extension detail page and confirm the Overview / Configuration / Commands / Metrics / Logs tabs exist.
- Switch to the Metrics tab: the extension-level metrics
bound_devices,total_inferences,total_recognized, andtotal_unknownshould be reporting (initially 0).
The SCRFD (
det_10g.onnx) and ArcFace models ship with the extension and are lazy-loaded on first inference — the first recognition after installation is slower, which is expected.
5. Dashboard Configuration and Usage
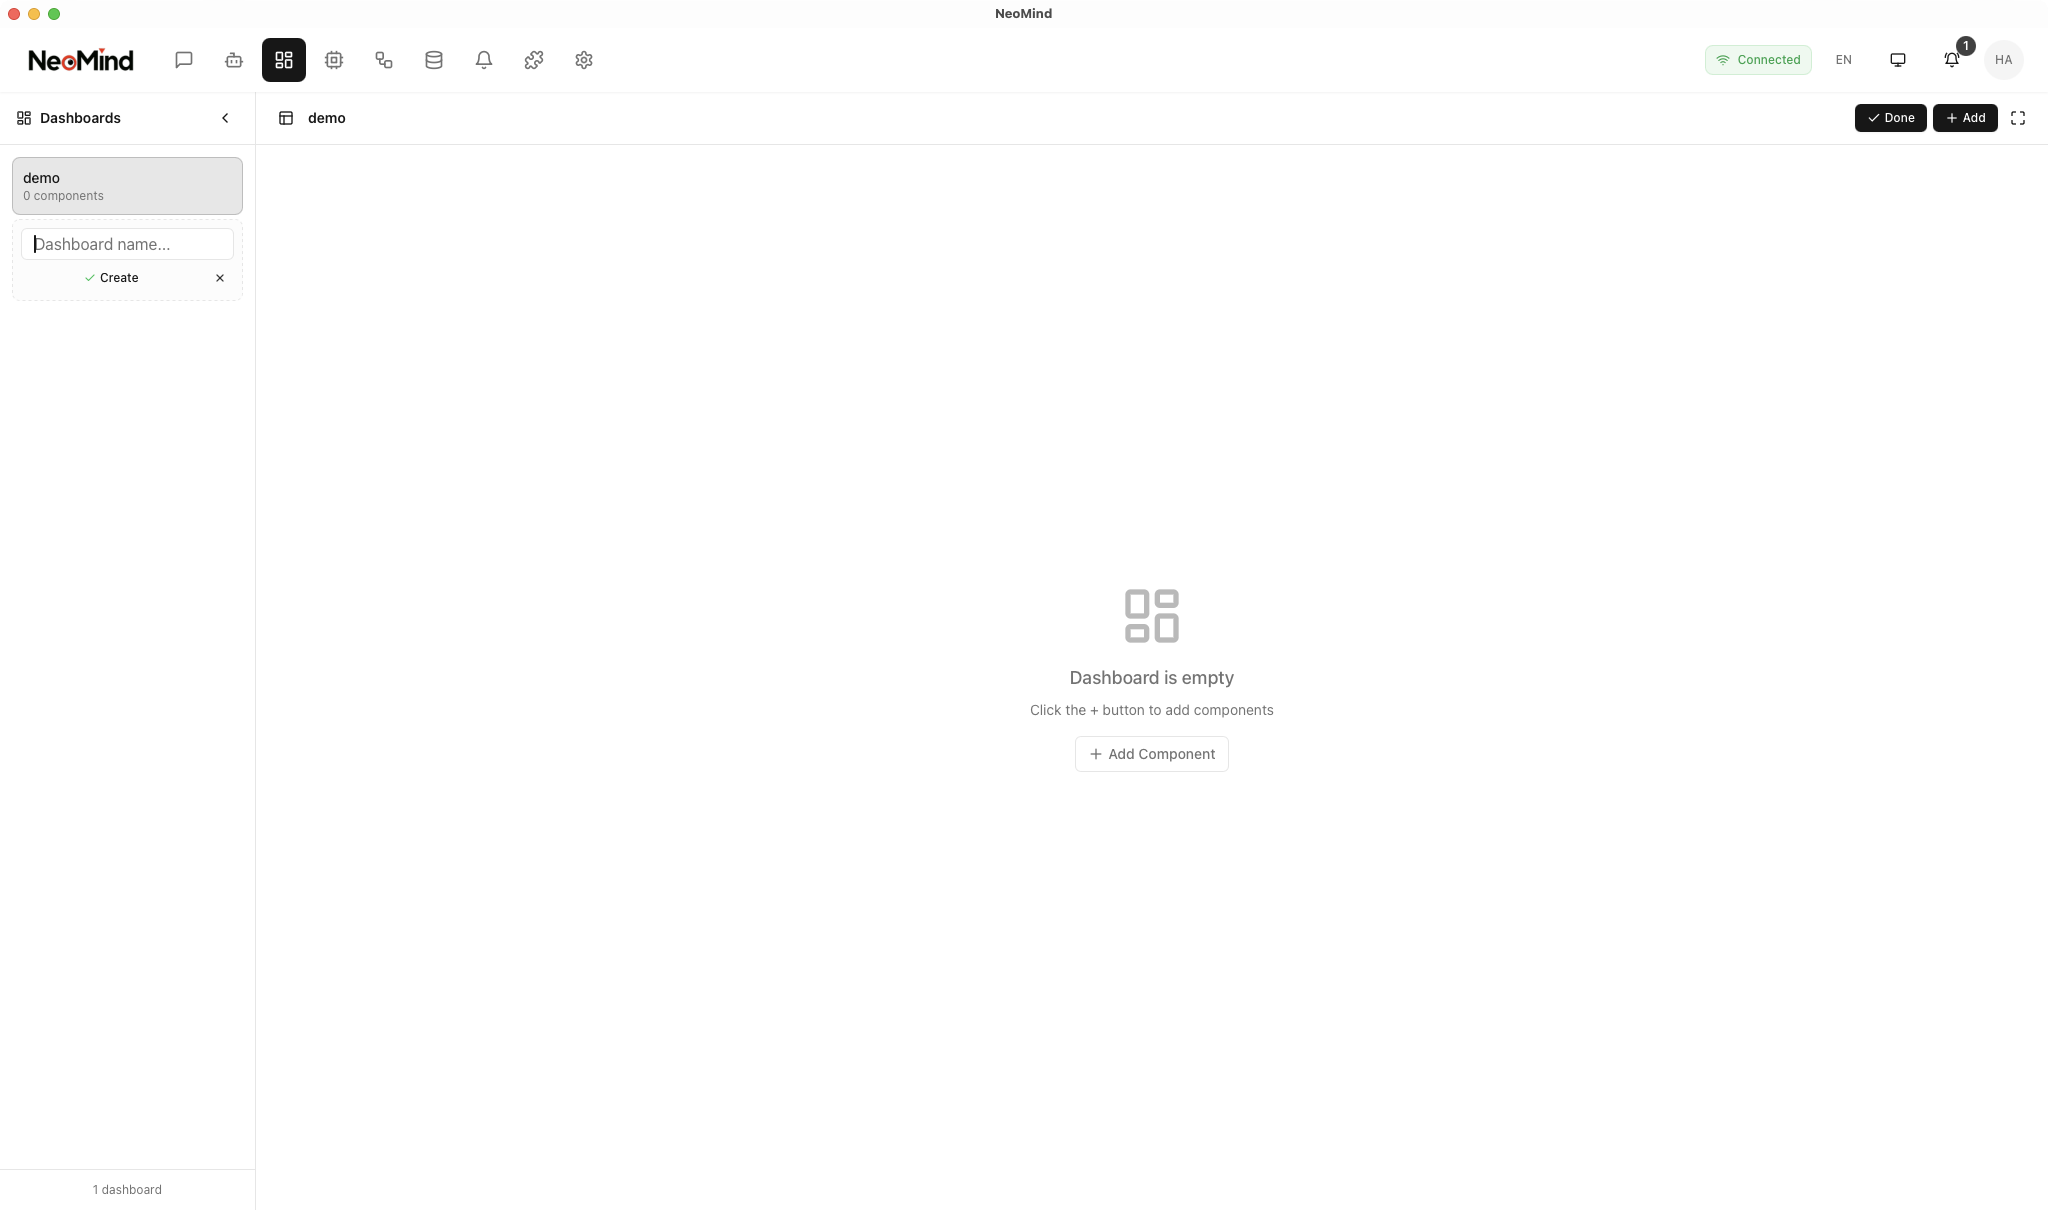
5.1 Create Dashboard and Add Face Recognition Component
Go to the Dashboard management page, click Create Dashboard, then click Add Panel and select the Face Recognition component under the Extensions tab (provided by the face-recognition extension):

5.2 Bind Device
Bind a target device (NE101 or NE301) in the Face Recognition widget; the image metric should match the device's actual image metric name (default image). Once bound, the widget will automatically receive and process images captured by the device:
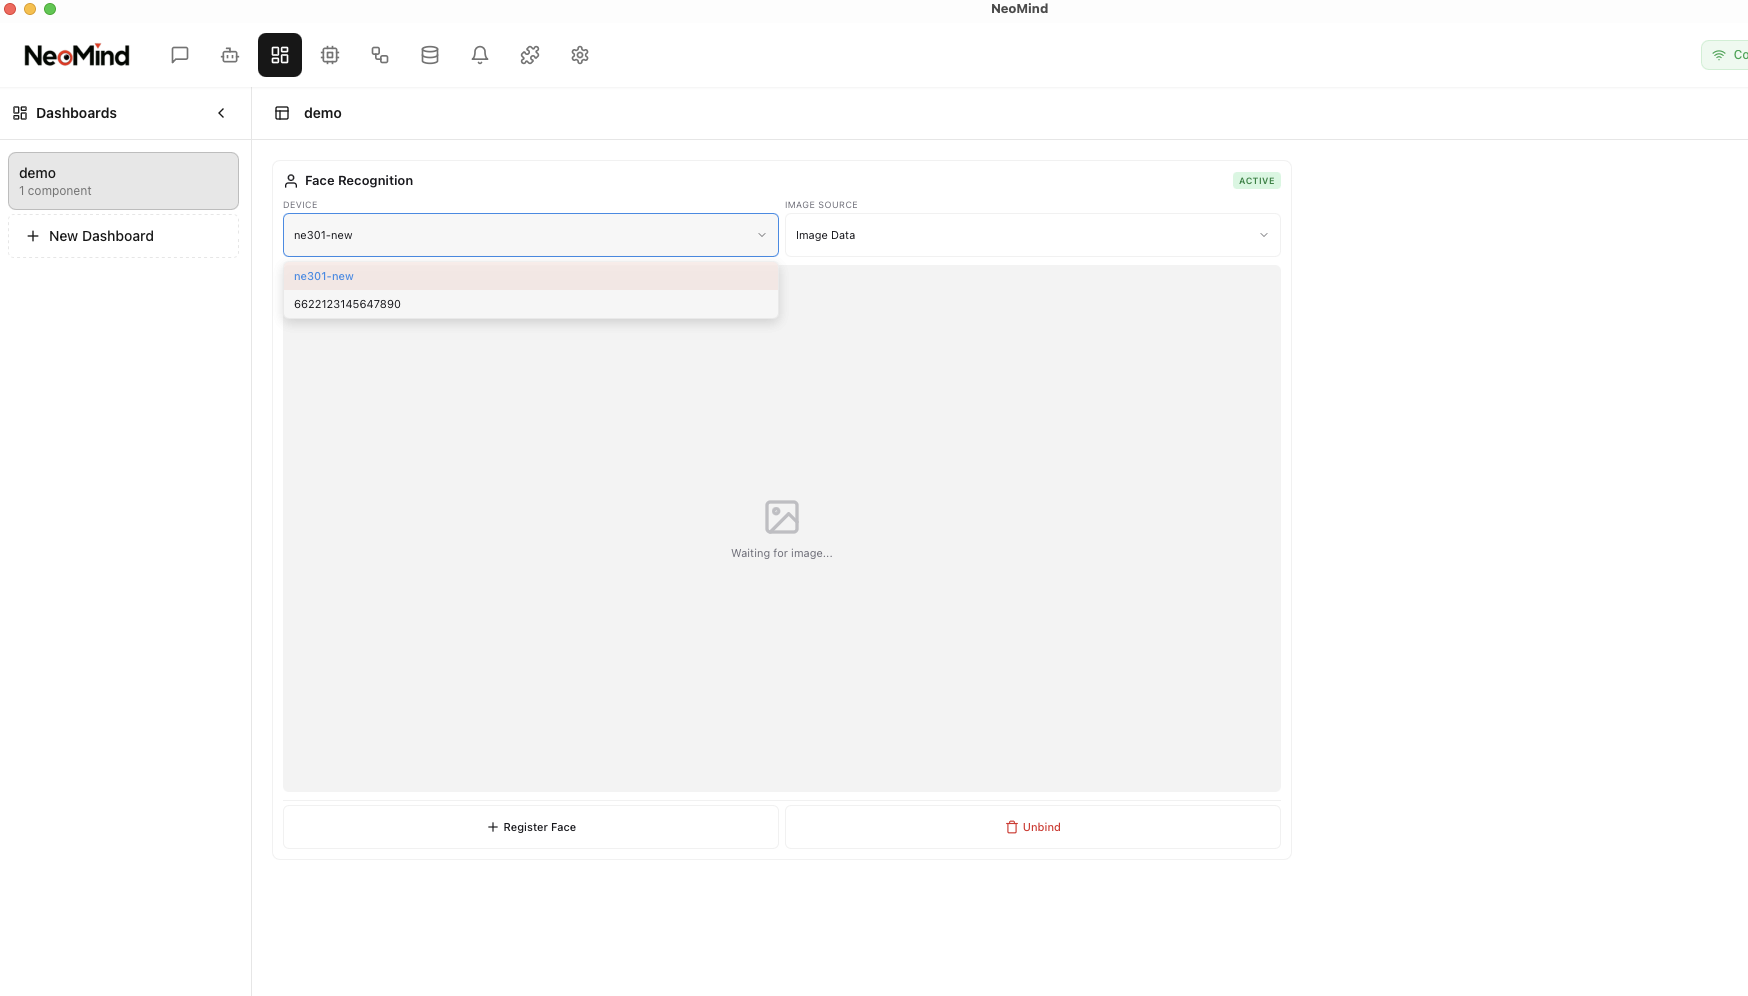
📷 Screenshot pending | Face Recognition widget device binding UI · suggested path
…/neomind/face-recognition/dashboard-3b.png
You can also bind via the bind_device command in the extension detail page Commands tab (or via REST POST /api/extensions/:id/command), with parameters device_id + metric_name (default image):
{ "command": "bind_device", "args": { "device_id": "ne101-gate", "metric_name": "image" } }
Binding management commands: get_bindings to list all bindings and their status, toggle_binding (device_id + active) to enable/pause, and unbind_device to remove a binding.
5.3 Register Faces
Before using the identification feature, you need to register faces to the face gallery. In the Face Recognition widget, click Register Face, upload a clear frontal photo and fill in the corresponding identity information:
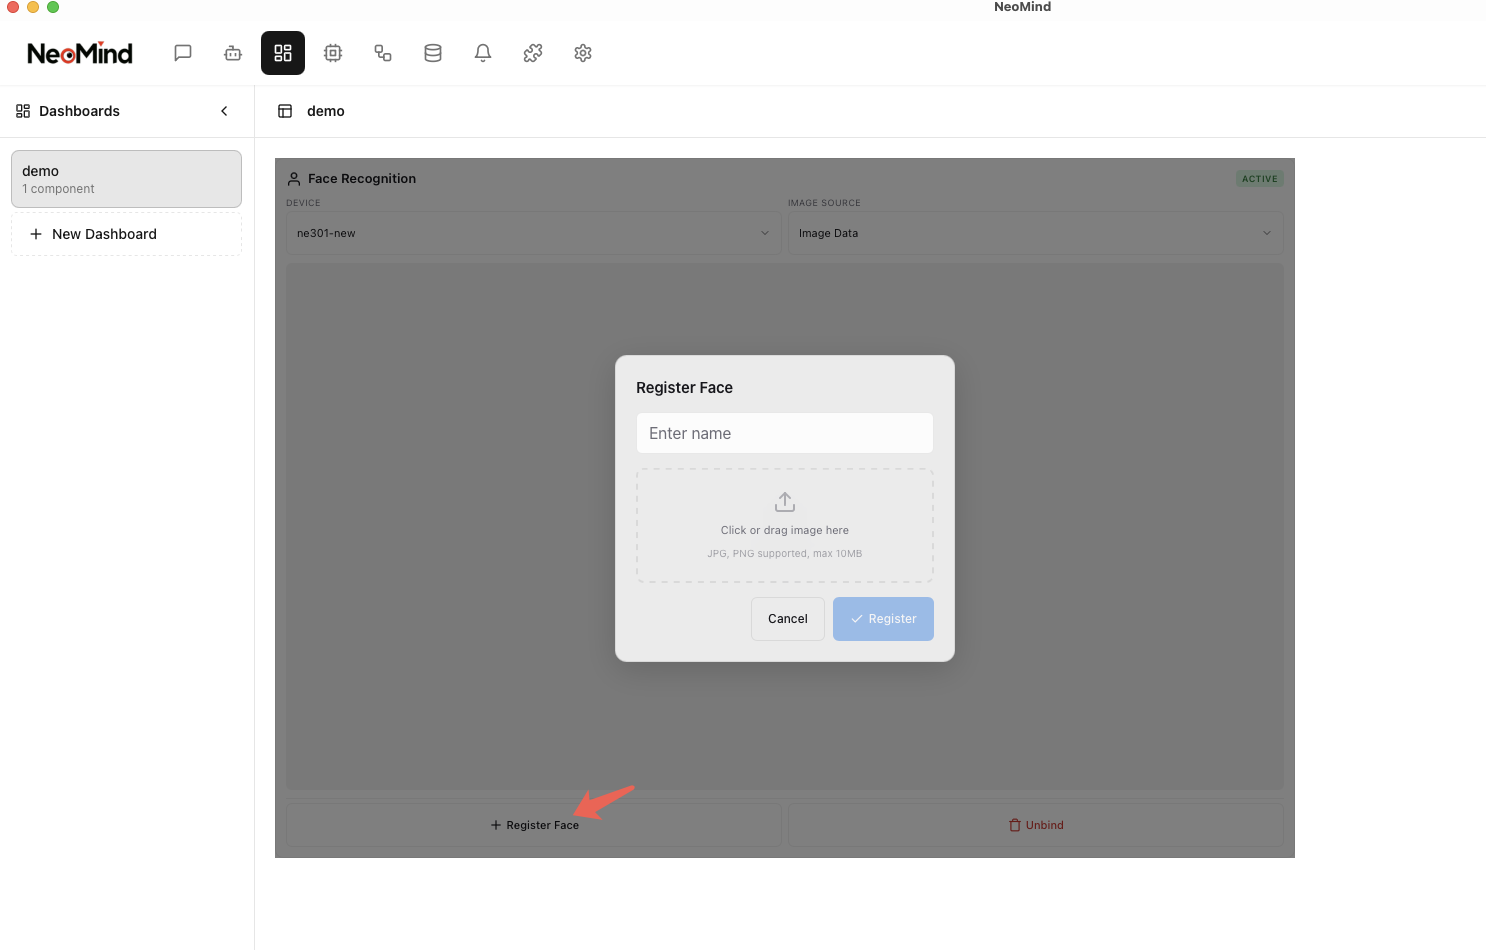
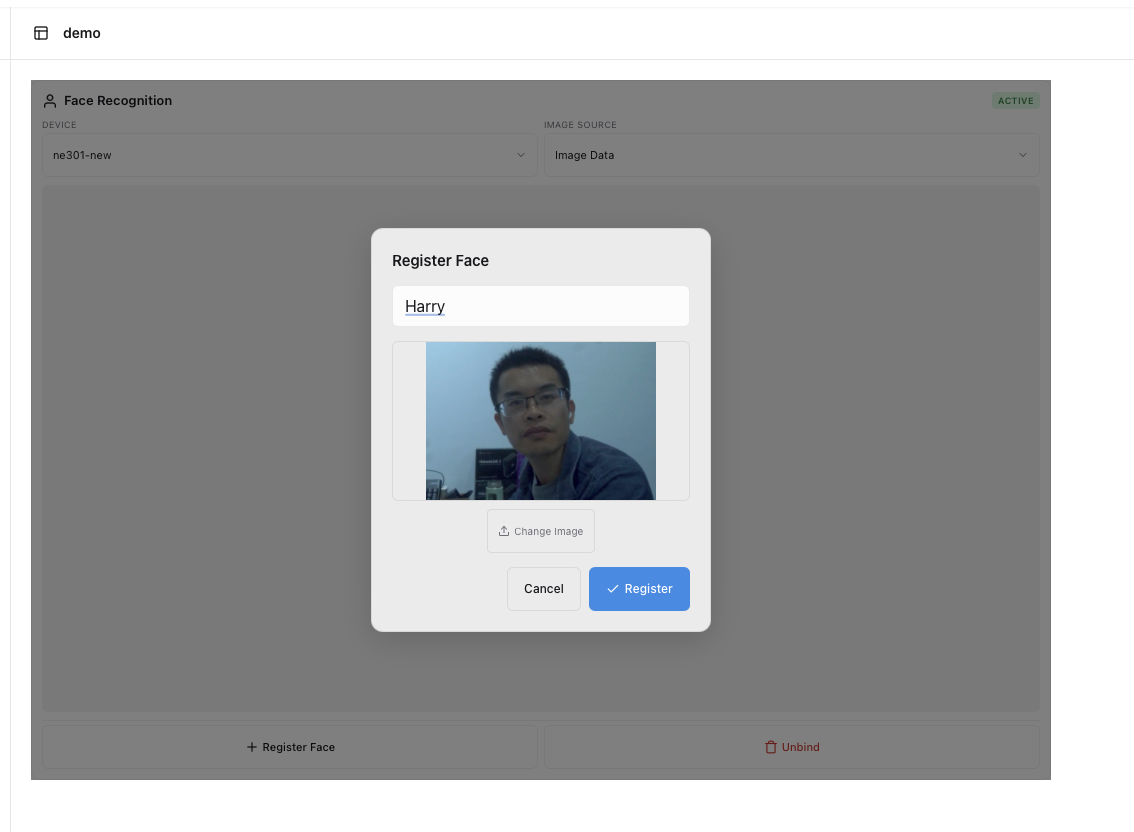
For best recognition accuracy, use clear, well-lit frontal photos for face registration.
You can also register via the register_face command. name is required (up to 100 characters; duplicate names return a DUPLICATE_NAME error) and image is a base64-encoded photo (data URI prefix accepted, max 10MB after decoding). Run it in the extension detail page Commands tab, or via REST POST /api/extensions/:id/command:
{
  "command": "register_face",
  "args": {
    "name": "Zhang San",
    "image": "/9j/4AAQSkZJRg… (base64-encoded face photo)"
  }
}
The extension first detects faces using the detection threshold (confidence_threshold, default 0.5) — registration fails if no face is found. On success it aligns a 112×112 face crop, extracts a 512-dim feature vector with ArcFace, and persists it together with a thumbnail into the face gallery:
{
  "success": true,
  "face_id": "9f8b7c6d-5a4e-4f3b-2c1d-0e9f8a7b6c5d",
  "name": "Zhang San",
  "registered_at": 1788912000,
  "message": "Face 'Zhang San' registered successfully"
}
face_id is the input for delete_face later; registered_at is a Unix timestamp (seconds). Right after registering, run list_faces to confirm the gallery — count should increase by one and faces contains the new entry's summary (id / name / registered_at / thumbnail, where thumbnail is the aligned 112×112 face thumbnail as a data URI):
{
  "success": true,
  "count": 2,
  "faces": [
    { "id": "9f8b7c6d-5a4e-…", "name": "Zhang San", "registered_at": 1788912000, "thumbnail": "data:image/jpeg;base64,…" },
    { "id": "2e4a1b3c-7d8e-…", "name": "Li Si", "registered_at": 1788912120, "thumbnail": "data:image/jpeg;base64,…" }
  ]
}
Two gallery maintenance notes: registering beyond the max_faces limit (default 10) returns MAX_FACES_EXCEEDED — delete a face first to free a slot. The gallery is persisted as faces.json in the extension data directory, so re-registration is not needed after an extension restart.
5.4 Test Recognition
Once faces are registered, the extension will automatically detect and identify faces when the device captures images. A full recognition pass works like this: the device captures a frame → SCRFD detects faces using the detection threshold (confidence_threshold, default 0.5) → each face is aligned and its 512-dim feature vector extracted with ArcFace → cosine similarity is computed against every gallery entry → the best match wins if its similarity ≥ recognition_threshold (default 0.45), otherwise the face is labeled unknown. Results are written to the virtual.face_recognition.* metrics and overlaid on the widget with face boxes and identity labels. View real-time recognition results on the dashboard:
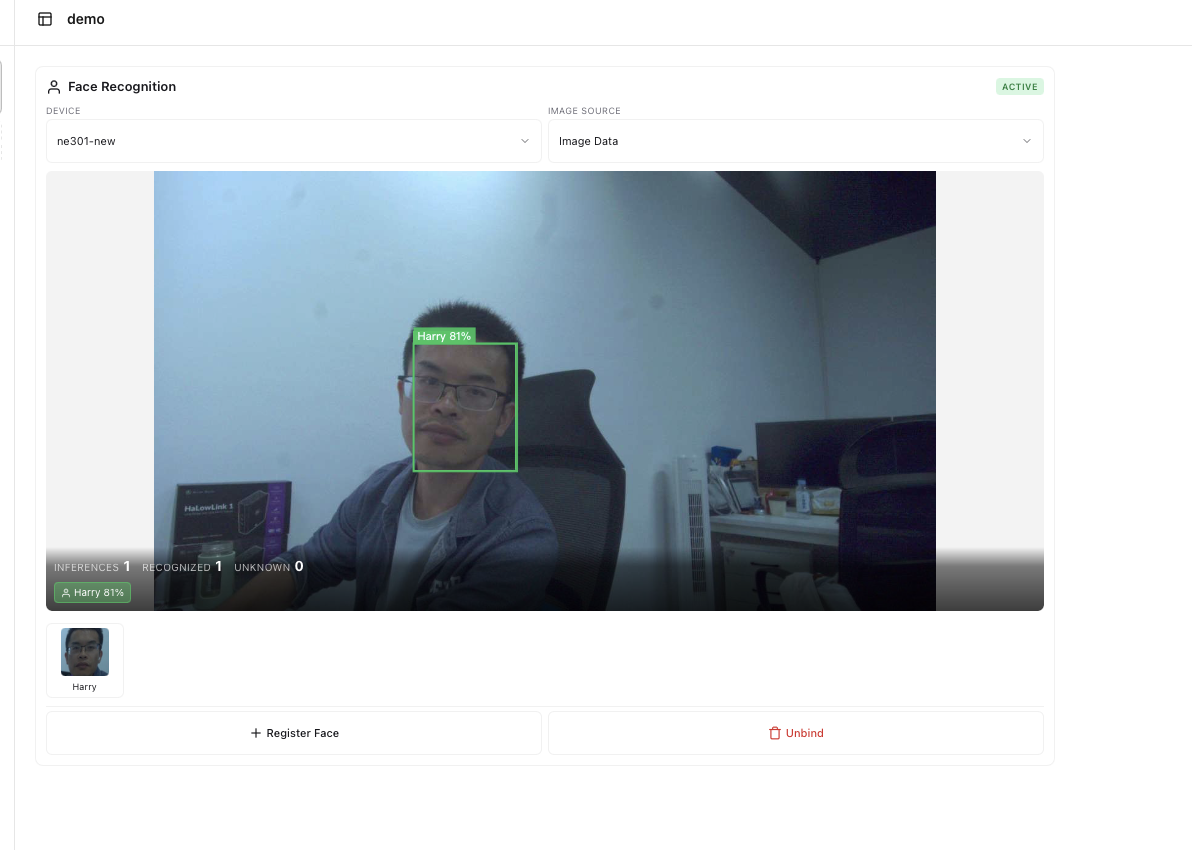
Recognition results include:
| Field | Description |
|---|---|
| Face Bounding Box | Marks the detected face location in the image |
| Identity Label | Shows the identified person's identity; unmatched faces are labeled unknown |
| Confidence Score | The confidence score of the recognition result |
Recognition thresholds and capacity can be adjusted at runtime via the configure command (get_config to view the current configuration):
{ "command": "configure", "args": { "config": { "recognition_threshold": 0.45, "max_faces": 10 } } }
| Setting | Default | Description |
|---|---|---|
recognition_threshold | 0.45 | Similarity threshold for identity matching; higher is stricter (fewer false matches, more misses), lower is looser |
max_faces | 10 | Maximum number of faces processed per frame |
confidence_threshold | 0.5 | Face detection confidence threshold |
Tuning example: too many false positives (strangers identified as registered people)
If passers-by keep being identified as "Zhang San" on site, matching is too loose. ArcFace matching uses cosine similarity, and a higher recognition_threshold means stricter matching. Raise the threshold from the default 0.45 to 0.6:
{ "command": "configure", "args": { "config": { "recognition_threshold": 0.6 } } }
The response echoes the full effective configuration — first confirm recognition_threshold is now 0.6:
{
  "success": true,
  "message": "Configuration updated",
  "config": {
    "confidence_threshold": 0.5,
    "recognition_threshold": 0.6,
    "max_faces": 10,
    "auto_detect": true,
    "bindings": []
  }
}
Then validate with the live scene, watching two counters on the Metrics tab: a rising total_unknown means previously misidentified strangers are now correctly rejected (the expected effect); if registered employees also start being labeled unknown (total_recognized stops growing), you overshot — back off to 0.5–0.55. Threshold changes take effect immediately and are persisted; no extension restart is needed. Adding registration photos from more angles further widens the similarity gap.
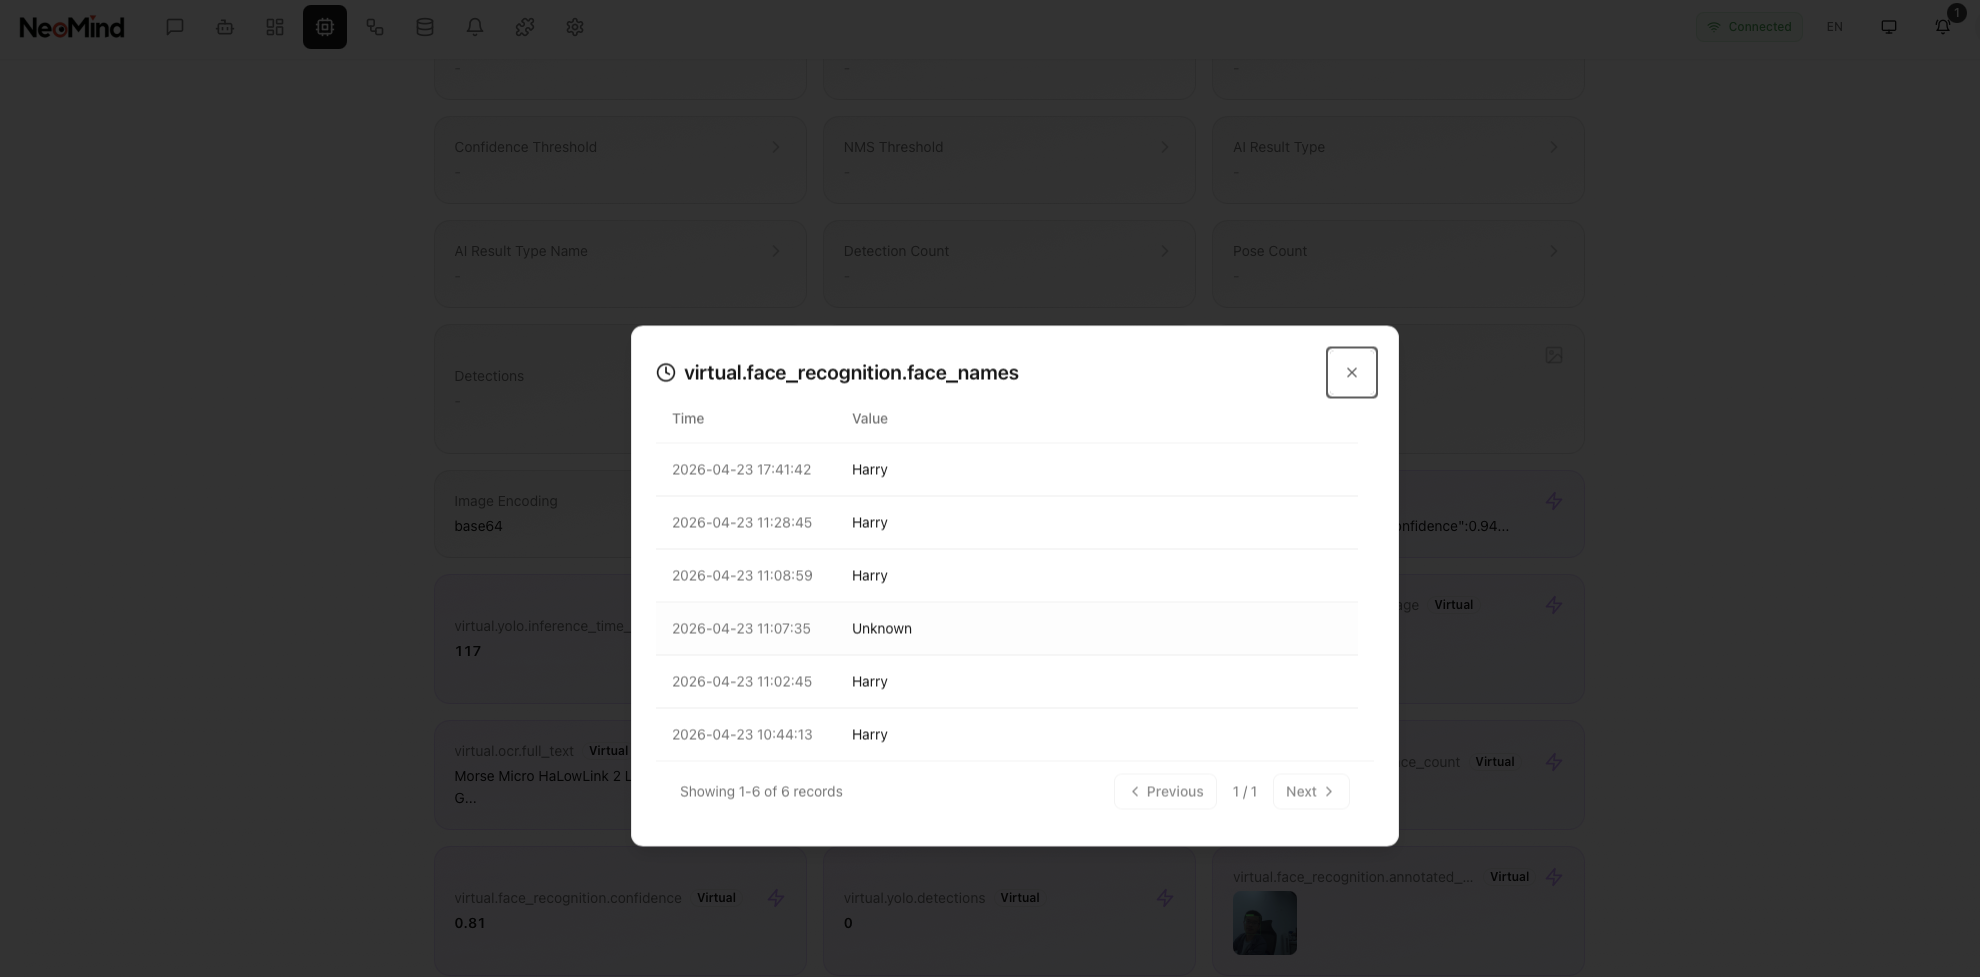
5.5 View History
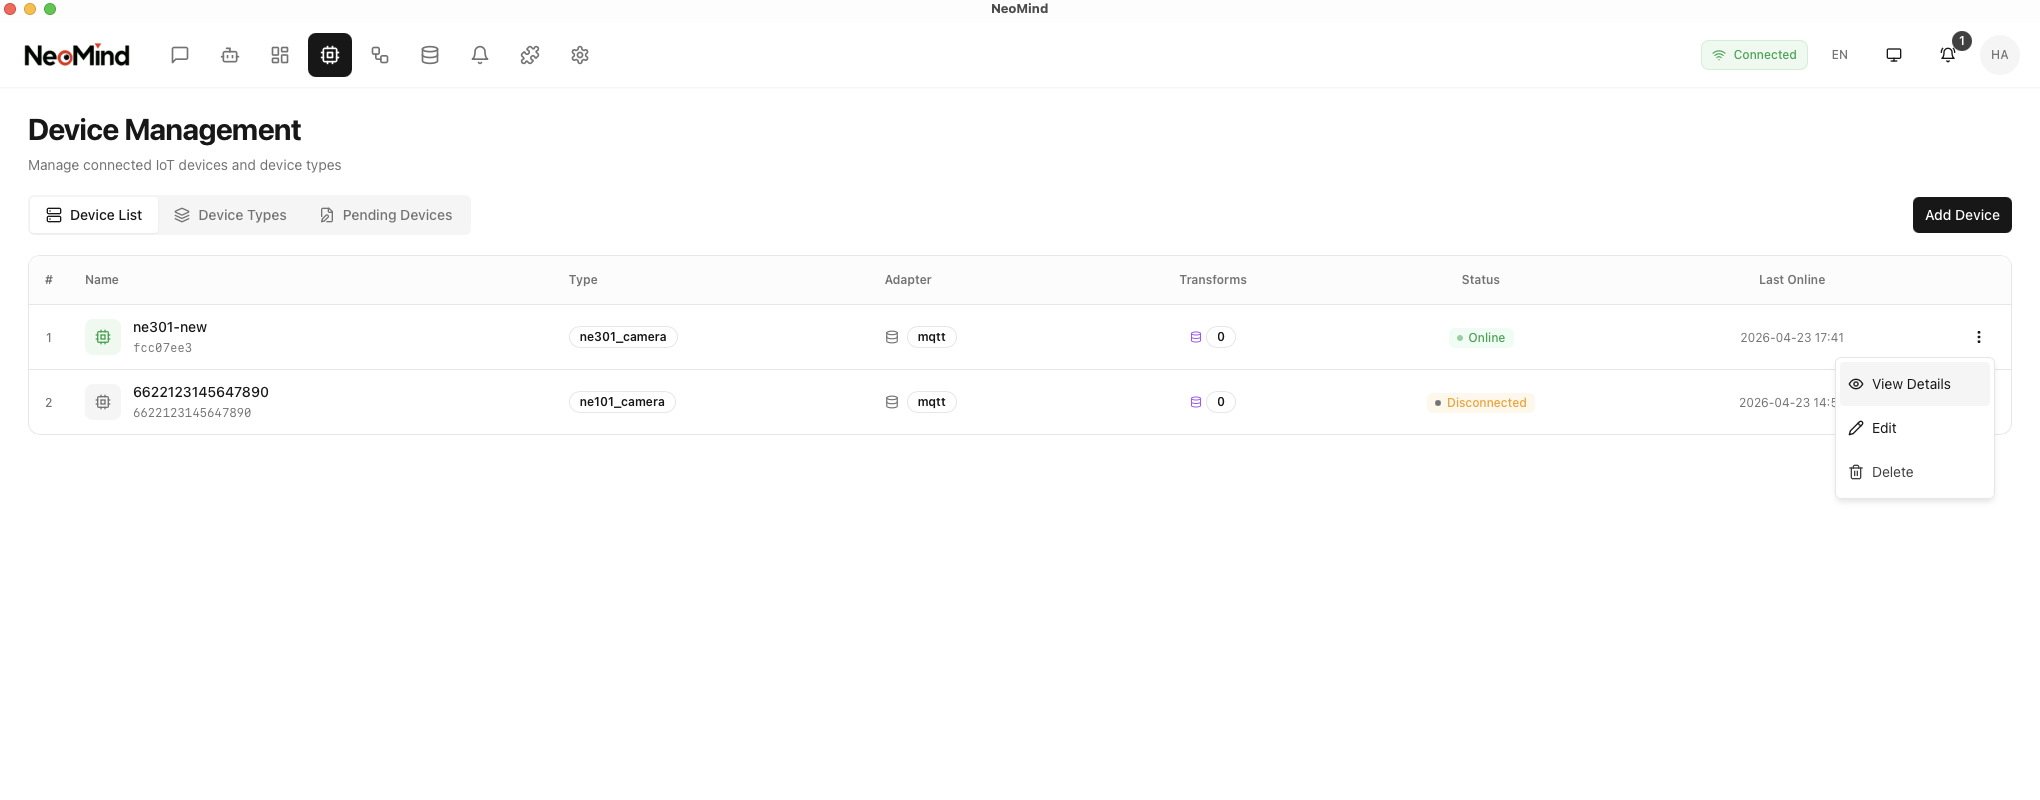
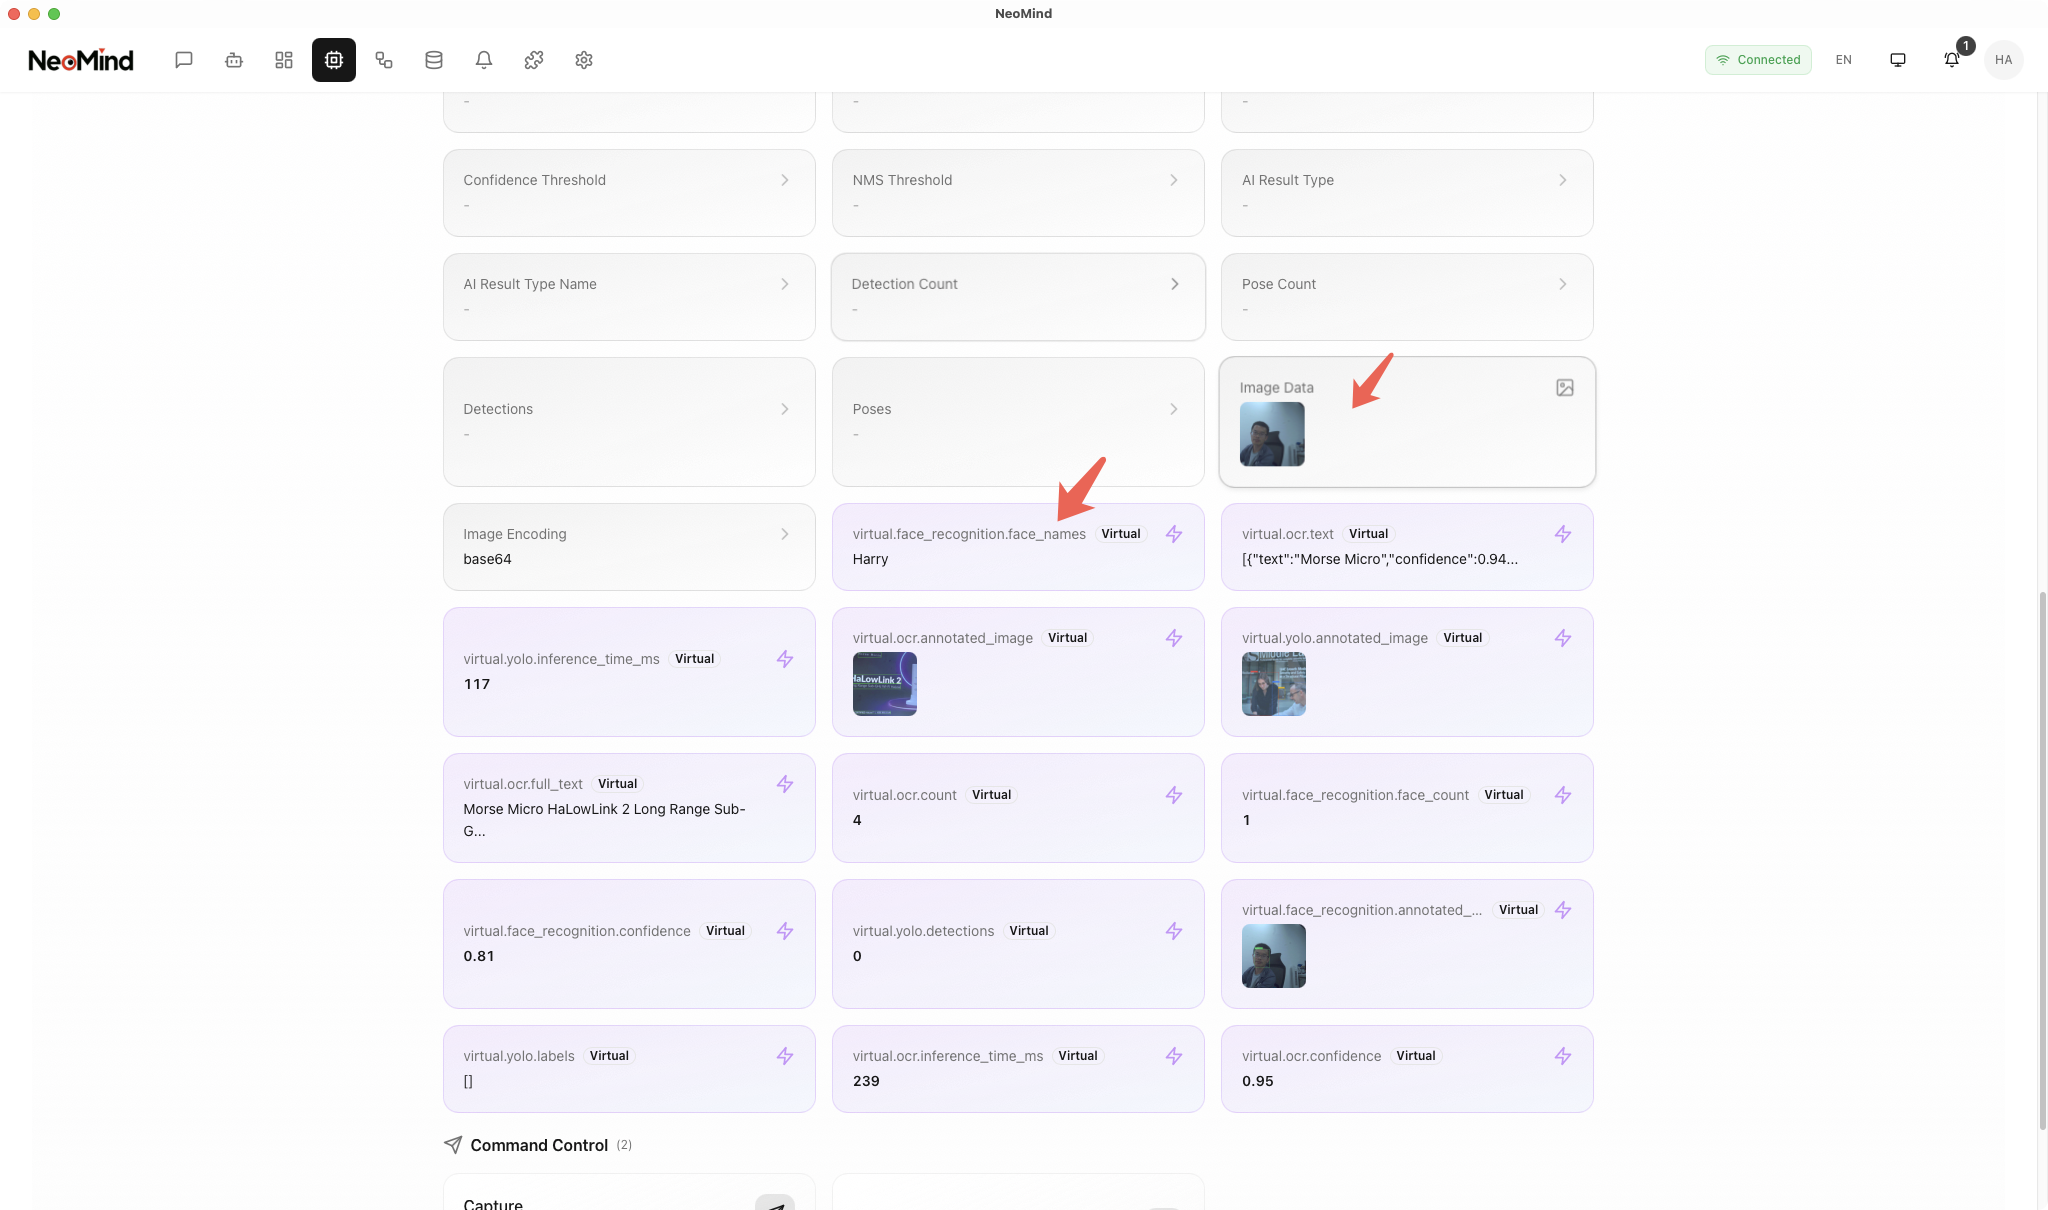
View all historical face recognition records in the device details, including the original image and recognition result for each entry:
5.6 Verify
- Extension detail page Metrics tab:
bound_devices≥ 1; when a person appears in view,total_inferenceskeeps growing;total_recognizedgrows on matches andtotal_unknowngrows when strangers appear. - Run
get_bindingsin the Commands tab and confirm the binding is active; runlist_facesto confirm faces are in the gallery. - Each recognition writes
virtual.face_recognition.*result metrics to the device, with DataSourceIds such as:device:ne101-gate:virtual.face_recognition.face_count(number of faces detected)device:ne101-gate:virtual.face_recognition.face_names(comma-separated identity list;unknownfor unmatched)device:ne101-gate:virtual.face_recognition.confidence(average confidence)device:ne101-gate:virtual.face_recognition.annotated_image(annotated image with face bounding boxes)
6. AI Chat Query
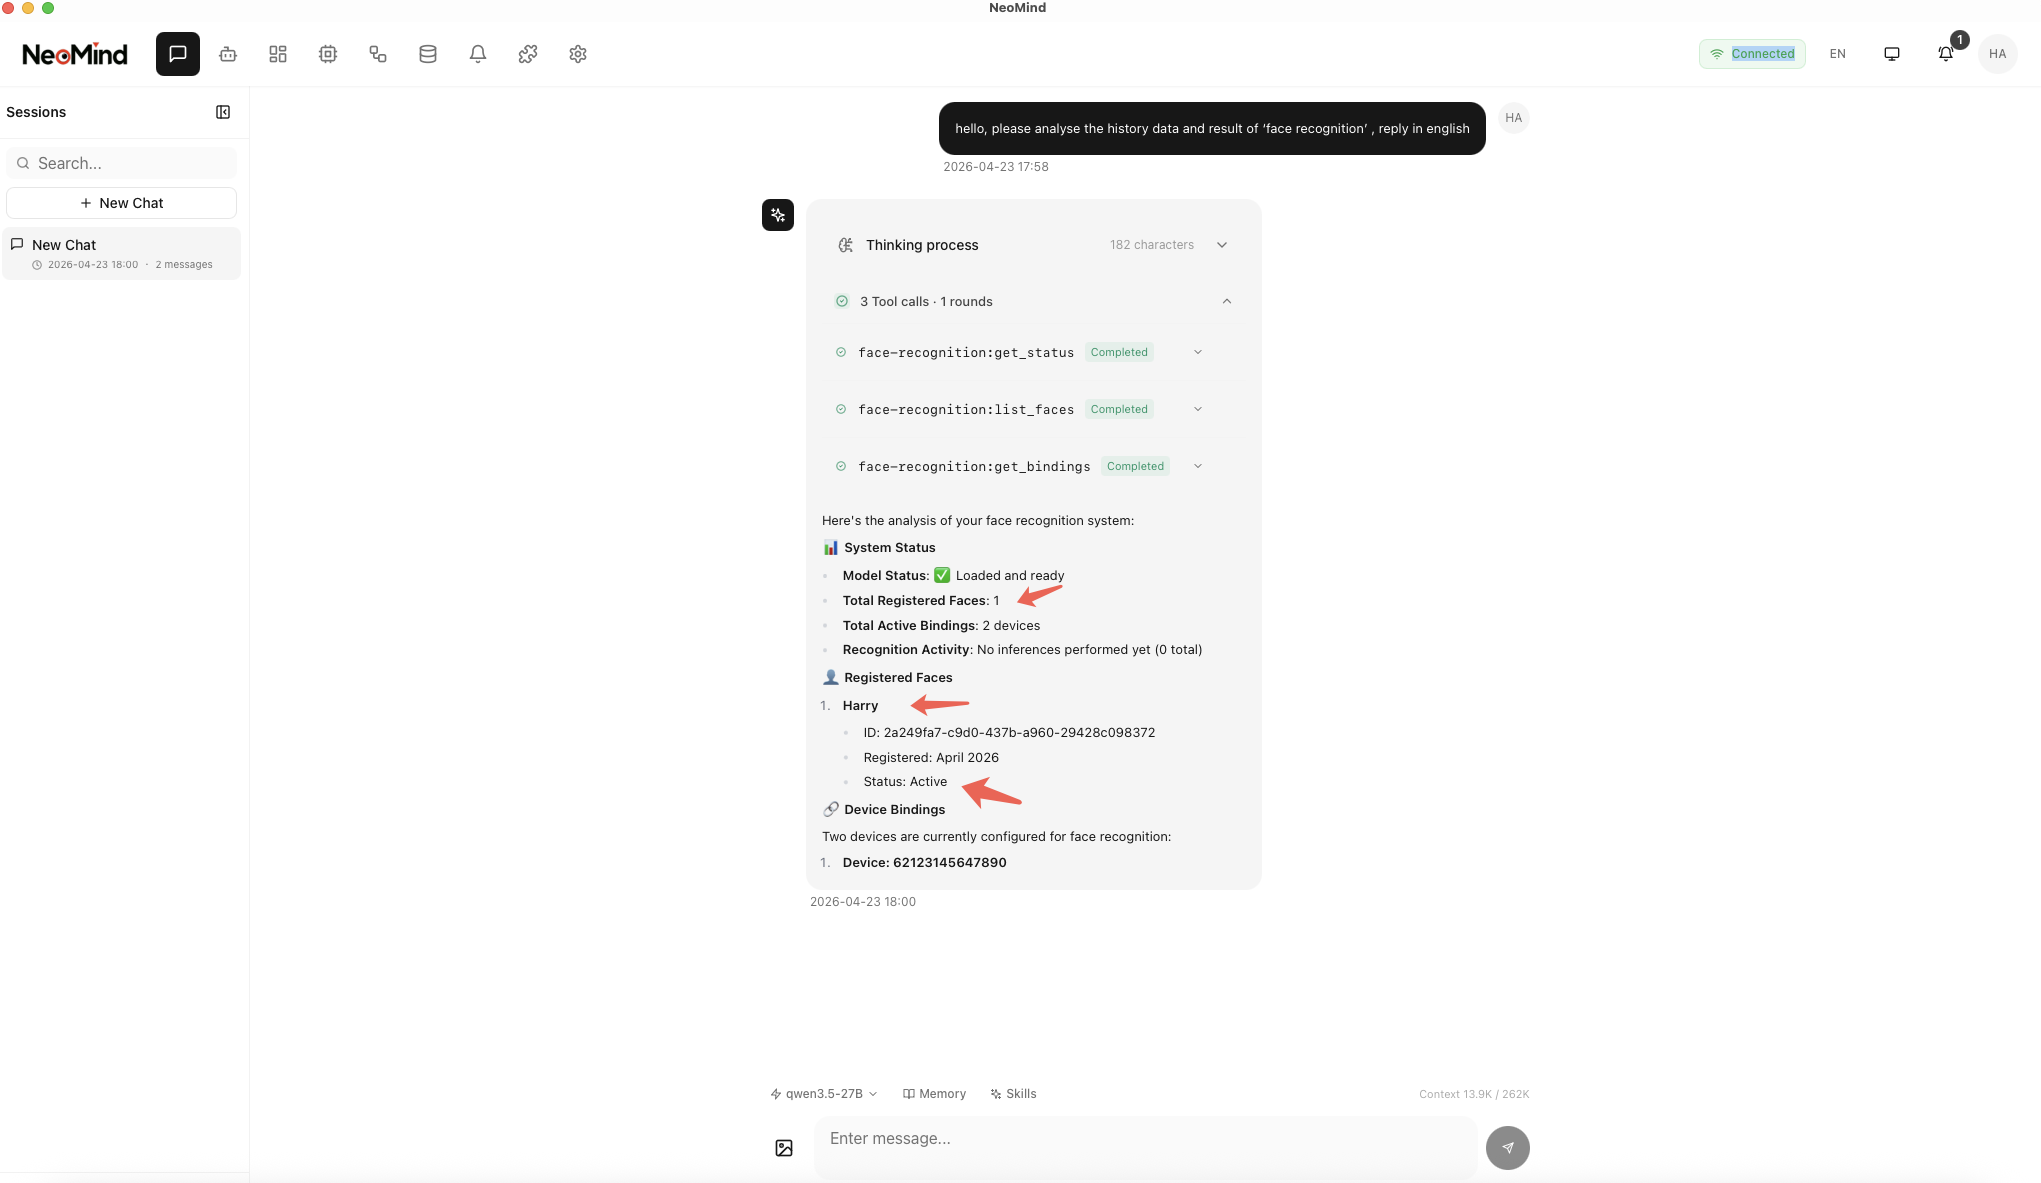
Once recognition results are stored, you can query face data using AI Chat with natural language. For example:
hello, please analyse the history data and result of 'face recognition', reply in english
Tip: AI Chat requires an LLM backend (e.g., Ollama). For configuration, refer to NeoMind Quick Start or Configure LLM Backend.
7. Downstream Usage
Face recognition results enter the platform as device:<deviceID>:<metric>. Dashboards, rules, and AI Chat all reference this format:
| Result | Metric | DataSourceId Example |
|---|---|---|
| Face count | virtual.face_recognition.face_count | device:ne101-gate:virtual.face_recognition.face_count |
| Identity list | virtual.face_recognition.face_names | device:ne101-gate:virtual.face_recognition.face_names |
| Average confidence | virtual.face_recognition.confidence | device:ne101-gate:virtual.face_recognition.confidence |
| Annotated image | virtual.face_recognition.annotated_image | device:ne101-gate:virtual.face_recognition.annotated_image |
- Dashboard: Bind the DataSourceIds above to text / value / image cards to display people on site, identities, and annotated frames in real time (see Using the Dashboard).
- Automation rules: For example, "notify as soon as someone appears at the gate" — set a threshold on
virtual.face_recognition.face_count(automation rules). Example rule JSON:
{
  "name": "Perimeter person-detected alert",
  "trigger": { "trigger_type": "data_change" },
  "condition": {
    "condition_type": "comparison",
    "source": "device:ne101-gate:virtual.face_recognition.face_count",
    "operator": "greater_than",
    "threshold": 0
  },
  "actions": [
    { "type": "notify", "message": "Gate camera detected {value} face(s), please check", "severity": "warning" }
  ]
}
- AI Chat: Natural language queries, e.g. "Who was recognized by the gate camera today?" or "How many strangers passed by in the last hour?"
8. Typical Scenarios
| Scenario | Recommended Configuration | How To |
|---|---|---|
| Access control / perimeter monitoring | Strict threshold + alert rules | After registering regular personnel, keep recognition_threshold at the default 0.45 or slightly higher to reduce false admissions; add a "greater than 0" rule on face_count for instant notification — strangers appear as unknown in face_names for follow-up |
| Attendance tracking | Fixed position + single face | Point the camera straight at the check-in spot where usually only one face is in frame; log attendance by the employee identities appearing in face_names, and use AI Chat for "who checked in today" statistics |
| Visitor registration | Whitelist matching | Register only internal staff; visitors show up as unknown, distinguishing them from known personnel and triggering a reception workflow |
| Crowd monitoring (retail, workshop) | Raise capacity | When many faces appear per frame, use configure to raise max_faces (default 10); watch total_recognized / total_unknown trends rather than single-frame results |
9. Troubleshooting
Locate issues with the trio: the extension detail page Logs tab for process output, the Metrics tab for total_inferences / total_recognized / total_unknown counters, and the Commands tab running get_bindings / list_faces / get_config for bindings, gallery, and configuration. Common issues:
| Symptom | Possible Cause | Solution |
|---|---|---|
register_face fails, or a registered person is never recognized | No face in the uploaded photo, or the photo is blurry / not frontal; poor lighting | Re-register with a clear, well-lit frontal photo; run list_faces afterwards to confirm it is in the gallery |
A registered person is recognized as unknown | recognition_threshold too high; on-site angle / distance differs too much from the registered photo | Check the threshold with get_config and lower recognition_threshold appropriately (default 0.45); re-register with photos taken from angles similar to the scene |
| A stranger is mistakenly identified as a registered person | recognition_threshold too low, matching too loosely | Raise recognition_threshold appropriately; add registration photos from more angles to improve discrimination |
| Some faces are missed when several people are in frame | max_faces cap reached (default 10); confidence_threshold too high causes detection misses | Raise max_faces via configure; lower the detection threshold confidence_threshold if needed (default 0.5) |
total_inferences does not grow after binding; no recognition at all | metric_name does not match the device's actual image metric name; binding is inactive | Confirm the device image metric name (default image) matches the binding parameter; check status with get_bindings and re-activate with toggle_binding (active: true) |
| First recognition after installation is very slow or times out | SCRFD / ArcFace models are lazy-loaded on first inference | Expected behavior — wait for the first frame to finish; later inferences run at normal speed. Watch total_inferences to confirm it keeps working |
10. Appendix
Related Documentation
- Extension Management
- Using the Dashboard
- AI Chat
- Configure LLM Backend
- NeoMind Quick Start
- OCR Text Extraction Solution (also an image-AI extension; can be combined)
- Object Detection Use Case
- NE101 Quick Start
- NE301 Quick Start
- face-recognition extension README
Last updated: 2026-09-08