Onboard a Device
NeoMind offers four ways to connect devices. For first-time users, MQTT is recommended — NeoMind has a built-in MQTT broker, so a device just publishes one message and it's auto-discovered. Zero configuration needed.
Prerequisites
Before you start, confirm each item:
- NeoMind server is running (browser can open the Web UI)
- Your device can reach NeoMind's MQTT port (1883) over the network
- You know the server's IP address (or domain name)
What does "can reach port 1883" mean? It depends on your deployment:
Deployment Device needs Local / Desktop app Device is on the same machine, use localhostLAN server Device is on the same network, use the LAN IP (e.g. 192.168.1.100)Remote server / Cloud VM Device can reach the server's public IP, and firewall / security group allows port 1883 Docker Device can reach the host machine's IP on port 1883 (check Docker port mapping)
Run this on the NeoMind machine:
neomind system info # the "server_ip" field is what you need
Or find it manually:
# macOS / Linux (LAN IP)
ifconfig | grep 'inet ' | grep -v 127.0.0.1
# Windows
ipconfig
- LAN deployment: look for
192.168.x.x/10.x.x.x - Cloud server: use the public IP (check your cloud console, or run
curl ifconfig.me) - Same machine: use
localhost
30-Second Quick Test
Before writing any device code, verify MQTT connectivity with a single command.
# 1. Install mosquitto clients (if you don't have them)
#    macOS:   brew install mosquitto
#    Linux:   sudo apt install mosquitto-clients
#    Windows: https://mosquitto.org/download/

# 2. Send a test message (replace 192.168.1.100 with your server IP)
mosquitto_pub -h 192.168.1.100 -p 1883 -t "test/my-sensor" -m '{"temperature": 25.5}'
After sending, open the Web UI → Devices → Pending Devices tab:
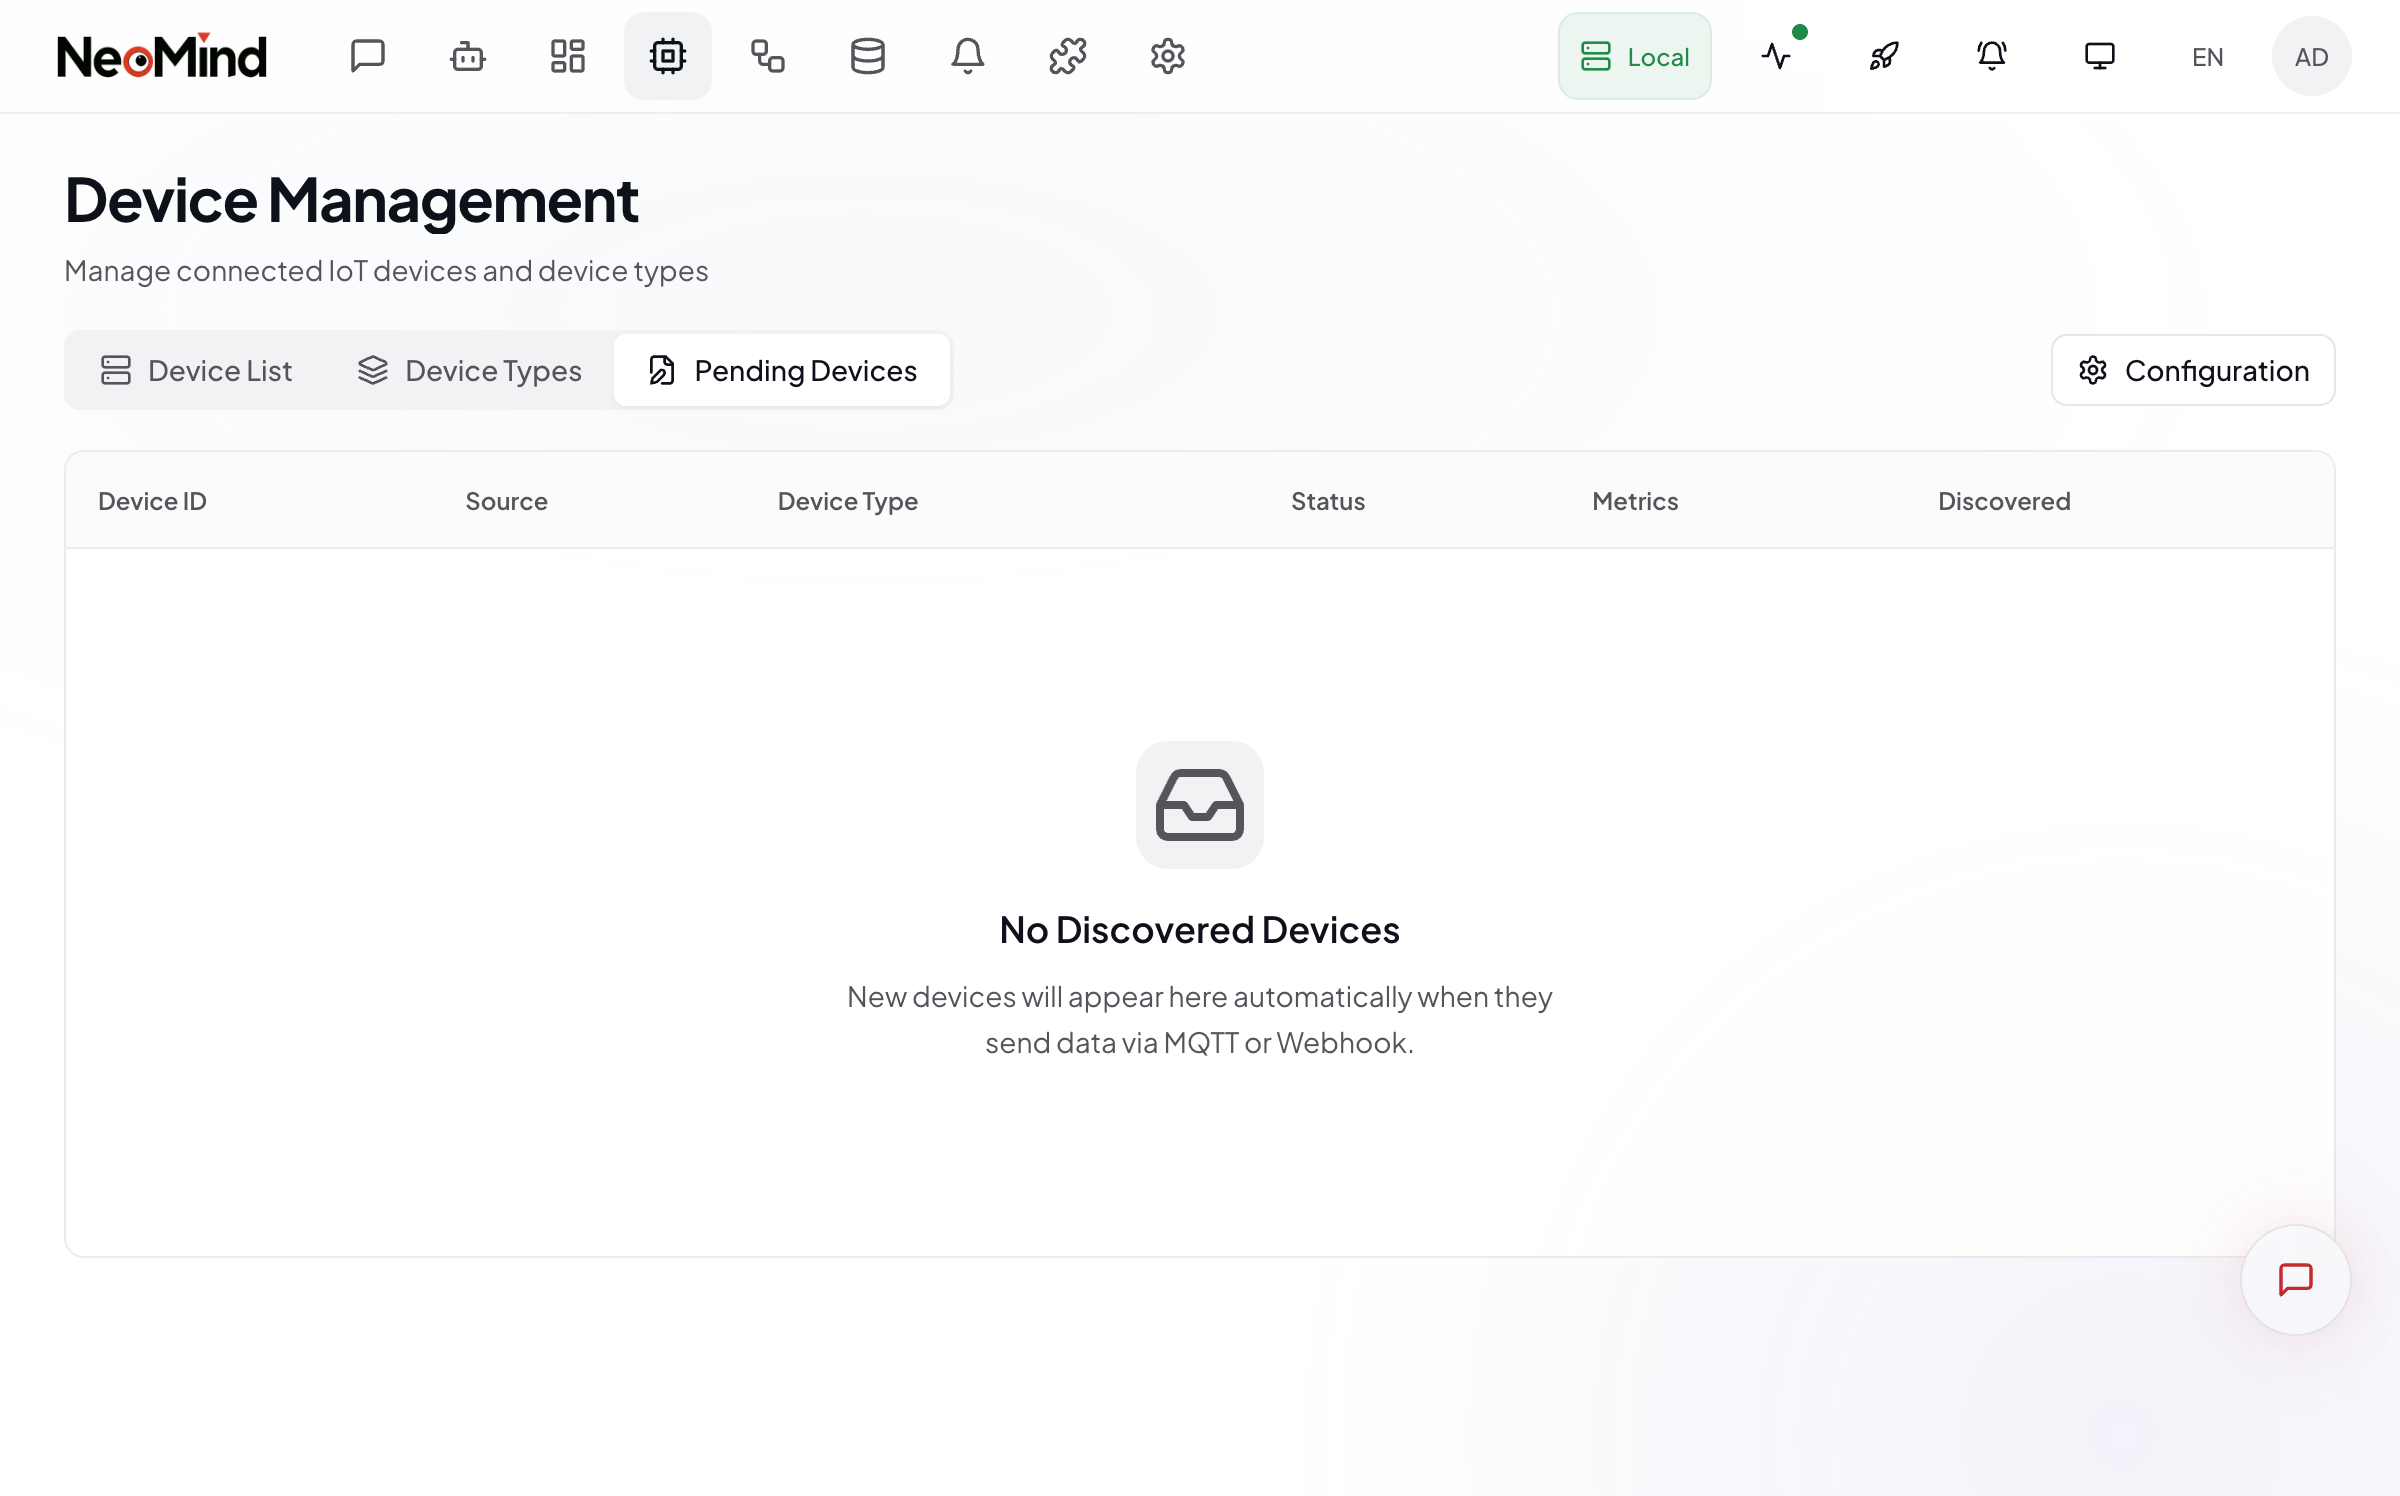
If you see a new draft device, MQTT is working.
Don't see a draft? Check each item:
- Is NeoMind running? →
curl http://localhost:9375/api/health- Is the IP correct? → Try
localhostif you're on the same machine- Is port 1883 blocked by firewall? →
telnet <IP> 1883- Is auto-discovery enabled? →
neomind device drafts config
Full Onboarding Flow (MQTT)
What is MQTT? Simply put, MQTT is an IoT communication protocol — think of it as "group chat for devices." NeoMind has a built-in MQTT broker (message relay server). Devices connect and exchange messages. A Topic is the channel name (e.g.
sensors/room1/temp), and the Payload is the message content (usually JSON).
Step 1: Get Connection Info
neomind system info
Note these key fields:
| Info | Example | What it's for |
|---|---|---|
| MQTT address | 192.168.1.100 | Put this IP in your device code |
| MQTT port | 1883 | Default port, usually no change needed |
| TLS | false (default off) | If true, device must use mqtts:// |
| Auth | false (default off) | If true, device needs username/password |
You can also check in the Web UI: Settings → Device Connections
Step 2: Send Data from Your Device
Your device only needs to do three things: connect → send data → stay connected.
Choose your platform:
Python (Recommended — easiest to start)
Prerequisite:
pip install paho-mqtt
import paho.mqtt.client as mqtt
import json, time, random

# ↓↓↓ Only change these three lines ↓↓↓
SERVER_IP = "192.168.1.100"   # Your NeoMind server IP
DEVICE_NAME = "my-python-sensor"
# ↑↑↑ That's it — run it ↑↑↑

client = mqtt.Client(DEVICE_NAME)
client.connect(SERVER_IP, 1883)

while True:
    # Simulated sensor data (replace with your real readings)
    data = {
        "temperature": round(random.uniform(20, 30), 1),
        "humidity": round(random.uniform(40, 70), 1)
    }
    # Publish to topic "sensors/<device-name>/data"
    client.publish(f"sensors/{DEVICE_NAME}/data", json.dumps(data))
    print(f"Sent: {data}")
    time.sleep(10)  # Send every 10 seconds
When running, you'll see Sent: {'temperature': 25.3, 'humidity': 60.5} repeating — data is flowing.
ESP32 + Arduino (C++)
#include <WiFi.h>
#include <PubSubClient.h>

// ↓↓↓ Change to your actual values ↓↓↓
const char* ssid       = "YOUR_WIFI_NAME";       // WiFi name
const char* password   = "YOUR_WIFI_PASSWORD";    // WiFi password
const char* mqtt_server = "192.168.1.100";        // NeoMind server IP
// ↑↑↑ Flash after changing ↑↑↑

const int mqtt_port = 1883;
WiFiClient espClient;
PubSubClient client(espClient);

void setup() {
  Serial.begin(115200);
  WiFi.begin(ssid, password);
  Serial.print("Connecting WiFi");
  while (WiFi.status() != WL_CONNECTED) {
    delay(500); Serial.print(".");
  }
  Serial.println(" WiFi connected");

  client.setServer(mqtt_server, mqtt_port);
}

void loop() {
  if (!client.connected()) {
    Serial.println("Connecting to MQTT...");
    client.connect("esp32-sensor-01");
    delay(2000);
    return;
  }

  // Read sensor (using a placeholder — replace with your real sensor code)
  float temp = 25.0;  // ← Replace with your sensor reading

  // Send data
  char msg[64];
  snprintf(msg, 64, "{\"temperature\": %.1f}", temp);
  client.publish("sensors/esp32-01/data", msg);
  Serial.print("Sent: ");
  Serial.println(msg);

  delay(5000);  // Send every 5 seconds
}
Other Platforms
Any language/platform with MQTT support works. The core is just two steps:
1. Connect:  mqtt_connect("<SERVER_IP>", 1883)
2. Publish:  mqtt_publish("sensors/my-device/data", '{"value": 23.5}')
Step 3: Approve the Device (in Web UI)
When a device sends data for the first time, it enters "Pending" status. This is NeoMind's security mechanism — preventing unknown devices from connecting without approval.
How to approve: Web UI → Devices → Pending Devices tab
- Click Actions → Process at the end of the draft row — the approval dialog opens:
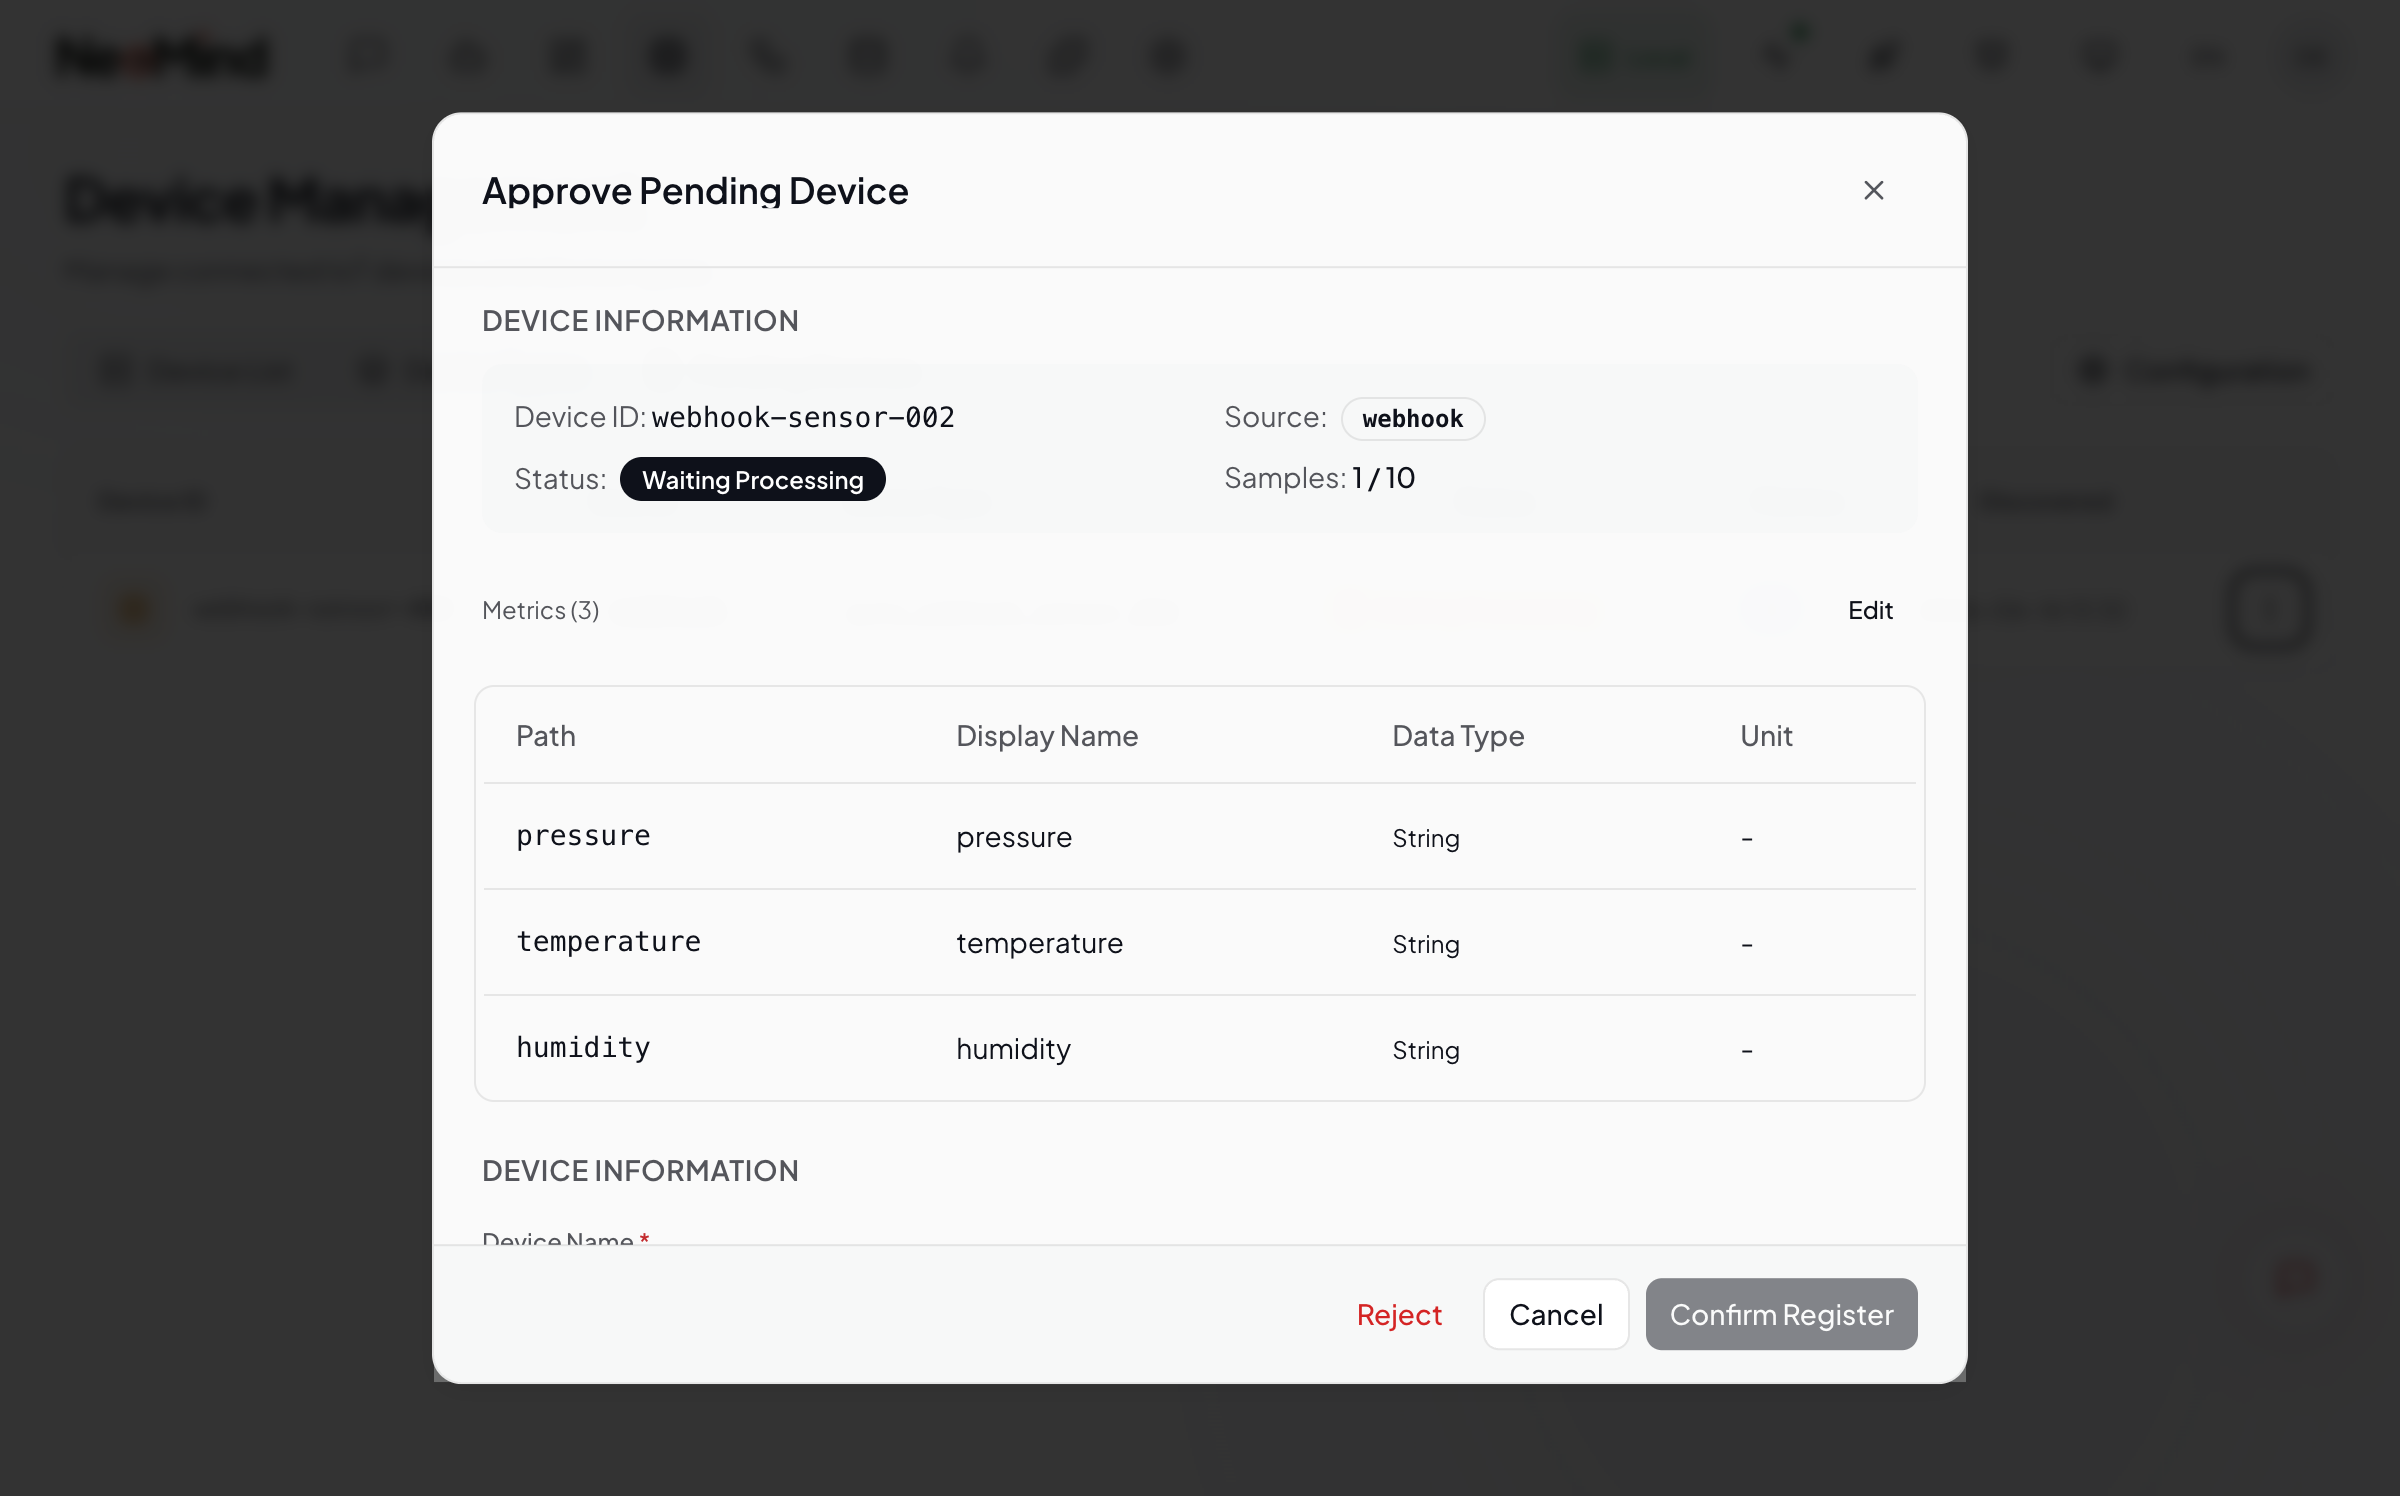
The approval dialog has several sections:
① Device Info — basic metadata about the draft:
| Field | Description |
|---|---|
| Device ID | Auto-generated unique identifier |
| Source | Data source (MQTT / Webhook) |
| Samples | Number of samples collected (e.g. 3 / 10) |
② Detected Metrics — metrics auto-parsed from the sample data:
| Field | Description |
|---|---|
| Path | JSON field path (e.g. temperature) |
| Display Name | Editable friendly name (e.g. "Temperature") |
| Data Type | String / Integer / Float / Boolean |
| Unit | Editable unit (e.g. °C, %) |
Click the Edit button in the metrics section to modify display names, data types, and units.
③ Original Data — shows the raw JSON samples sent by the device (up to 5). Click the numbered tabs to browse them — helps you understand the actual data structure.
④ Registration Form — fields you need to fill in:
| Field | Required | Description |
|---|---|---|
| Device Name | ✅ | A recognizable name, e.g. "Living Room Sensor" |
| Device Type | ✅ | Search existing types or create a new one (see below) |
How to choose a device type?
The input auto-searches and recommends matching existing types, each with a match score badge. You have two options:
- Use existing type: pick from the recommendations — works for standard devices (e.g.
temp_sensor)- Create new type: if nothing matches, type a new name. You'll also need to fill in:
- Type Name (required)
- Description (optional)
NeoMind auto-generates the metrics definition from detected indicators for new types.
- Once filled, click Confirm Register
Or approve via CLI:
# List pending drafts
neomind device drafts list

# Approve and name
neomind device drafts approve <DRAFT_ID> --name "Living Room Sensor" --type temp_sensor
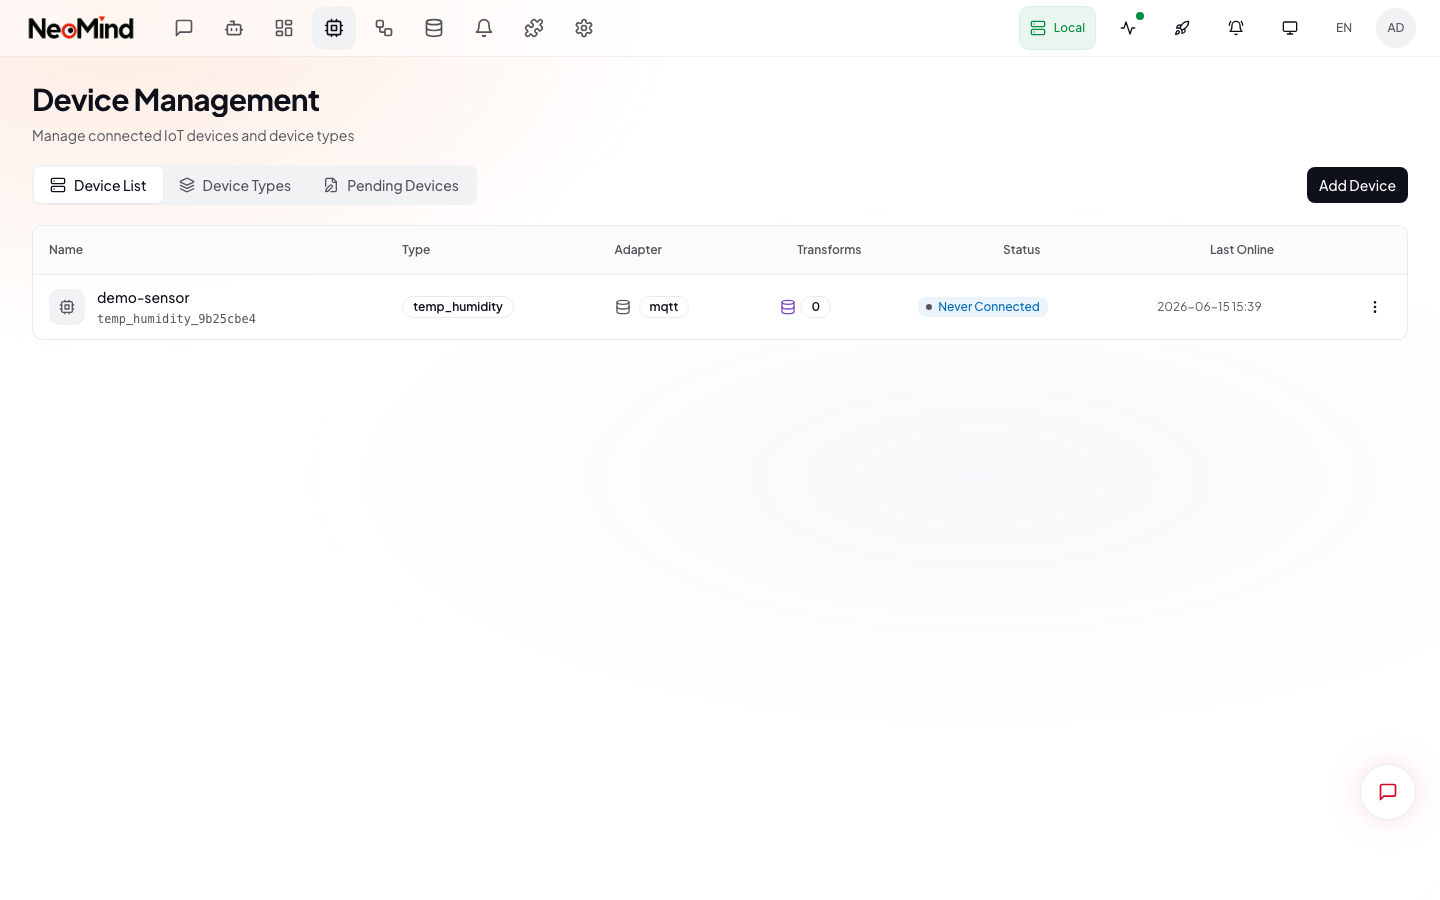
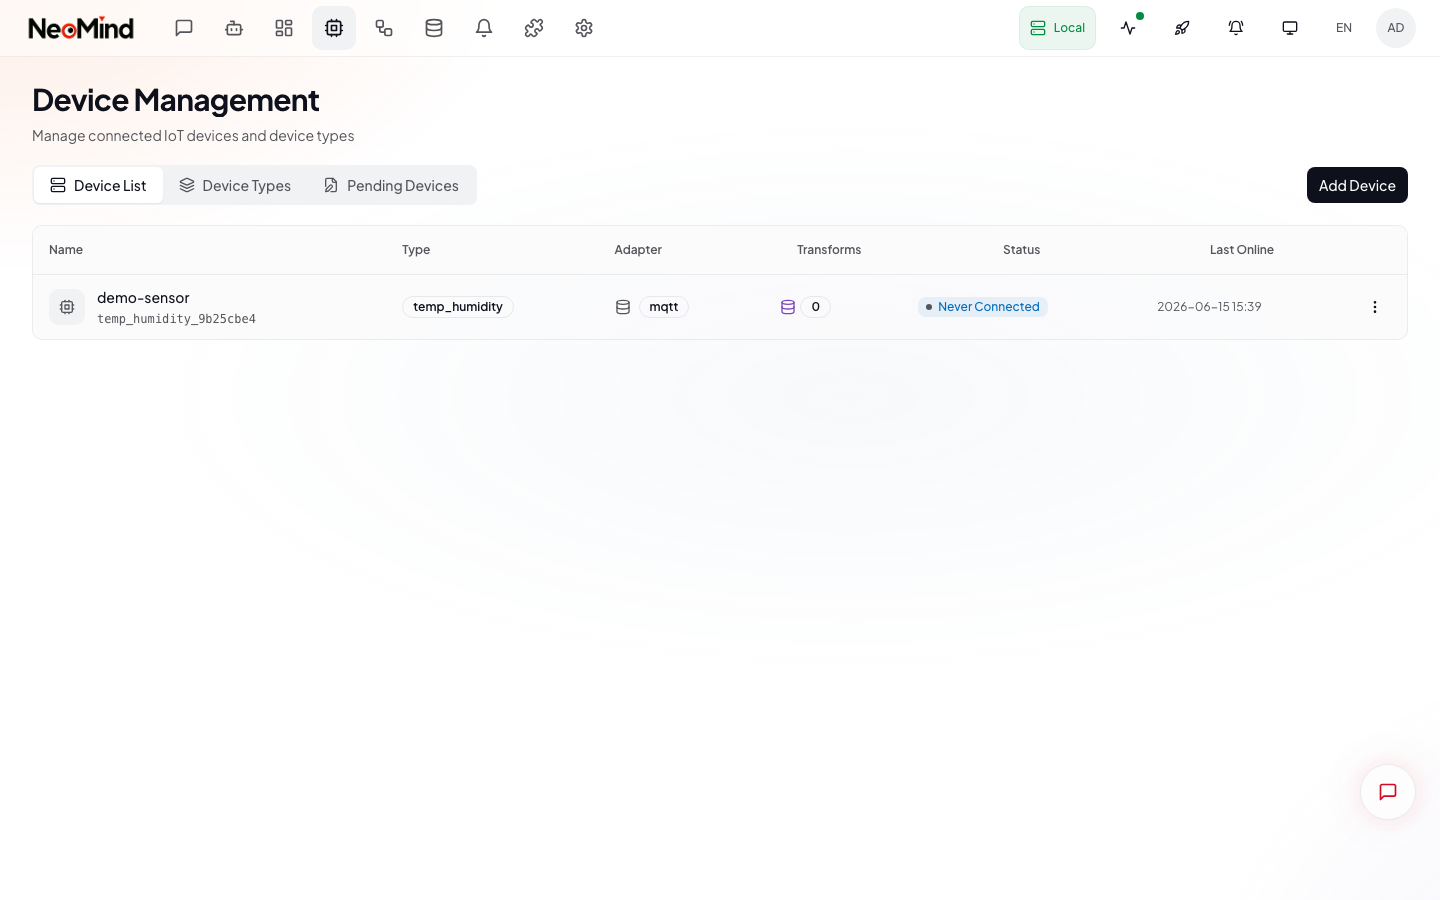
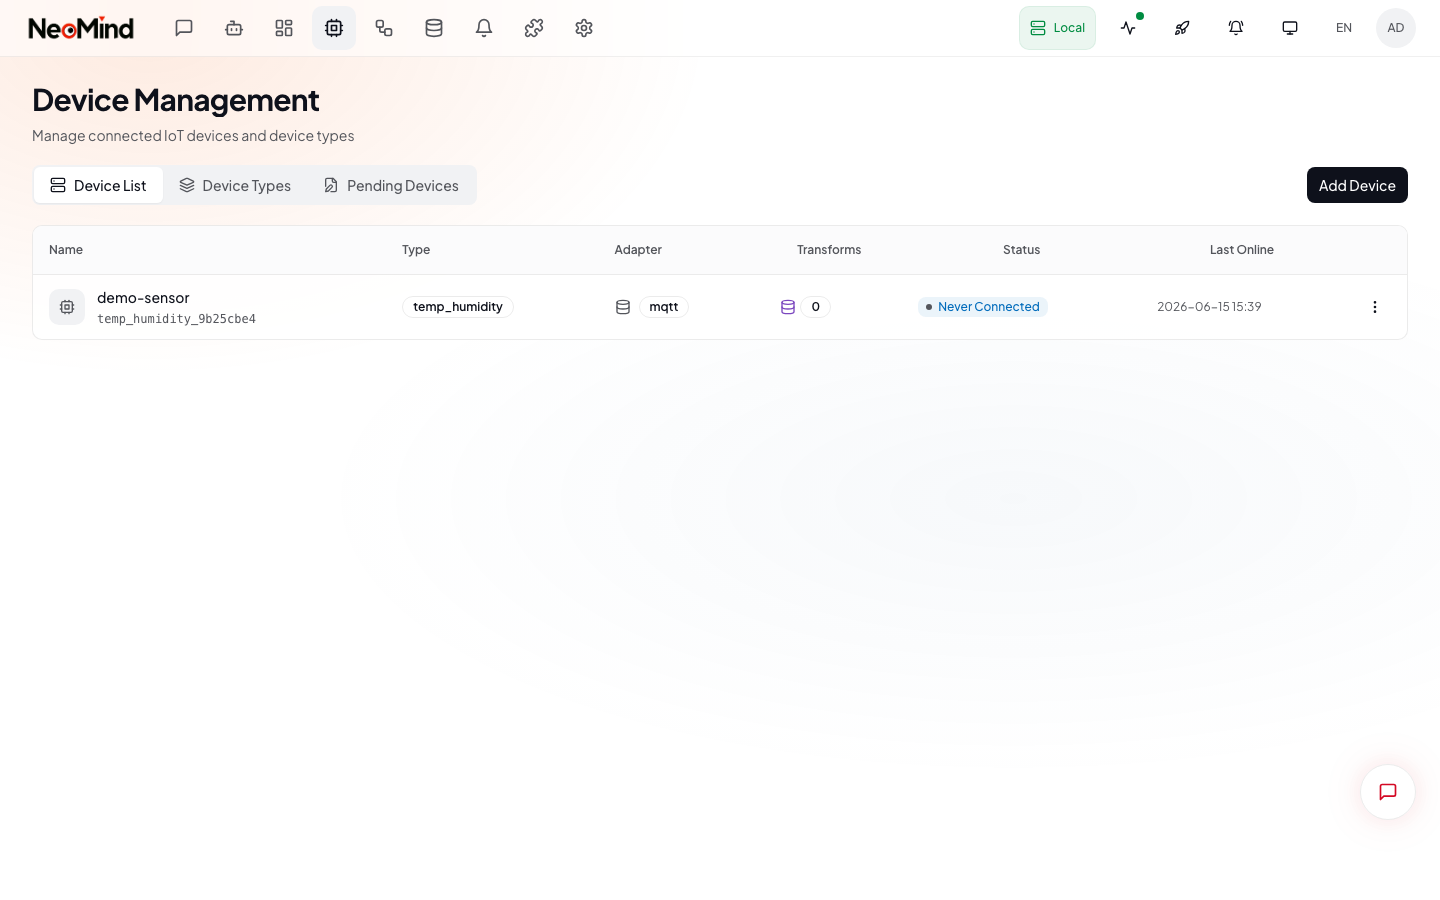
After approval, the device appears in the Device List tab:
Enable auto-approve — devices are accepted automatically after sending data (good for testing):
neomind device drafts config --auto-approve true
Step 4: Verify Data
# List devices
neomind device list

# Check latest data for a specific device
neomind device get <DEVICE_ID>
You can also click a device in Web UI → Devices → Device List to see real-time data charts:
Other Connection Methods
Manual Registration (Manual Add)
Best for: You already know the device details and want to skip auto-discovery, or you need to use a custom device type.
Steps
-
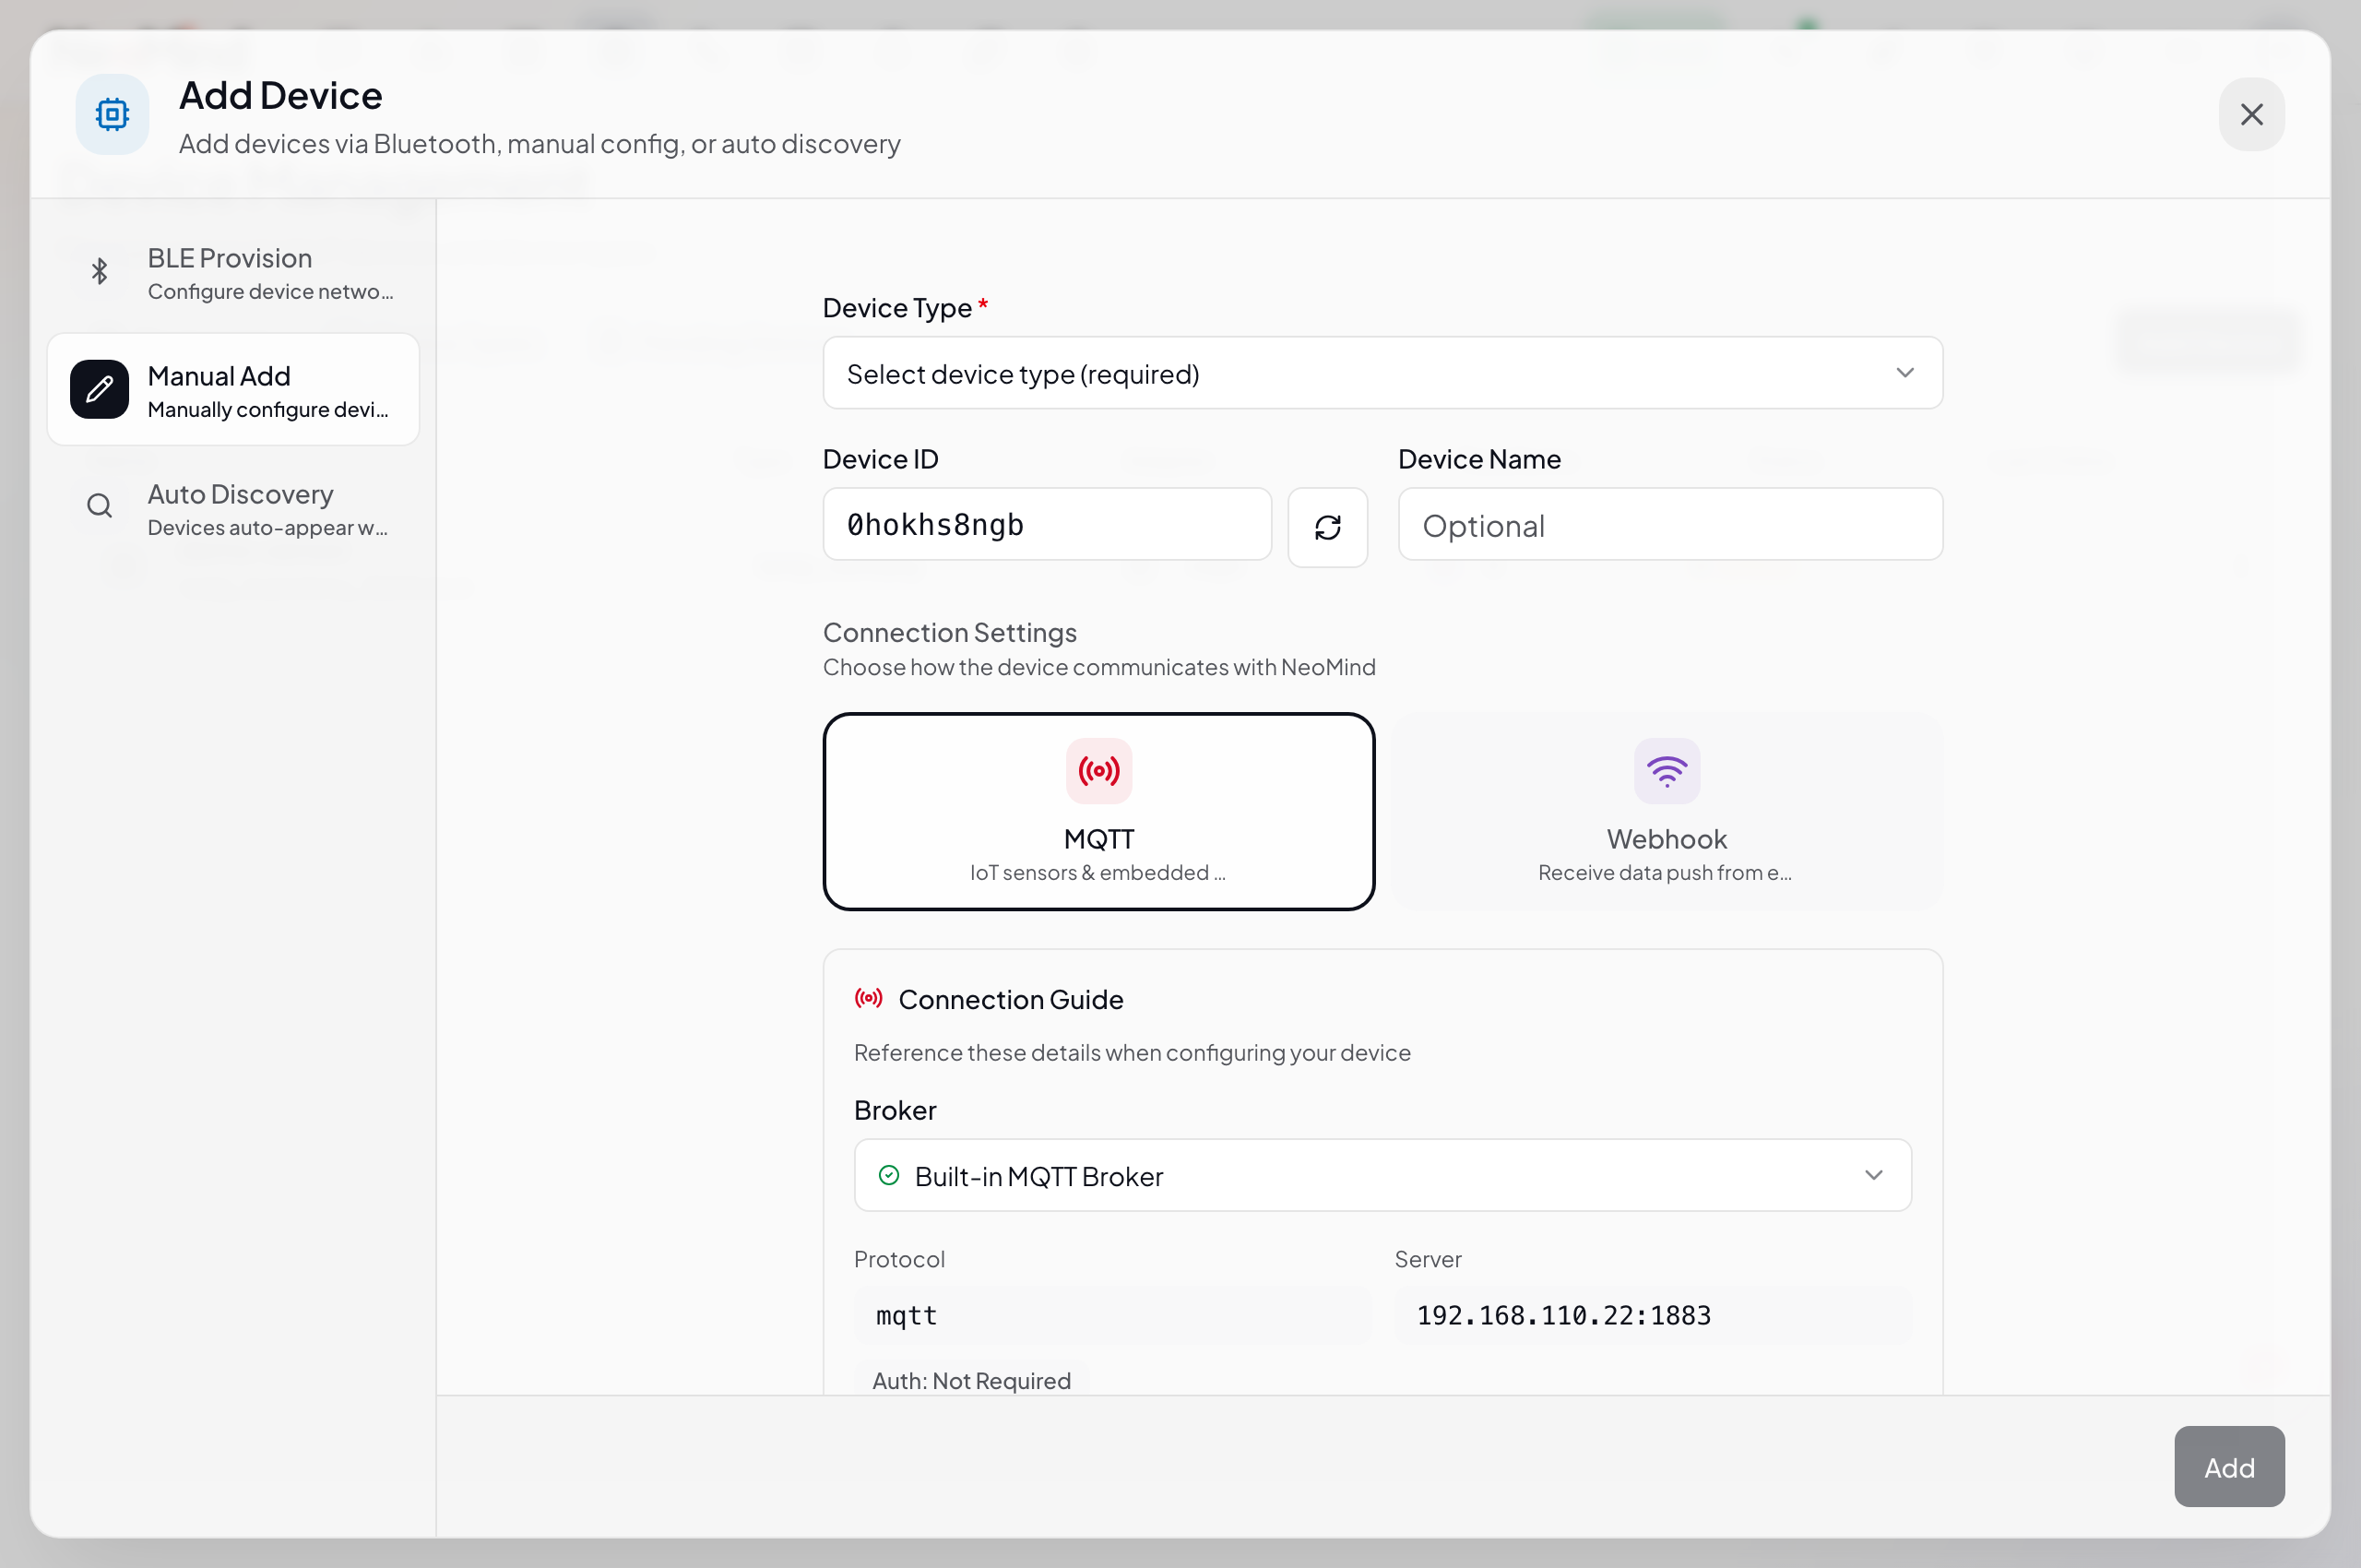
Open the Add Device dialog: Web UI → Devices → Device List → click the Add Device button in the top right
The dialog has three tabs on the left sidebar:
Tab Purpose BLE Provision Provision CamThink hardware (NE101/NE301) via Bluetooth Manual Add Fill in device details manually ← choose this Auto Discovery Shows how auto-discovery works -
Click Manual Add — the registration form appears on the right:
Field Reference
Device Information:
| Field | Required | Description |
|---|---|---|
| Device Type | ✅ | Select a device type template from the dropdown. Determines what metrics the device reports and what commands it supports. See explanation below |
| Device ID | Auto-generated | A 10-character random ID is auto-generated. Click the refresh button to regenerate, or edit manually |
| Device Name | Optional | A human-readable name. Defaults to the Device ID if left blank |
Connection Settings — choose how the device communicates:
| Option | Best for |
|---|---|
| MQTT (default) | Bidirectional — can send and receive. Best for IoT sensors and embedded devices |
| Webhook | Receive only (one-way). For devices that can only make HTTP POST requests |
- Selecting MQTT shows the built-in broker connection info (address, port, protocol, auth) and auto-generated telemetry topic (
device/{type}/{id}/uplink) and command topic - Selecting Webhook shows the device's dedicated Webhook URL and optional Token (see Webhook onboarding below)
Why is device type selection required?
The device type is a "template" that defines:
- Metrics: What data the device reports (e.g.
temperature,humidity), including field names, data types, and units- Commands: What control commands the device supports (e.g.
power_on,set_mode) and their parameter definitionsWhen NeoMind receives data from a device, it uses the type template to parse and store the data. Without a type, the system wouldn't know that
{ "t": 25.3 }means temperature — and couldn't display it correctly on dashboards.Built-in types include CamThink hardware (NE301 Edge AI Camera, NE101 Sensing Camera) and common sensor types. You can also create custom types in Settings → Device Types.
- Click Add to create the device. Its status will be Disconnected until it starts sending data, then it automatically becomes Online.
Via CLI
# List available device types
neomind device types list

# Create device (MQTT mode)
neomind device create --name "My Sensor" --device-type temp_sensor --adapter-type mqtt

# Create device (Webhook mode)
neomind device create --name "Weather Station" --device-type weather-station --adapter-type webhook

# If no type matches, create a custom type first
neomind device types create \
  --name 'My Sensor' \
  --metrics '[{"name":"temperature","display_name":"Temperature","data_type":"Float","unit":"°C"}]'
HTTP Webhook (For HTTP-Only Devices)
Webhook is one-way — devices can only send data to NeoMind, not receive commands. If your device supports MQTT, use MQTT instead.
Steps
- Create a Webhook device: In the Manual Add dialog, select Webhook in the Connection Settings:
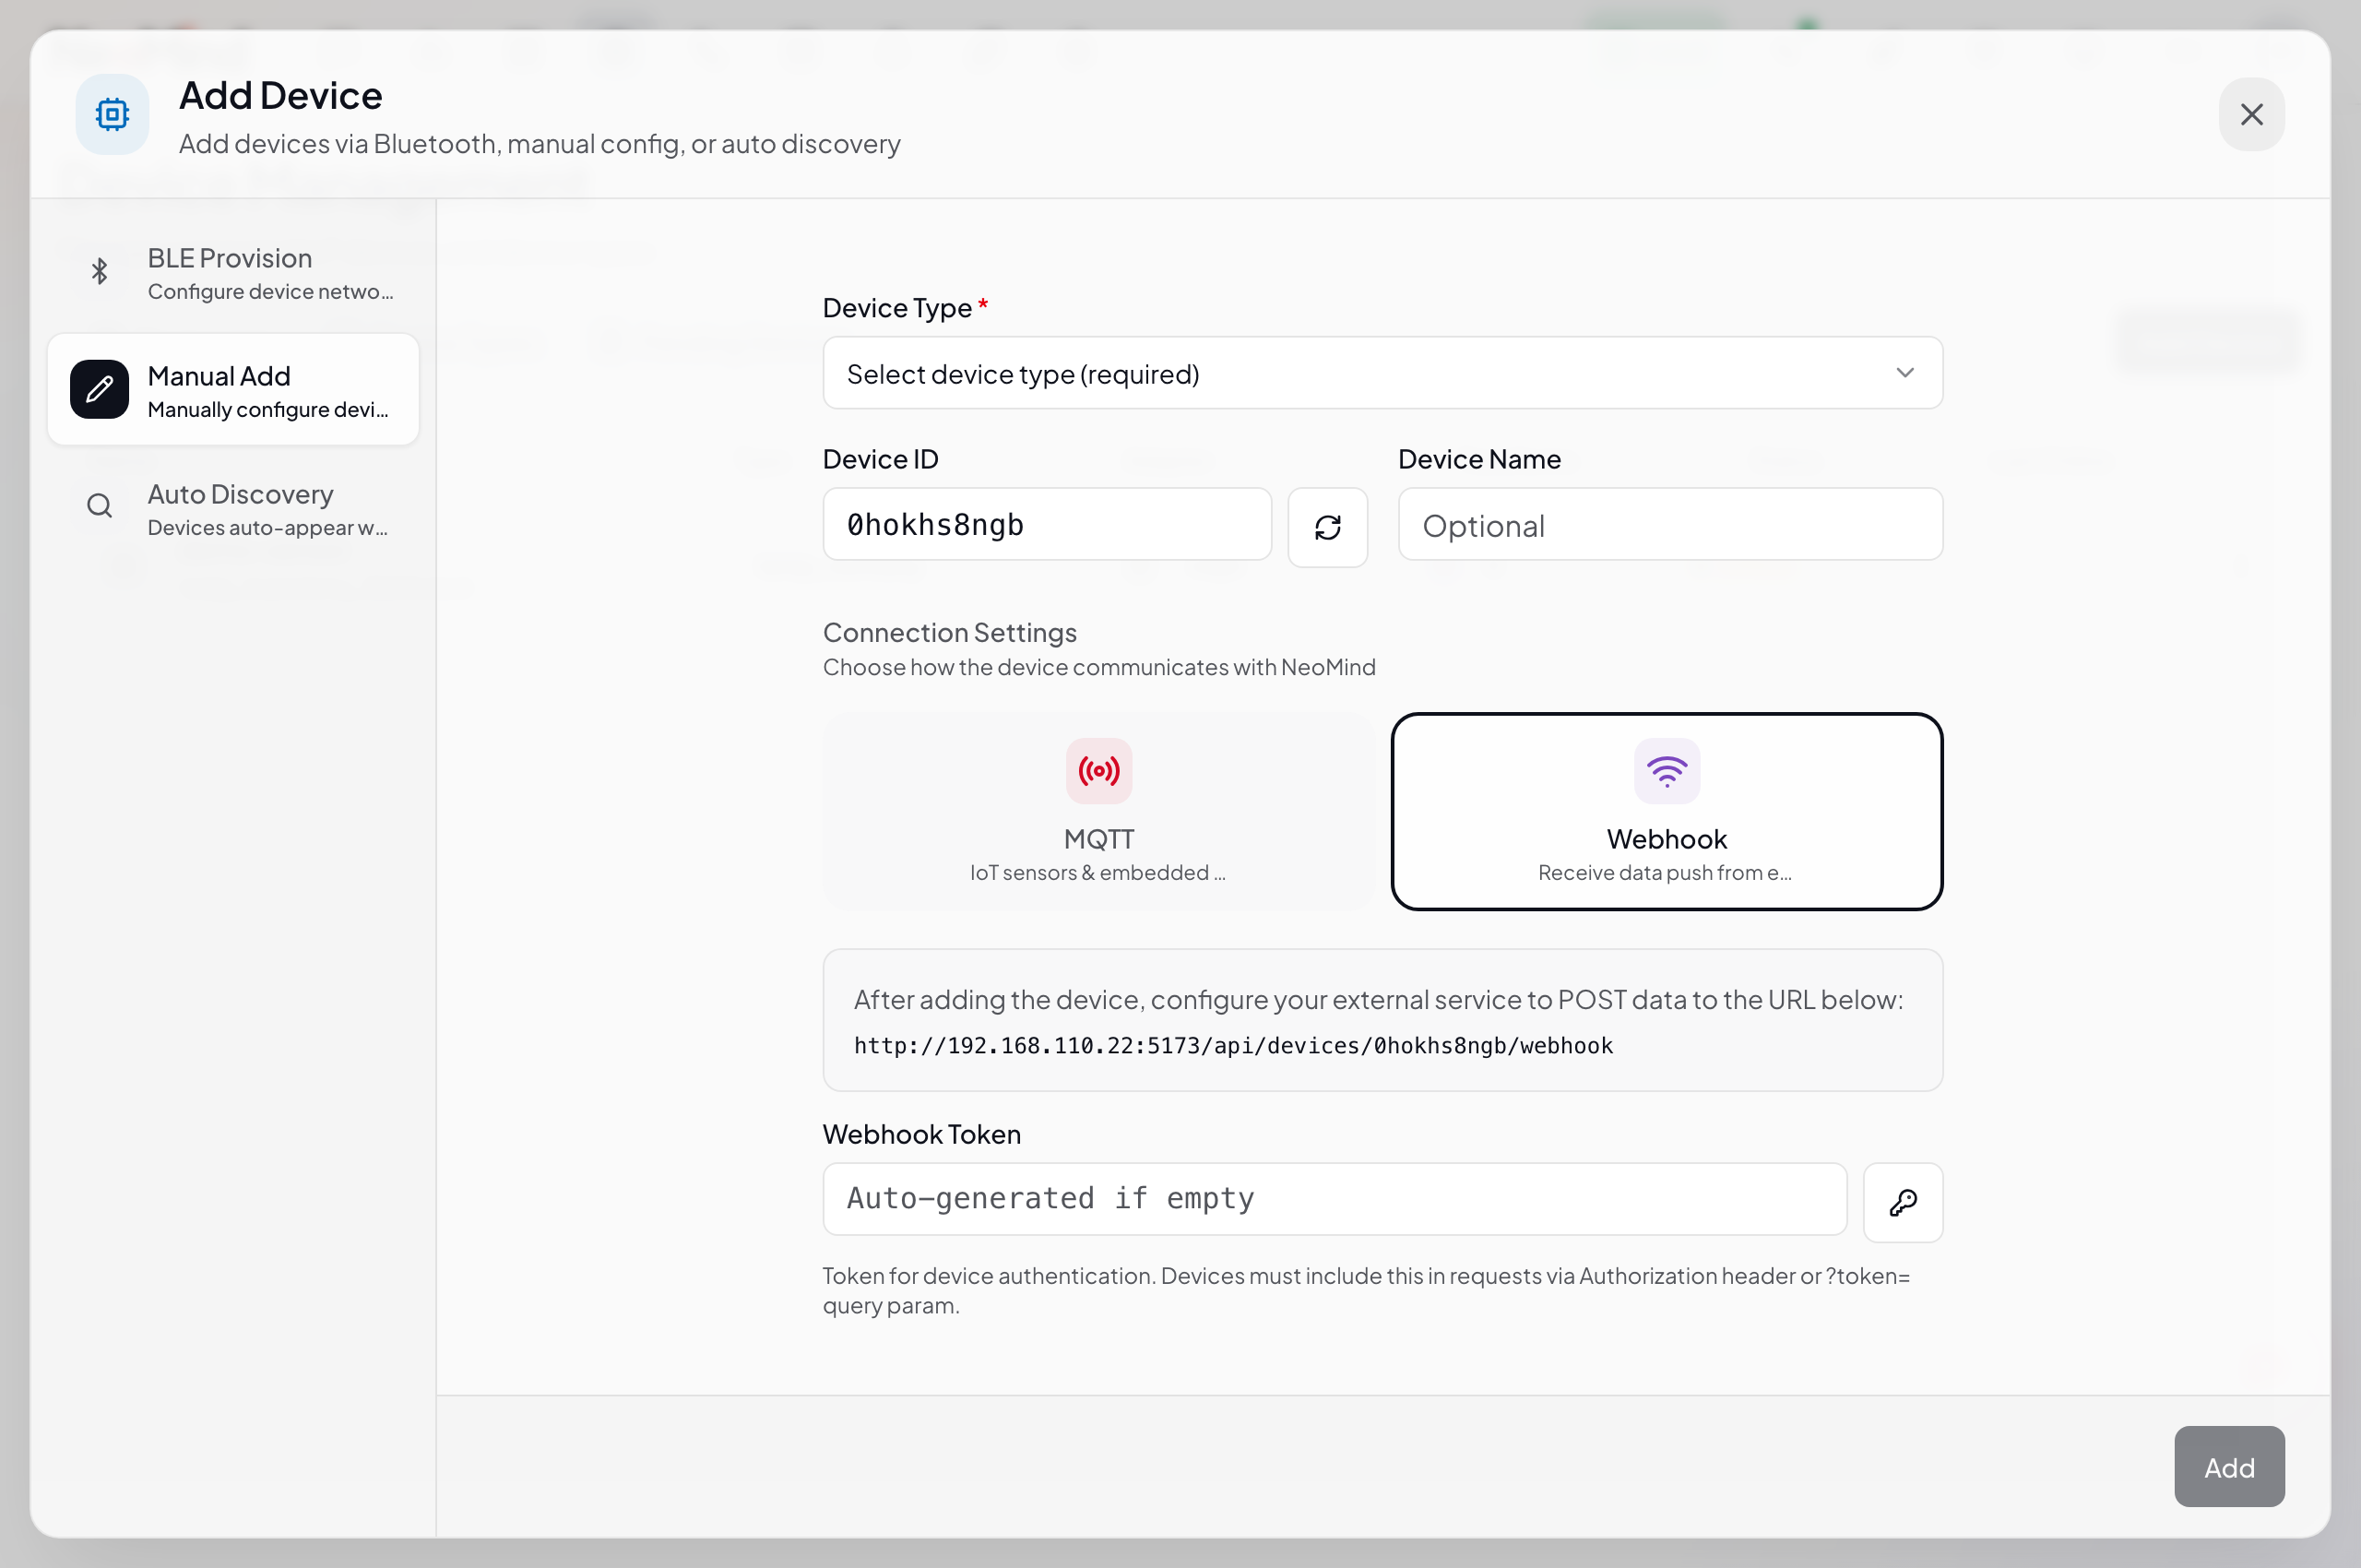
The system auto-generates a dedicated Webhook URL for this device (format: http://<SERVER_IP>:9375/api/devices/<DEVICE_ID>/webhook).
-
(Optional) Generate a Webhook Token: Click the key icon next to the Token field to auto-generate a
whk_prefixed token. If set, devices must include it in requests for authentication. -
Click Add to create the device, then have your device send HTTP POST requests to the URL:
curl -X POST http://192.168.1.100:9375/api/devices/<DEVICE_ID>/webhook \
  -H 'Content-Type: application/json' \
  -d '{"data": {"temperature": 23.5, "humidity": 65}}'
Payload Format
The webhook accepts JSON POST requests. Only data is required:
{
  "data": {              // ✅ Required: actual sensor data
    "temperature": 23.5,
    "humidity": 65
  },
  "timestamp": 1718534400,  // Optional: data collection timestamp, server time if omitted
  "quality": 1.0            // Optional: data quality (0~1)
}
Authentication (Optional)
If you set a Token when creating the device, include it in requests:
# Method 1: Authorization header (recommended)
curl -X POST http://<SERVER>:9375/api/devices/<DEVICE_ID>/webhook \
  -H 'Content-Type: application/json' \
  -H 'Authorization: Bearer whk_yourToken' \
  -d '{"data": {"temperature": 23.5}}'

# Method 2: URL query parameter
curl -X POST 'http://<SERVER>:9375/api/devices/<DEVICE_ID>/webhook?token=whk_yourToken' \
  -H 'Content-Type: application/json' \
  -d '{"data": {"temperature": 23.5}}'
CLI Shortcut
# 1. Create the device
neomind device create --name "Weather Station" --device-type weather-station --adapter-type webhook

# 2. Get the webhook URL
neomind device webhook-url <DEVICE_ID>
# Output: POST http://<SERVER_IP>:9375/api/devices/<DEVICE_ID>/webhook
External MQTT Broker (Existing EMQX / Mosquitto)
If you already run an external MQTT broker (e.g. an EMQX cluster in your factory), NeoMind can subscribe to it — no need to point devices at the built-in broker.
Web UI
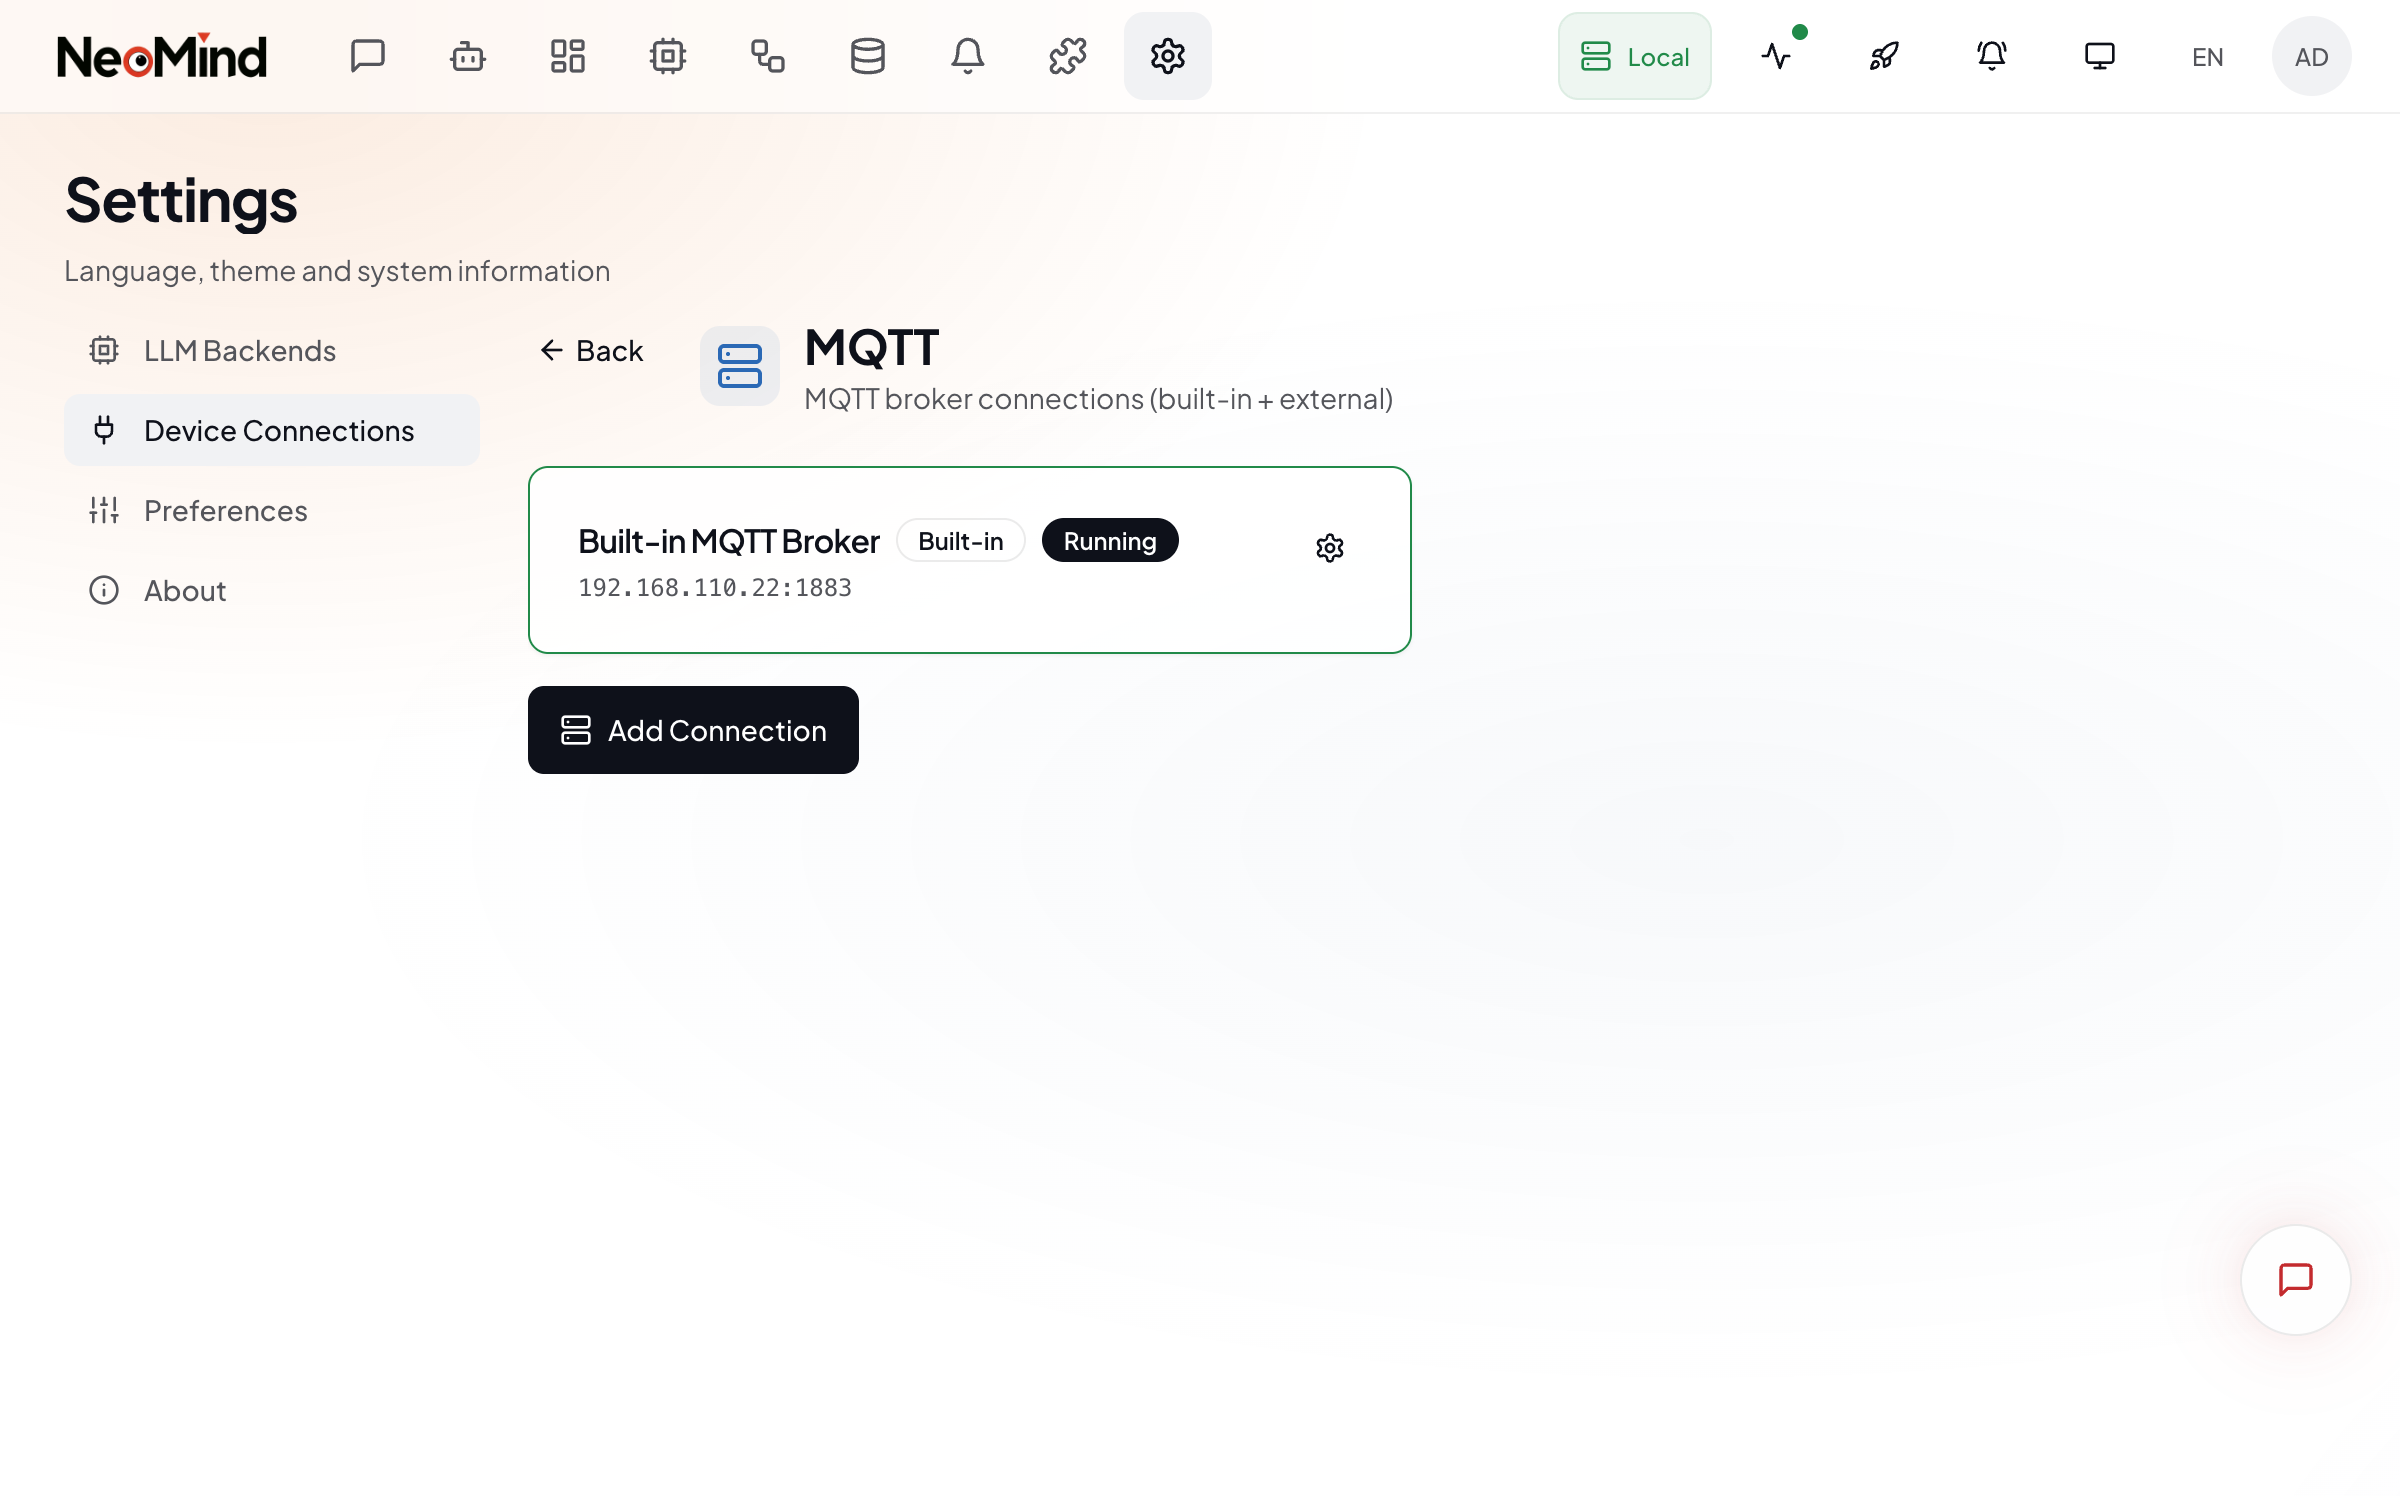
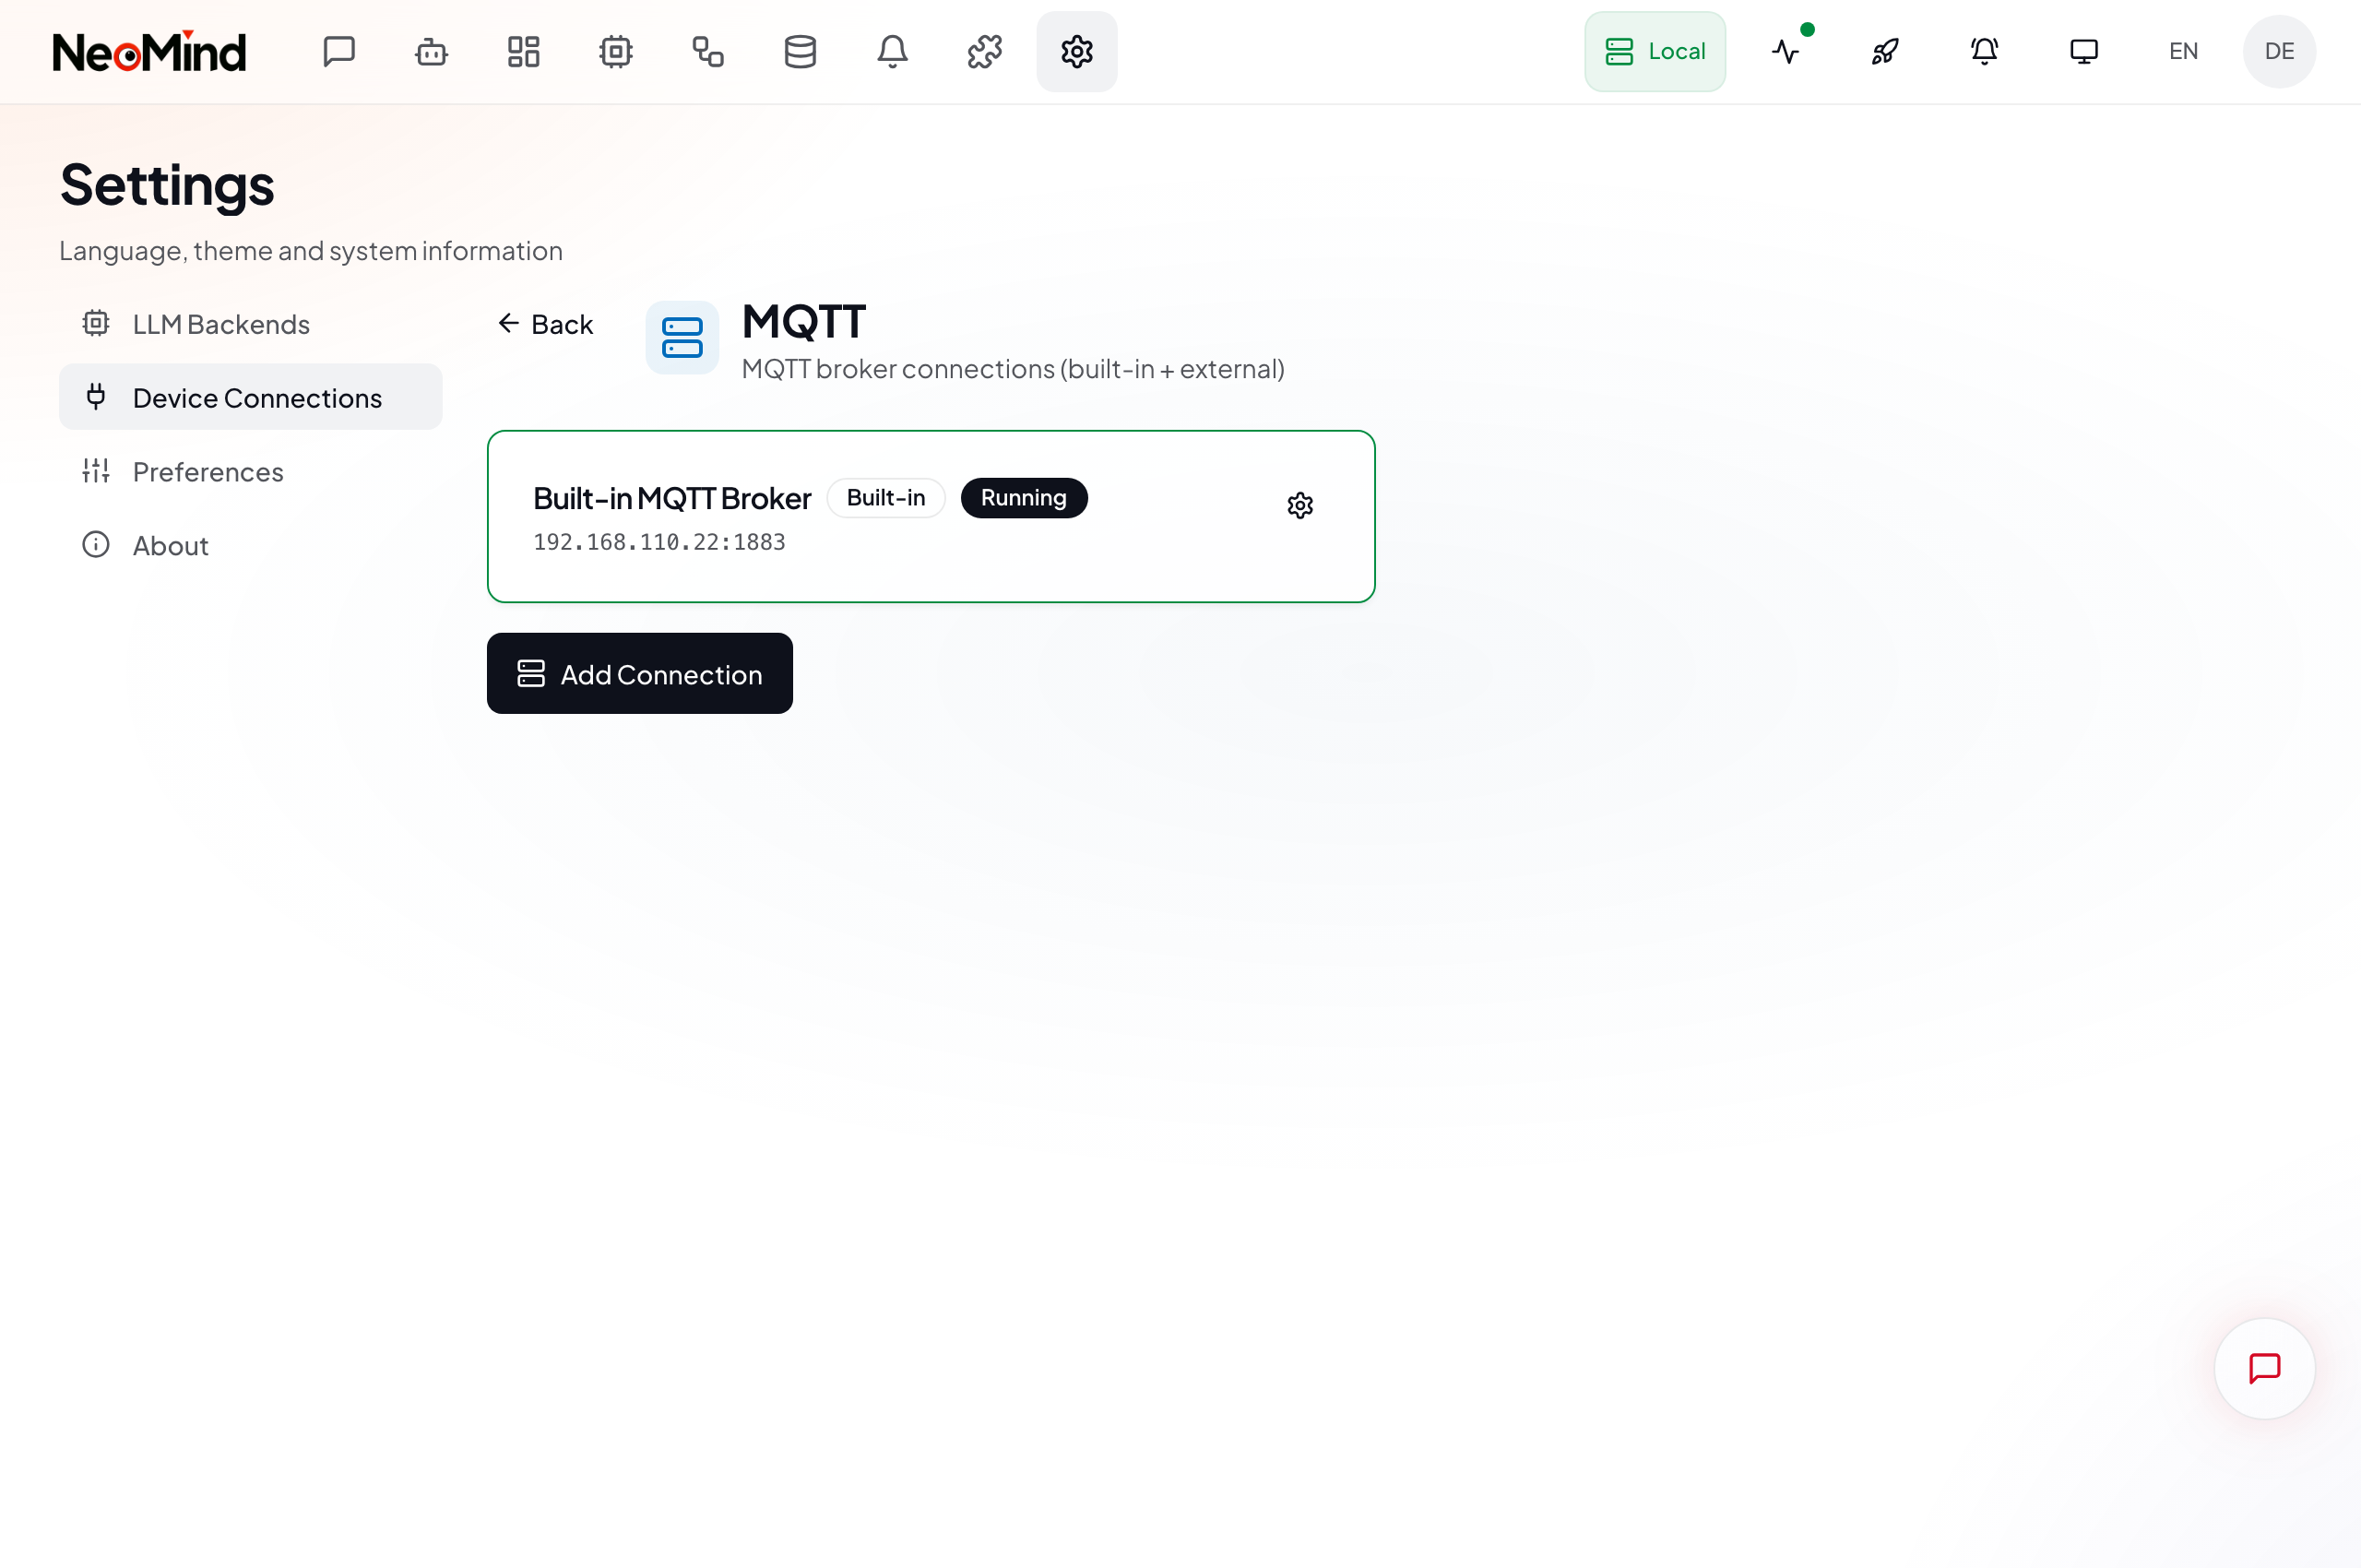
-
Open Broker Management: Web UI → Settings → Device Connections → click the MQTT card
This page shows all MQTT broker instances, including the built-in broker's status and connection info:
- Add an External Broker: Click the Add Connection button — the configuration dialog opens:
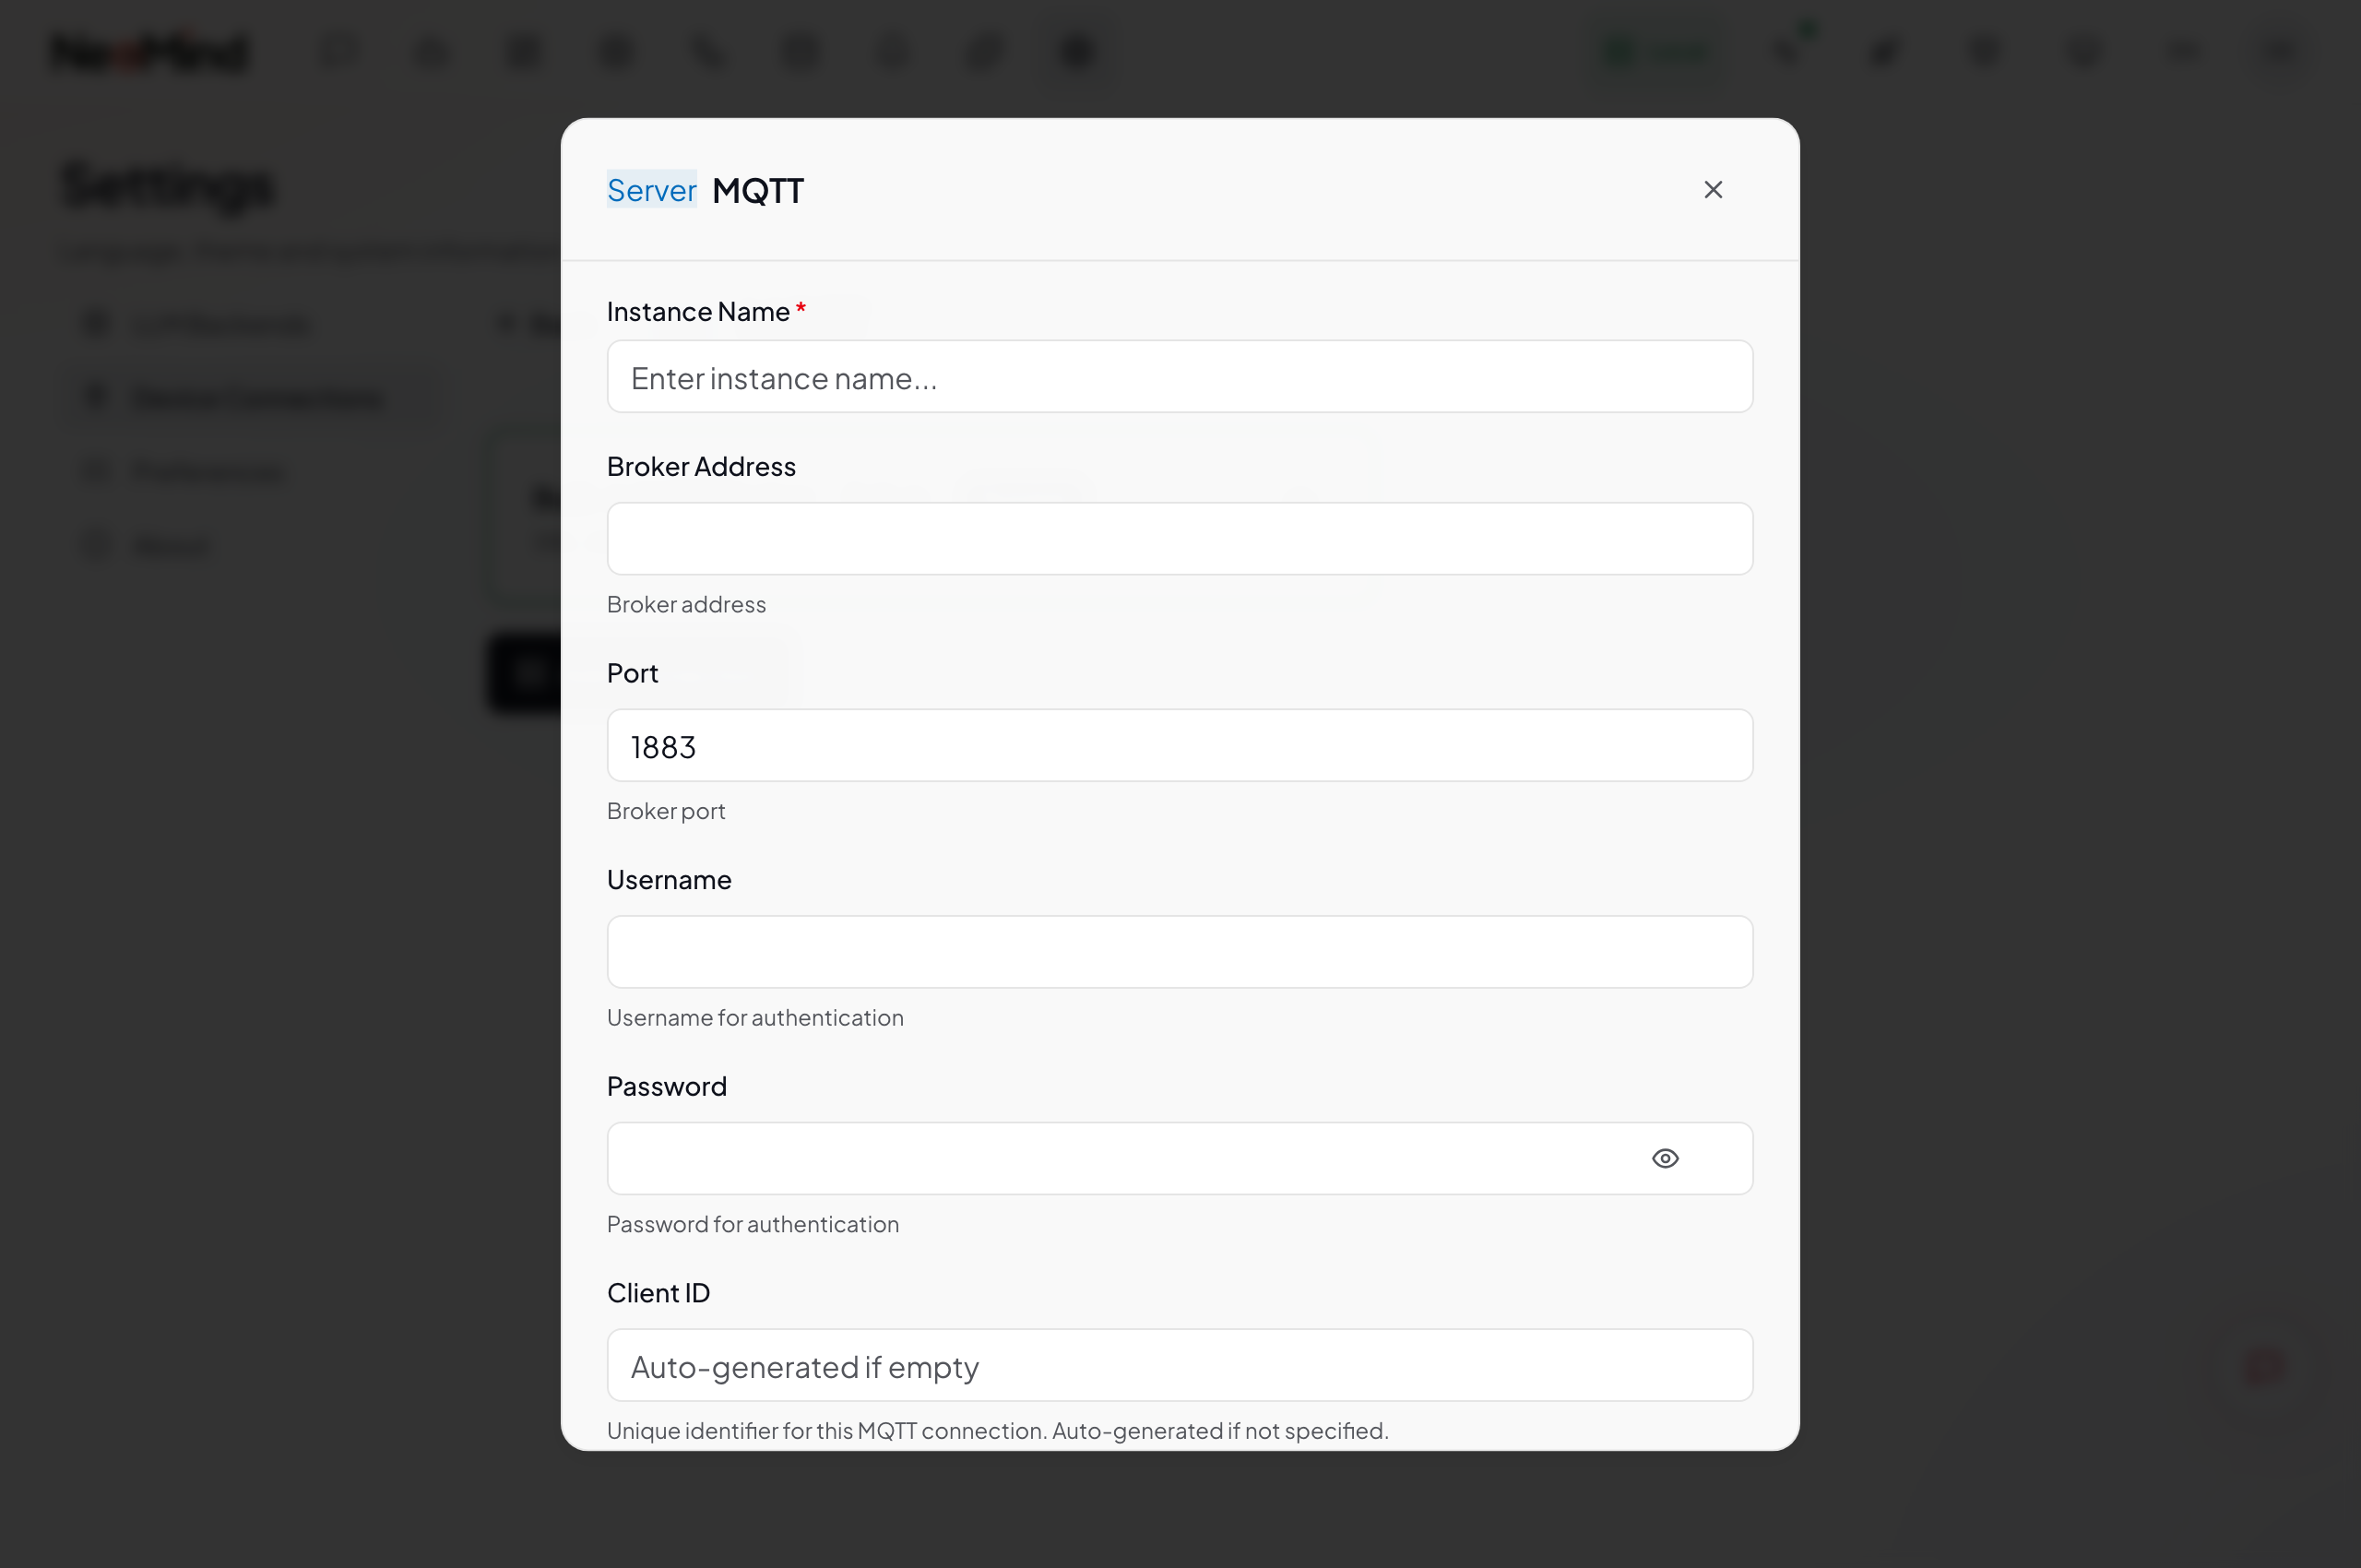
| Field | Required | Description |
|---|---|---|
| Instance Name | ✅ | A name for this broker connection, e.g. "Plant EMQX" |
| Broker Address | ✅ | The external broker's IP or hostname, e.g. emqx.local |
| Port | ✅ | Default 1883. TLS typically uses 8883 |
| Username | Optional | Username if the broker requires authentication |
| Password | Optional | The corresponding password |
| Client ID | Optional | NeoMind's client identifier for this connection — auto-generated if left blank |
- Test after saving: The broker connects automatically once saved. Check the connection status on the broker card, or click Test to verify manually.
CLI
# 1. Create an external broker connection
neomind connector create --name "Plant EMQX" --host emqx.local --port 1883

# 2. Check connection status
neomind connector list

# 3. Test the connection
neomind connector test <ID>

# 4. View subscribed topics
neomind connector subscriptions
Once connected, messages matching the device/+/+/uplink pattern on the external broker are automatically received and processed by NeoMind. Unknown devices still go through the Pending approval flow.
Send Commands to a Device
MQTT-connected devices support bidirectional communication — you can control them remotely:
# Syntax: neomind device control <DEVICE_ID> <command> --params '<json>'
neomind device control ac-01 power_on --params '{"mode": "cool", "temp": 24}'
Commands are delivered via MQTT to the device's {topic}/command — the device subscribes to that topic to receive them.
Device Status Reference
Devices in NeoMind go through different lifecycle stages, each with its own status.
Device Lifecycle
New device sends data → [Waiting Processing] → Approved → [Online / Offline] → Ready for commands
                                              ↓
                                         Rejected → Device discarded
Draft Status (Before Approval)
When a device sends data for the first time, before it's been approved:
| Status | Meaning | Color |
|---|---|---|
| Waiting Processing | Device auto-discovered, awaiting admin approval | Yellow / Orange |
Draft devices don't appear in the Device List — they're only visible in the Pending Devices tab. Only after approval are they formally registered.
Device Status (After Approval)
Once approved, the device is registered. Depending on connectivity, it toggles between:
| Status | Meaning | Trigger | Color |
|---|---|---|---|
| Online | Device connected and actively sending data | Data received within the last 5 minutes | Green |
| Offline | Device was connected, but is now disconnected or timed out | Has reported data before, but no new data for over 5 minutes | Yellow |
| Disconnected | Device has never sent data | Manually registered or created via CLI, but the device has never come online | Blue |
NeoMind considers a device online if it has reported data within the last 5 minutes. Even if the MQTT connection is alive, the status changes to Offline if no data arrives for 5+ minutes.
Disconnected is common for manually registered devices — you clicked Manual Add in the Web UI or used
neomind device createto create the device, but the device itself hasn't started sending data yet. Once the device reports data for the first time, the status automatically becomes Online.
Command Execution Status
When you send a command via neomind device control, each command tracks its own status:
| Status | Meaning |
|---|---|
| Pending | Command queued, waiting for device |
| Executing | Command being sent to the device |
| Success | Device confirmed execution |
| Failed | Execution failed (device rejected or bad params) |
| Timeout | Device didn't respond in time |
Supported Device Types
NeoMind ships with built-in types for CamThink hardware. Go to Web UI → Settings → Device Types to view and manage all types:
| Model | Name | Features |
|---|---|---|
| NE301 | Edge AI Camera | Video streaming + AI inference |
| NE101 | Sensing Camera | Image + environmental sensing |
Full definitions at NeoMind-DeviceTypes.
Concept Reference
| Term | Plain English |
|---|---|
| MQTT | IoT communication protocol — like "group chat for devices" |
| Broker | Message relay server. NeoMind has one built in — no need to install |
| Topic | Message channel name, e.g. sensors/temp. You choose it when publishing |
| Payload | Message content, usually JSON (e.g. {"temp": 25}) |
| Draft | Status when a device first sends data — needs approval to be officially onboarded |
| Adapter | Connection method: MQTT (bidirectional) or Webhook (receive only) |
| Telemetry | Sensor data reported by devices (temperature, humidity, etc.) |
| Command | Control instruction sent from NeoMind to a device (turn on, adjust, etc.) |
Common Issues
| Symptom | Likely Cause | Solution |
|---|---|---|
| Device sent data but nothing in Pending | MQTT not connected | 1. Verify IP and port (1883) 2. neomind system info check MQTT status 3. Confirm auto-discovery is on |
Connection refused | Server not running or port blocked | Check if NeoMind is running, firewall allows 1883 |
Auth failed | Authentication enabled | Get credentials from neomind system info, add to device code |
TLS handshake failed | TLS enabled | Device must use mqtts:// and trust the CA cert |
| Data exists but no charts | Device type mismatch | Select the correct device type during approval |
| Device shows Offline after approval | Device disconnected | Check if device is still running, network is OK |
More in Troubleshooting.
Next Steps
- Use Dashboard — Visualize device data
- AI Chat — Query device status in natural language
- Automation Rules — Set threshold alerts and linked control
Last updated: 2026-06-16